Introduction
Hello! In our last lesson, we took a deep dive into the architecture of Spring's transaction management. We uncovered how Spring uses Aspect-Oriented Programming (AOP) proxies to wrap your business logic with transactional capabilities, and we explored the roles of key components like the PlatformTransactionManager and TransactionSynchronizationManager.
Today, we transition from theory to practice. Our goal is to use the @Transactional annotation to manage database transactions declaratively. You will learn where to place this annotation, how to influence its behavior with various attributes, and how to avoid common pitfalls that arise from its underlying proxy-based mechanism. This lesson will solidify your understanding by having you apply the concepts we've discussed to ensure data integrity in your service layer.
Applying @Transactional for Declarative Control
As we discussed, @Transactional is Spring's way of letting you declare transactional boundaries without writing boilerplate JDBC code. When Spring Boot detects spring-boot-starter-data-jpa on the classpath, it automatically configures a JpaTransactionManager and enables transaction management, so all you need to do is apply the annotation.
Typically, you apply @Transactional to the public methods of your service layer beans (@Service). You can apply it to individual methods or at the class level. Applying it at the class level is a common convention that makes all public methods in that class transactional by default.
// Example: Annotation at the class level
@Service
@Transactional
public class UserServiceImpl implements UserService {

    private final UserRepository userRepository;

    // ... constructor

    @Override
    public UserDTO createUser(CreateUserDTO createUserDTO) {
        // This entire method runs in a single transaction.
        // If any part fails, all database changes are rolled back.
        User newUser = new User();
        newUser.setUsername(createUserDTO.getUsername());
        User savedUser = userRepository.save(newUser);
        // ... map and return DTO
    }

    @Override
    @Transactional(readOnly = true) // Overrides class-level annotation
    public UserDTO getUserById(Long id) {
        // This method runs in a read-only transaction for optimization.
        // ...
    }
}
To reinforce how this simple annotation connects back to the low-level JDBC operations we saw previously, the following reading provides a concise summary.
Spring Transaction Management: @Transactional In-Depth
The article 'Spring Transaction Management: @Transactional In-Depth' by Marco Behler effectively shows the connection between a method annotated with @Transactional and the equivalent manual JDBC code.
Please read the subsection titled 'How to use Spring’s @Transactional annotation ( Declarative Transaction Management )'. Focus on how the simple registerUser method with the annotation is translated into the verbose JDBC code block. This clearly illustrates the abstraction Spring provides.
This abstraction is made possible by the proxy objects we discussed. Let's quickly review how they work, as understanding them is crucial for using @Transactional effectively.
A Deeper Look at the Proxy Mechanism
In our last lesson, we established that Spring creates a proxy that intercepts calls to your transactional methods. The proxy is what contains the logic to begin, commit, or roll back the transaction. This proxy can be created in two ways:
- JDK Dynamic Proxy: Used if the target bean implements an interface. The proxy implements the same interface and wraps the target object.
- CGLIB Proxy: Used if the target bean does not implement an interface. The proxy is created by subclassing your bean at runtime.
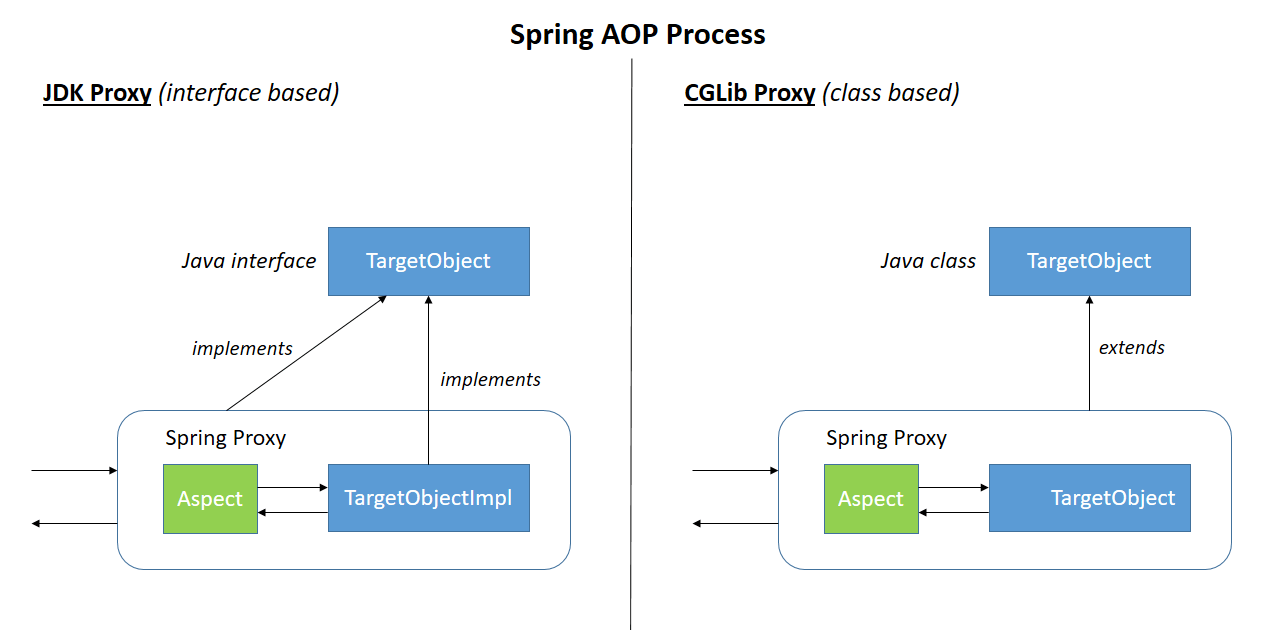
With Spring Boot, CGLIB is the default, but it's good to know both exist. The crucial takeaway is that the caller interacts with the proxy, not your original object.
How Spring @Transactional Works Internally ? ( AOP, Proxies & Debug Walkthrough) @Javatechie
The video 'How Spring @Transactional Works Internally?' by Java Techie gives an excellent explanation of how this proxy interacts with an internal Spring component called TransactionInterceptor to manage the transaction. This will give you a more concrete mental model of the process.
Watch from 07:30 to 12:45. This segment uses pseudo-code to explain how the proxy is created and how it delegates the work of managing the transaction to the TransactionInterceptor.
Understanding that you're interacting with a proxy that wraps your object is the key to mastering @Transactional and avoiding its common pitfalls.
Customizing Transaction Behavior
While the default behavior of @Transactional is often sufficient, you will frequently need to customize it. The two most important aspects to control are rollback rules and read-only status.
Default Rollback Behavior in Action
By default, Spring only triggers a rollback for unchecked exceptions (RuntimeException and its subclasses) and Errors. It does not roll back for checked exceptions (subclasses of Exception but not RuntimeException). This design choice assumes that checked exceptions represent recoverable business scenarios that your code should handle, while unchecked exceptions signify unexpected, systemic failures.
Let's see this in action. The following video walks through a debugging session that clearly demonstrates the default commit and rollback flow.
How Spring @Transactional Works Internally ? ( AOP, Proxies & Debug Walkthrough) @Javatechie
This debug walkthrough from Java Techie will show you exactly what happens during a successful transaction and what happens when a RuntimeException is thrown.
Please watch from 19:23 to 32:12. Happy Path (19:23 - 29:16): Observe how the code executes without exceptions, and the TransactionInterceptor proceeds to commit the transaction. Failure Path (29:16 - 32:12): See what happens when a RuntimeException is introduced. Notice how the execution path changes, and the interceptor catches the exception and initiates a rollback. Don't worry about following every single line of the debugger; focus on the high-level flow from method execution to either commit or rollback.
Overriding Defaults: rollbackFor and readOnly
The default rollback rule is not always what you want. Imagine a transferMoney method that throws a custom checked exception, InsufficientFundsException. By default, Spring would commit the transaction, which is incorrect.
You can customize this behavior and apply performance optimizations using attributes on the @Transactional annotation.
Spring & Spring Data JPA: Managing Transactions
The video 'Spring & Spring Data JPA: Managing Transactions' by Thorben Janssen provides a concise overview of the most important attributes for customizing @Transactional.
Watch from 05:47 to 08:34. This segment covers the key attributes: propagation, readOnly, rollbackFor, and noRollbackFor. Pay close attention to the rollbackFor and readOnly examples.
Let's summarize the key attributes from the video:
rollbackFor: Specifies an array of exception classes that should trigger a rollback.// Now, a checked exception will also trigger a rollback. @Transactional(rollbackFor = InsufficientFundsException.class) public void transferMoney(...) throws InsufficientFundsException { // ... logic that might throw InsufficientFundsException }noRollbackFor: Specifies an array of exception classes that should not trigger a rollback, even if they are unchecked.readOnly = true: A crucial optimization for read operations. It provides a hint to the persistence provider (like Hibernate) that no data will be modified. This allows Hibernate to skip dirty checking (a process of checking for changes in managed entities), which can significantly improve performance for query-heavy operations.// Best practice for all query methods. @Transactional(readOnly = true) public List<UserDTO> findAllUsers() { // ... }propagation: Controls how a transactional method behaves when called from another transactional method. We discussed the theory in the last lesson (REQUIRED,REQUIRES_NEW, etc.).
The Most Common @Transactional Pitfall: Self-Invocation
Understanding the proxy mechanism is essential to avoid the most common trap associated with @Transactional. What happens if you call a transactional method from another method within the same class?
@Service
public class UserService {

    @Transactional
    public void methodA() {
        // ... some logic
        this.methodB(); // This call bypasses the proxy!
    }

    @Transactional(propagation = Propagation.REQUIRES_NEW)
    public void methodB() {
        // You might expect this to run in a new transaction, but it won't.
    }
}
In the example above, the REQUIRES_NEW propagation level on methodB will be completely ignored. Both methods will run in the same transaction started for methodA. Why?
The call to this.methodB() is a direct method call on the original UserService object. It does not go through the transactional proxy that Spring created. Since the proxy is bypassed, the TransactionInterceptor never gets a chance to see the call to methodB and apply its specific transactional settings.
Spring Transaction Management: @Transactional In-Depth
Marco Behler's article explains this pitfall with a clear diagram and explanation.
Please read the section 'The most common @Transactional pitfall'. The diagram perfectly illustrates why the internal method call bypasses the proxy.
How to solve this?
- The Best Way: Refactor. Move
methodBto a separate bean (e.g.,NewTransactionService) and inject that bean intoUserService. A call tonewTransactionService.methodB()will now go through the proxy for that new bean, and the transactional settings will be applied correctly. This usually leads to a better design with higher cohesion. - The Workaround: Self-Injection. You can inject the
UserServiceproxy into itself.
While this works, it can be considered a code smell and may confuse other developers. Use it with caution.@Service public class UserService { @Autowired private UserService self; // Injects the proxy of this service @Transactional public void methodA() { self.methodB(); // This call now goes through the proxy } // ... methodB }
Conclusion
In this lesson, we bridged the gap between the theory of Spring's transaction management and its practical application. You've learned how to apply and configure the @Transactional annotation to ensure data consistency in your applications.
Key Takeaways:
- Declarative Control:
@Transactionalis used on service-layer classes or methods to define transaction boundaries without writing low-level code. - Default Rollback Rules: Transactions roll back on unchecked exceptions by default. Use the
rollbackForattribute to include checked exceptions in rollback rules. - Read-Only Optimization: Always use
@Transactional(readOnly = true)for query methods to improve performance by allowing the persistence layer to skip dirty checking. - The Proxy is Key: The self-invocation pitfall is a direct consequence of the proxy-based architecture. Transactional annotations are only effective when a method is called through the proxy from an external object.
In our next lesson, we will begin a new module, Building REST APIs with Spring Web MVC. We'll move up the application stack to the web layer and start with the lesson Explain the Spring MVC request handling architecture (e.g., DispatcherServlet). You will learn how Spring receives an HTTP request and orchestrates the process of routing it to the appropriate controller method, laying the groundwork for building your REST API endpoints.