Introduction
Hello! In our last lesson, we mastered ResponseEntity, gaining full control over the HTTP responses our API sends. We now know how to set status codes, add headers, and properly handle resource creation with a 201 Created status and a Location header. This completes our look at the "front door" of our application—the web layer handled by Spring MVC.
Now, a crucial question arises: where should the actual business logic of our application live? So far, we've placed some simple logic directly inside our controller methods. While this works for trivial examples, it's a practice that leads to bloated, hard-to-maintain, and difficult-to-test code in real-world applications.
This brings us to today's learning outcome: Organize application logic into a service layer using the @Service annotation.
In this lesson, we'll explore one of the most fundamental design patterns in enterprise application development: the layered architecture. You'll learn how to create a dedicated "service layer" to house your business logic, separating it cleanly from the web-related concerns of the controller. Given your extensive experience in system design and microservices, the principles of separation of concerns and creating well-defined component boundaries will be very familiar.
The Why: Understanding Layered Architecture
Most well-structured Spring applications are organized into layers, each with a distinct responsibility. The most common and effective pattern is the three-layer architecture:
- Presentation Layer (Controller): Its only job is to handle HTTP requests and responses. It validates incoming data, calls the appropriate service method to do the actual work, and formats the result into an HTTP response. It should contain no business logic.
- Service Layer (Business Logic): This is the heart of the application. It contains the core business rules and logic. It orchestrates operations, such as calling one or more repositories to fetch or save data, interacting with other services, or performing complex calculations.
- Data Access Layer (Repository): This layer's sole responsibility is to communicate with the database. It provides a simple, data-centric API for creating, reading, updating, and deleting (CRUD) data.
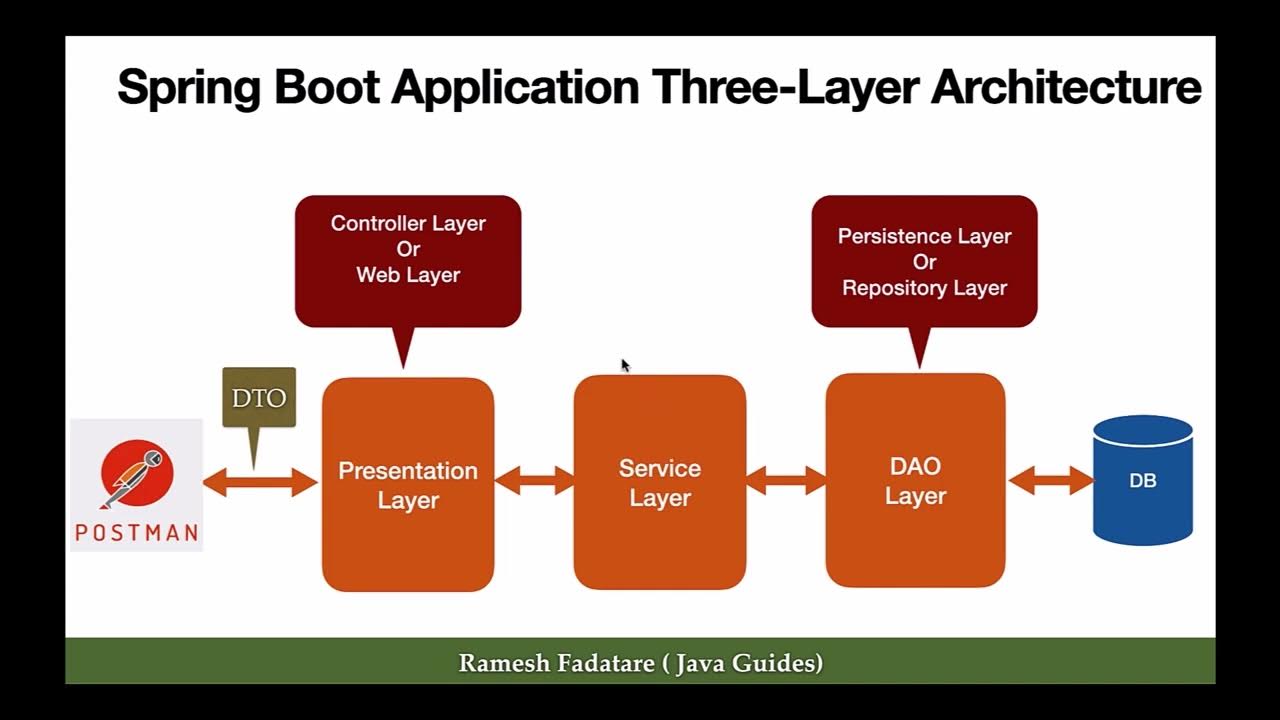
To get a clear overview of these responsibilities, let's watch a short video.
Understanding Layered Architecture in Spring Boot | Best Practices and Implementation
This video from CodeSnippet provides a concise explanation of the Controller, Service, and Repository layers and how they interact.
Watch the segment from 01:10 to 05:28. As you watch, focus on the specific role defined for each layer: Controller: The entry point that handles the request and response, but delegates business operations. Service: Where all the business operations and processing happen. Repository: The layer that talks directly to the database. Notice the clear, one-way flow of dependency: Controller -> Service -> Repository.
This separation provides several key benefits that are crucial for building scalable and maintainable systems.
Service Layer Pattern in Java With Spring Boot
The article 'Service Layer Pattern in Java With Spring Boot' offers an excellent, in-depth explanation of these benefits and how the service layer fits into the familiar Model-View-Controller (MVC) pattern.
Please read the first three sections of the article: 'What is the Service Layer pattern?' 'Why use a service layer?' 'How the Service Layer fits with MVC' Pay close attention to the list of benefits, particularly separation of concerns, reusability, and testability.
The How: Implementing the Service Layer
Now that we understand the "why," let's move to the "how." Implementing a service layer in Spring is straightforward. It involves two main steps:
- Creating a service class and annotating it with
@Service. - Injecting the service into the controller.
The @Service Annotation
The @Service annotation is one of Spring's stereotype annotations (along with @Component, @Repository, and @Controller). Its primary function is to mark a Java class as a bean—an object that Spring's Inversion of Control (IoC) container will instantiate and manage.
While you could technically use the generic @Component annotation, using @Service is a best practice because it clearly communicates the class's role in the application architecture. It tells other developers, "This class contains business logic."
Refactoring from a Fat Controller
The best way to understand the process is to see it in action. We'll follow a common refactoring path: moving business logic out of a "fat controller" and into a lean, focused service class.

Let's watch a video that demonstrates this exact refactoring process.
The video '#14 Spring MVC and Layers' by Telusko provides a practical, step-by-step guide to creating a service layer and refactoring a controller to use it.
Watch the segment from 05:41 to 13:09. The presenter does exactly what we need to learn: (05:41) Explains why business logic shouldn't be in the controller and introduces the service layer. (06:56) Organizes the project into controller, service, and model packages for clarity. (07:44) Creates a ProductService class, annotates it with @Service, and implements a method to provide product data. (11:52) Injects the ProductService into the ProductController using @Autowired and updates the controller method to be a simple one-line call to the service.
As you saw in the video, the result is a controller that is "thin" and a service that contains the actual logic.
Here is a look at a more detailed service implementation that includes business rules.
Service Layer Pattern in Java With Spring Boot
Let's revisit the 'Service Layer Pattern' article to see a more complex example of a service implementation. This shows how a service can orchestrate multiple operations and enforce business rules.
Read 'Step 4: The service implementation'. Study the UserServiceImpl code snippet. Notice how this class: Is annotated with @Service. Uses constructor injection to get dependencies (UserRepository, EmailService). Enforces business rules (e.g., checking for duplicate emails, validating email format). Orchestrates multiple steps (validate, save to repository, send an email). Throws business-specific exceptions (DuplicateEmailException).
This UserServiceImpl is a perfect example of what a service layer component should do. The controller that calls createUser doesn't need to know about any of these details; it simply calls the service and trusts it to do the right thing.
Best Practices and Common Pitfalls
Adopting a layered architecture is a huge step forward, but there are some common mistakes to avoid.
Service Layer Pattern in Java With Spring Boot
The foojay.io and Medium articles provide excellent, concise lists of best practices and common mistakes.
Read the final sections of the article: 'Best practices' and 'Common mistakes to avoid'. Pay special attention to the concept of an 'Anemic service', which is a service that adds no value and just passes calls directly to the repository. Your service methods should contain actual business logic, even if it's just handling a 'not found' case.
To reinforce this, here is one more clear example. In the code below, from the "Controller-Service-Repository" article, notice how the service adds value by handling the Optional returned by the repository and throwing a custom CatNotFoundException if the Optional is empty. This is business logic that protects the controller from persistence-layer details.
// From the "Controller-Service-Repository" article (resource [LINK](https://tom-collings.medium.com/controller-service-repository-16e29a4684e5))
@Service
public class CatService {

    private CatRepository catRepository;

    public CatService(CatRepository catRepository) {
        this.catRepository = catRepository;
    }

    public Cat findById(long id) throws CatNotFoundException {
        // Business logic: translate the repository's Optional into a concrete
        // object or a business-specific exception.
        Optional<Cat> oCat = catRepository.findById(id);
        if (oCat.isEmpty()) {
            throw new CatNotFoundException();
        }
        return oCat.get();
    }
}
This is a great example of a service that isn't "anemic." It performs a crucial translation between the data layer and the layers above it.
Conclusion
In this lesson, we established a robust structure for our application by introducing a service layer. This is a foundational pattern that you will use in virtually every Spring application you build.
Key Takeaways:
- Layered Architecture separates an application into a Presentation (Controller), Service (Business), and Data Access (Repository) layer.
- Separation of Concerns is the guiding principle: controllers handle web concerns, services handle business logic, and repositories handle data persistence.
- The
@Serviceannotation marks a class as a service layer component, making it a Spring-managed bean. - Business logic should be moved out of controllers and into service classes. Controllers then become "thin" by delegating calls to injected service beans.
- A good service layer adds value by orchestrating operations, enforcing business rules, and handling transactions, avoiding the "anemic service" anti-pattern.
You now have the tools to structure the core logic of your application in a way that is clean, testable, and maintainable.
In our next lesson, we will continue to refine our application's internal structure. We'll tackle a common challenge: the data model used by our API (@RestController) is often different from the data model used by our database (@Entity). We'll learn how to implement Data Transfer Objects (DTOs) to decouple API models from data models, a critical technique for building flexible and robust APIs.