Hello! Welcome to your next lesson in the "Formulas, Functions, and Data Integrity" module.
In our last lesson, you learned how to construct basic arithmetic formulas using operators and cell references. We saw how the order of operations (BODMAS/PEMDAS) is crucial for getting accurate results and how using cell references makes your spreadsheets dynamic.
Today, we move from simple calculations to "smart" calculations. The learning outcome for this lesson is to explain the purpose of the IF function and apply it to perform conditional calculations. The IF function is a fundamental tool in spreadsheets that allows you to automate decisions, a skill that is frequently tested and highly valuable for any accounting task.
1. The IF Function: Adding Logic to Your Formulas
At its core, the IF function asks a question and then gives one of two possible answers based on whether the outcome is true or false. Think of it as adding a decision-making step directly into a cell.
The syntax for the IF function is:=IF(logical_test, value_if_true, value_if_false)
Let's break down its three parts:
-
logical_test: This is the condition you want to check. It's a question that can only have a "true" or "false" answer. It often involves logical operators like:=(equal to)>(greater than)<(less than)>=(greater than or equal to)<=(less than or equal to)<>(not equal to)
For example,B2>=50is a logical test that asks, "Is the value in cell B2 greater than or equal to 50?"
-
value_if_true: This is what the function will return if thelogical_testis true. It can be a number, text (which must be enclosed in double quotes, e.g.,"Pass"), or even another formula. -
value_if_false: This is what the function will return if thelogical_testis false.
Question 12, 2. Spreadsheet, Computerised Accounting System
This brief text provides a clear, formal definition of the IF function and breaks down its components with a simple example.
Read the section titled 'IF function'. Pay close attention to the example '=IF(C4<8000,“Yes”,“No”)' and the numbered breakdown that follows it.
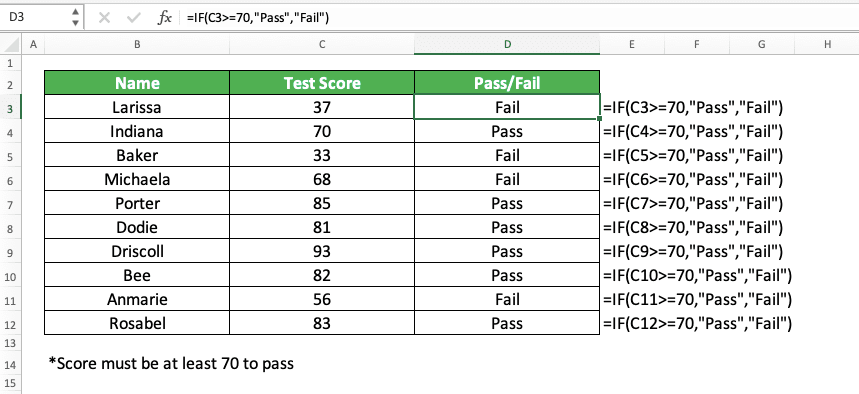
A classic example is determining whether a student has passed or failed based on their score.
2. Performing Conditional Calculations
The true power of the IF function in accounting comes from its ability to perform different calculations based on a condition. Instead of just returning text like "Pass" or "Fail", the value_if_true and value_if_false arguments can be arithmetic formulas.
For instance, consider calculating a sales bonus. A common business rule might be: "If an employee's sales exceed ₹1,00,000, they get a 5% bonus; otherwise, they get no bonus."
If the sales amount is in cell C2 and their base salary is in B2, the formula to calculate the bonus amount would be:=IF(C2>100000, B2*5%, 0)
Here, if the condition C2>100000 is true, the spreadsheet calculates B2*5%. If it's false, it simply returns 0.
Top 10 Most Important Excel Formulas - Made Easy!
The following video provides an excellent demonstration of how the IF function can be used to perform different calculations depending on the logical test's outcome.
Watch from 00:15:00 to 00:17:38. The presenter shows two great examples. First, how to multiply a number by 10 only if it's greater than a certain value. Second, how to either subtract 10 from a number or divide it by 10, depending on the condition. This clearly illustrates using formulas in the true/false arguments.
3. Handling Multiple Conditions with Nested IF
A single IF function is great for two outcomes (e.g., Bonus/No Bonus, Pass/Fail). But what if you have more than two possibilities? For example, categorizing salaries as 'Low', 'Medium', or 'High'.
This is where nested IF functions come in. A nested IF is simply an IF function placed inside another IF function, usually in the value_if_false position.
The structure looks like this:=IF(condition1, value_if_true1, IF(condition2, value_if_true2, value_if_false2))
The logic flows in sequence:
- Excel checks
condition1. - If it's true, it returns
value_if_true1and stops. - If it's false, it moves to the second
IFfunction and checkscondition2. - If
condition2is true, it returnsvalue_if_true2. - If
condition2is also false, it returns the finalvalue_if_false2.
Your NCERT textbook provides a perfect, exam-relevant example of a nested IF used in a payroll calculation.
Chapter 03 Use of Spreadsheet in Business Applications
Let's look at the NCERT textbook's chapter on spreadsheets. It demonstrates how a nested IF function is used to calculate Transport Allowance based on employee type.
First, read the brief text under the heading 'TEMPLATE DESIGN', focusing on the 'Notes' section which explicitly points out the use of a nested-if function. Then, look at the large table of formulas. Find the row for 'Transport Allowance' (row J) and examine the formula provided: '=IF(C12="Sup",$I$7,IF(C12="Nsup",$I$8,0))'. This formula checks if an employee is a Supervisor ('Sup') or Non-supervisor ('Nsup') to assign the correct allowance.
To see this concept explained with another practical example, the following video is very helpful.
Excel Logical Functions - IF, AND, OR
This video provides a clear walkthrough of building a nested IF function from scratch to categorize salaries.
Watch from 00:05:33 to 00:07:43. The presenter creates a formula to label salaries as 'low', 'medium', or 'high' based on specific thresholds. Notice how the second IF statement is placed in the 'value_if_false' part of the first IF statement.
Exam-Style Practice
For your exam, you might be asked to write a formula that solves a problem with multiple conditions.
Question (3 Marks):
A company offers a discount on bulk purchases. The discount logic is as follows:
- If more than 100 units are purchased, a 15% discount is given.
- If 51 to 100 units are purchased, a 10% discount is given.
- If 50 or fewer units are purchased, no discount is given.
The number of units purchased is in cell A2, and the price per unit (₹500) is in cell B2. Write the formula to be entered in cell C2 to calculate the total payable amount after the discount.
Model Answer:
The formula requires a nested IF to first calculate the total price and then apply the correct discount.
=IF(A2>100, (A2*B2)*(1-15%), IF(A2>50, (A2*B2)*(1-10%), A2*B2))
- Breakdown:
A2*B2is the base calculation for the total price.- The first
IFchecks if units (A2) are greater than 100. If true, it calculates the total price and applies a 15% discount (by multiplying by1 - 0.15, which is 85%). - If false, the second
IFchecks if units are greater than 50. If true, it applies a 10% discount (multiplying by 90%). - If both are false (meaning 50 or fewer units), it simply returns the undiscounted total price (
A2*B2).
Conclusion
Great work! You have now added one of Excel's most powerful logical functions to your toolkit. By mastering the IF function, you can automate complex business rules and make your financial models much more intelligent.
Key Takeaways:
- The
IFfunction performs a logical test and returns one of two values:=IF(test, value_if_true, value_if_false). - It can return simple text or perform different calculations based on the outcome of the test.
- Nested
IFfunctions are used to test multiple sequential conditions, allowing for more than two possible outcomes. - Pay close attention to parentheses and the order of conditions, as the function stops as soon as it finds a true condition.
In our next lesson, we will continue exploring powerful built-in functions. We'll learn how to use the PMT function to easily calculate loan instalments—a very common financial task. We'll also cover how to identify and resolve two of the most frequent spreadsheet errors: #DIV/0! and #REF!.