Hello! Welcome to the next lesson in our journey through Computerized Accounting.
In our last session, we established the crucial role of data validation in maintaining data integrity, based on the principle of "Garbage In, Garbage Out." We saw how to set up basic rules to prevent incorrect data from being entered.
Today, we'll build directly on that knowledge. We'll focus on what happens when a user tries to enter invalid data. This lesson covers the learning outcome: Describe how to use the 'Error Alert' feature within data validation settings. We will explore how to create custom, informative error messages that guide users—a key skill for building robust accounting spreadsheets and a frequent topic in your exam.
1. What is an Error Alert?
When you set a data validation rule, you also get to decide how the spreadsheet should react if someone breaks that rule. Instead of just showing a generic error, you can create a specific, helpful message. This is done using the Error Alert feature.
The main purpose of an Error Alert is to:
- Inform the user that they have entered invalid data.
- Explain why the data is invalid.
- Guide them on how to enter the correct data.
This is a huge improvement over Excel's default error messages, as it makes your spreadsheet more user-friendly and further strengthens your data integrity.
The 'Error Alert' feature is configured in its own tab within the Data Validation dialog box.
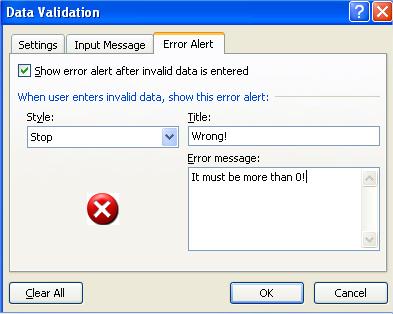
2. The Three Styles of Error Alerts
The most important setting in the 'Error Alert' tab is the Style. This determines how strictly your rule is enforced. There are three styles to choose from, each with a different icon and behavior. Understanding the difference is critical.
| Style | Icon | Description | User Options |
|---|---|---|---|
| Stop | ⛔ | This is the strictest style. It prevents the user from entering invalid data. | Retry: Allows the user to try entering a new value. Cancel: Reverts the cell to its original value. |
| Warning | ⚠️ | This style warns the user that the data is invalid but gives them the option to override the rule and enter it anyway. | Yes: Accepts the invalid data. No: Allows the user to edit the entry. Cancel: Reverts the cell to its original value. |
| Information | ℹ️ | This is the most lenient style. It informs the user that the data is invalid and lets them accept it by clicking OK. | OK: Accepts the invalid data. Cancel: Reverts the cell to its original value. |
For most accounting controls (like ensuring an invoice amount is positive or a date is within the financial year), the Stop alert is the most appropriate choice because it guarantees data integrity.
Let's watch a video that demonstrates these three styles in action.
MS Excel - Data Validation Error Alert
This video from TutorialsPoint clearly shows how each of the three error alert styles behaves when a user enters invalid data. This will help you visualize the difference between them.
Please watch the video from 03:30 to 05:59. The video will walk you through: The 'Stop' alert (03:30 - 03:58): Notice how it completely blocks the invalid entry. The 'Warning' alert (03:58 - 05:01): See how the user is given the choice to accept the invalid data. The 'Information' alert (05:01 - 05:59): Observe how this alert simply informs the user and allows the entry.
3. How to Set Up a Custom Error Message
Now that you understand the three styles, let's focus on creating the message itself. A well-written error message is a key part of a good computerized accounting system.
To create a custom error alert, you follow these steps after setting your validation rule on the 'Settings' tab:
- Go to the Data tab and click Data Validation.
- Navigate to the Error Alert tab.
- Make sure the box "Show error alert after invalid data is entered" is checked. If it's not, no message will appear, and invalid data might be allowed.
- Choose a Style (
Stop,Warning, orInformation) from the dropdown menu. - In the Title box, enter a short, clear heading for your error message.
- In the Error message box, write a helpful message that explains what is wrong and how to fix it.
- Click OK.
Example for an Accounting Scenario:
Let's say you have a column for 'GST Rate (%)' and you want to ensure users only enter values between 0 and 28.
- Validation Rule:
Decimalbetween0and28. - Error Alert Setup:
- Style:
Stop - Title:
Invalid GST Rate - Error message:
The GST rate must be a number between 0 and 28. Please enter a valid rate.
- Style:
Now, if a user tries to enter 30 or -5, they will be stopped by a clear, custom message that tells them exactly what to do.
To see this process of customizing the title and message field, you can review this quick video.
Data Validation Error Alerts in Excel - Tutorial
This clip from Excel Tutorials by Y. Acosta focuses specifically on customizing the title and message fields to provide clear instructions to the user.
Watch the short segment from 04:34 to 05:30. Pay attention to how the 'Title' and 'Error Message' fields are used to create a specific, helpful alert.
Conclusion
Excellent work! You now know how to create effective error alerts that not only enforce your data validation rules but also guide users toward entering correct information. This is a practical skill that is highly valued and frequently tested.
Key Takeaways:
- The Error Alert feature in data validation allows you to create custom messages when invalid data is entered.
- There are three Styles of alerts:
- Stop: Prevents invalid entries (strictest).
- Warning: Warns the user but allows them to proceed (medium).
- Information: Informs the user but allows the entry (most lenient).
- A good error alert has a clear Title and a helpful Error message that explains the rule and how to comply with it.
- For accounting purposes, the Stop alert is generally the best choice for maintaining strict data integrity.
In our next lesson, we will shift from data entry and validation to data analysis. We will begin Module 5 by exploring how to visualize data, starting with the learning outcome: Identify and describe key chart elements, including data labels, legends, and data series.