Hello! In our last lesson, we got our hands dirty by adding and modifying the basic building blocks of any design: shapes and text. You learned how to create these fundamental elements and change their properties using Canva's editor.
Today, we're going to expand our creative toolkit significantly. We'll move beyond simple shapes and explore Canva's vast library of pre-made assets. Think of it like this: in the last lesson, you learned to work with basic ingredients like flour and water. Now, you're getting access to a fully stocked pantry with every spice, sauce, and specialty item you can imagine. This lesson will teach you how to search for and insert images and graphics, which will bring your social media posts to life with color, detail, and personality.
The 'Elements' Tab: Your Creative Library
We briefly visited the Elements tab in the last lesson to find shapes. However, this tab is the gateway to much more. It contains millions of design assets that you can use to build or enhance your designs.

To get a clear idea of what's available, let's start with a formal definition from Canva's own Help Center.
Add, duplicate, and delete elements - Canva Help Center
This article from the Canva Help Center provides a great overview of what "elements" are.
Read the short section titled What are elements in Canva. This will clarify the different types of assets you have at your fingertips.
As you can see, "Elements" is a broad category that includes everything from graphics and photos to videos and audio clips. For this course, we will focus primarily on graphics and photos.
Searching for the Perfect Element
With millions of options, scrolling endlessly is not an effective strategy. The most powerful tool in the Elements tab is the search bar. Learning to use it effectively is key to finding exactly what you need quickly.
The official Canva channel has an excellent video that breaks down how to search and filter your results.
Exploring the Element Library: One million options and counting
This video, "Exploring the Element Library," gives a concise tour of the search and filter functions.
Watch from the start of the search demonstration. Pay close attention to how you can use the search field and then apply filters for type, color, and other options to narrow down your results.
Now, let's see this in action with a practical example. Imagine you're creating a post and you need a star graphic.
Canva Tutorial for Beginners (How to use Canva step by step)
In this segment from the "Canva Tutorial for Beginners," Kate Hayes demonstrates a real-world search.
Watch from where she searches for a star. Notice how she types "Star" into the search bar and then toggles between the Graphics and Photos tabs to see different types of results for the same search term.
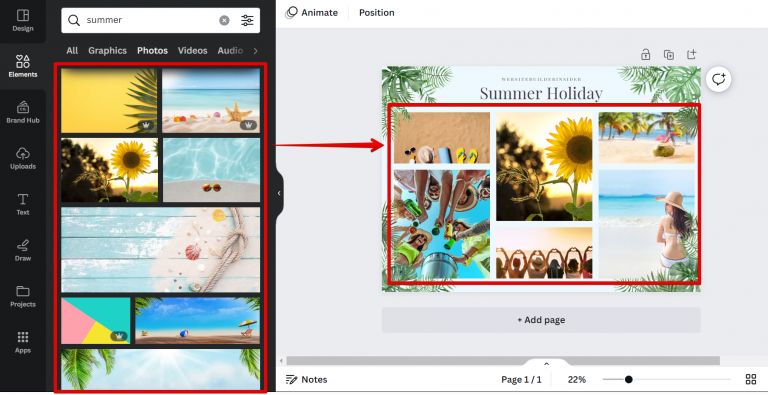
This ability to switch between asset types is crucial. "Graphics" will give you illustrations, icons, and drawings, while "Photos" will provide realistic, photographic images.
Adding Graphics and Photos to Your Design
Once you find an element you like, adding it to your design is simple: you can either click on it or drag and drop it onto your canvas.
The process is essentially the same for both graphics and photos. You can resize, rotate, and position them just as you did with shapes in our previous lesson. Many graphics also allow you to change their colors using the contextual toolbar that appears at the top when the element is selected.
A Pro Technique: Using Frames
While you can place photos anywhere on your canvas, sometimes you want them to fit neatly into a specific shape, like a circle or a phone screen. For this, Canva has a fantastic tool called Frames.
Frames are special placeholders that you can find in the Elements tab. You can add a frame to your design and then simply drag a photo on top of it. The photo will automatically "snap" into the shape of the frame.
Exploring the Element Library: One million options and counting
Let's return to the official Canva video to see how frames work.
Watch the segment from the introduction to frames. The demonstration clearly shows how a photo snaps into a frame and how you can then adjust the photo's position within that frame.
This technique is incredibly useful for creating polished and structured layouts, such as in testimonials where you might want a circular headshot next to a quote, or for creating mockups. You can find frames by searching for "frames" in the Elements tab.
Bonus Tip: Using Your Own Images
Canva's library is extensive, but there will be times when you want to use your own images, such as a logo for your cooking business or a photo you took yourself. Canva makes this easy through the Uploads tab.
Add, duplicate, and delete elements - Canva Help Center
This section of the Canva Help Center article explains how to upload and use your own files.
Read the section on uploading your own elements. It clearly distinguishes between Canva's built-in Elements and your personal Uploads.
This is a valuable feature to remember as you begin to develop a unique visual style for your social media presence.
Conclusion
Great work today! You've just unlocked a massive library of visual content that will be essential for creating engaging social media posts. You've moved beyond the absolute basics and can now start to build truly dynamic designs.
Here are the key takeaways from this lesson:
- The Elements tab is your library for millions of assets, including graphics, photos, frames, and more.
- Use the search bar and filters to efficiently find the specific asset you need.
- You can easily differentiate between Graphics (illustrations) and Photos (real images) in the search results.
- Frames are powerful tools for placing your photos into specific shapes, creating clean and professional layouts.
- The Uploads tab allows you to add your own personal images to use in your Canva designs.
In our next lesson, we will shift our focus slightly. Now that you know how to add all the key components to a design—shapes, text, graphics, and photos—we'll start exploring the why. We'll begin with one of the most important aspects of design: understanding the role of color and typography in setting the mood and conveying a message.