Welcome back. In our last two lessons, we focused on data architecture, sketching out the blueprints for our database using Entity-Relationship Diagrams. We've meticulously planned what data our application will manage. Now, it's time to shift our focus from data architecture to code architecture. We need a plan for where the code that handles this data will live.
This lesson directly addresses one of the key challenges you mentioned: designing a project structure that doesn't become a tangled mess as it grows. We will design a clean, logical, and scalable folder structure for a MERN project. Specifically, we'll focus on the backend and learn how to separate concerns using the common and powerful pattern of routes, controllers, services, and models. Mastering this will provide you with a clear roadmap for your code, significantly boosting your confidence when starting projects from scratch.
1. The Big Picture: A Monolithic Repository
For most MERN projects, especially when you're the primary developer, the most straightforward approach is to keep the frontend and backend code in a single Git repository. This is often called a "monolithic repository" or "monorepo" (though true monorepos often have more complex tooling). Inside this main project folder, we create two primary subdirectories: client for our React application and server for our Node.js/Express API.
The Ultimate MERN Project Structure for Scalable Application
This article provides a great overview of a standard, scalable MERN project structure. It begins by outlining this top-level client/server separation.
Please read the section "Monolithic Structure". Pay attention to the clear separation between the client/ and server/ directories. This is the foundational organization for our entire project.
This separation is the first and most important step. It prevents frontend concerns (like CSS and React components) from getting mixed up with backend concerns (like database connections and API logic).
2. Backend Architecture: The Three-Layer Approach
Now, let's zoom in on the server directory. A common mistake when starting out is to put all the logic for an API endpoint into a single file or function. This works for tiny projects, but it quickly becomes unmanageable. To build scalable and maintainable applications, we adopt a layered architecture that separates distinct responsibilities. The most common pattern consists of:
- Routes: Define the API endpoints (e.g.,
/api/products/:id) and the HTTP methods that apply to them (GET, POST, PUT, DELETE). Their only job is to receive a request and pass it to the correct controller. - Controllers: Act as the intermediary. They parse incoming request data (like
req.bodyorreq.params), call the appropriate service to perform the business logic, and then format and send the HTTP response back to the client. Controllers should not contain business logic themselves. - Services: This is where the core business logic lives. If you need to calculate a discount, check inventory levels before adding to a cart, or combine data from multiple sources, that logic belongs in a service. Services are the "brain" of your application.
- Models: Define the structure of your data (the Mongoose schema) and provide the interface for all communication with the database (creating, reading, updating, and deleting documents).
This separation is often called a "Three-Layer Approach". Let's watch a video that explains the rationale behind this structure.
Node.js Project Structure and Architecture Best Practices
This video from Software Developer Diaries gives a fantastic conceptual overview of why this layered approach is superior to putting all logic in one place.
Watch the first two minutes, from the beginning. The presenter uses a whiteboard to clearly illustrate the flow of a request and the role of each layer. Notice the clear distinction he makes between a simple, non-scalable approach and the more robust three-layer design.
This layered approach makes your code:
- Easier to read: You know exactly where to look for routing, business logic, or database queries.
- Easier to test: You can test business logic in a service without needing to simulate a full HTTP request.
- More reusable: A single service function might be used by multiple controllers or even other services.
The following diagram illustrates how an incoming HTTP request flows through these layers.

3. A Practical Folder Structure
Now let's translate this architectural concept into a concrete folder structure. An intermediate and very effective way to organize your Express application is by following the Model-View-Controller (MVC) pattern, where our "Services" layer handles the bulk of the business logic that would otherwise bloat the controllers.
Folder Structure for API's - Beginner, Intermediate, and Advanced
The presenter in this video from PedroTech walks through a practical implementation of this structure, which he calls the "intermediate level."
Watch the segment from this section. Pay close attention to how he organizes the folders within an api directory and explains the responsibility of each one: routes, controllers, services, models, middlewares, and validations.
Based on that, a standard, scalable backend structure within your server/src folder would look like this:
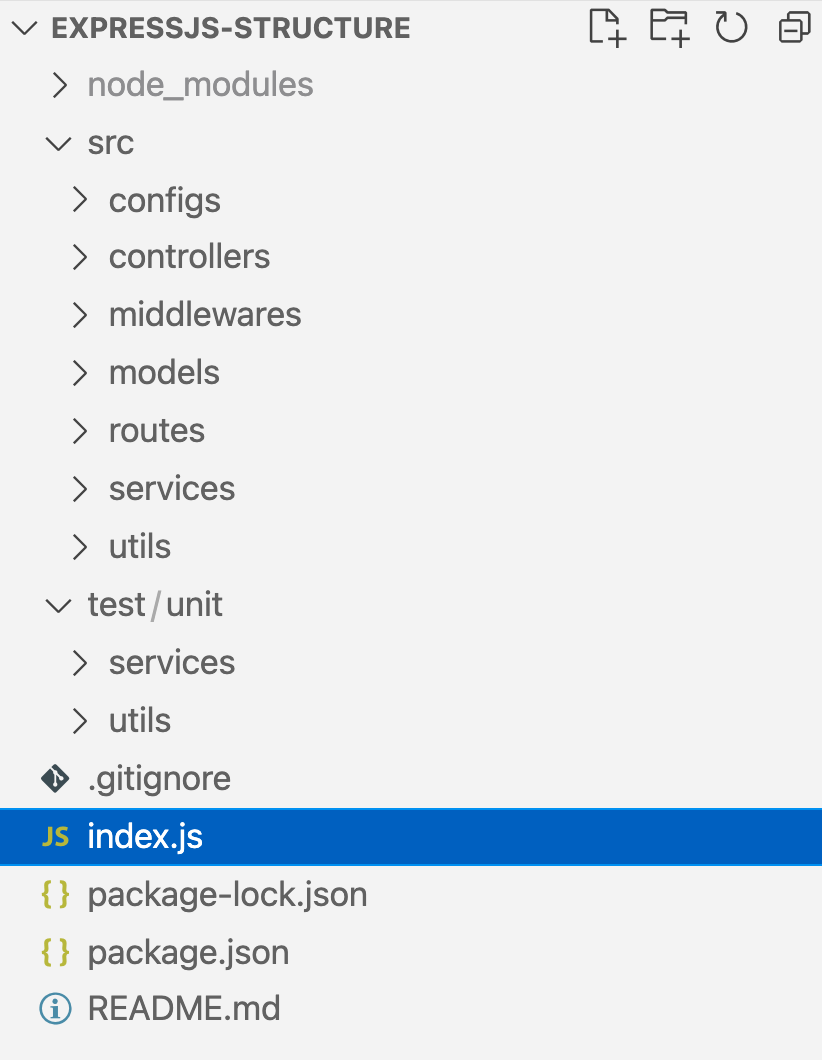
Let's break down the key folders:
src/routes: Contains files that define your API endpoints. For an e-commerce app, you'd haveproducts.routes.js,users.routes.js,orders.routes.js, etc.src/controllers: Holds the controller functions that are called by the routes. You'd haveproducts.controller.js,users.controller.js, etc.src/services: Contains the files with the core business logic.products.service.jswould have functions likecreateProduct,checkStock, etc.src/models: Stores your Mongoose schema definitions, e.g.,product.model.js,user.model.js.src/middleware: For functions that run between the request and the controller, such as authentication checks (auth.middleware.js) or centralized error handling (errorHandler.middleware.js).src/config: For configuration files, like your database connection logic (database.js).src/utils: A place for genuinely reusable helper functions that don't fit anywhere else (e.g., a logger, an API response formatter).
4. Evolving for Scale: Feature-based Structure
The layered structure we just discussed is excellent and will serve you well for most projects. However, as an application becomes very large, you might notice that to change one feature (e.g., user authentication), you have to jump between five or six different folders (routes, controllers, services, models, middleware).
A more advanced pattern that addresses this is a feature-based structure. Here, you still use layers, but you group them inside folders named after the feature they belong to.
How should I structure my MERN project · community · Discussion #193161 · GitHub
This GitHub discussion provides a fantastic explanation of the difference between a pure layer-based structure and a more scalable feature-based one.
Start by reading the main recommendation to move from a layer-based to a feature-based structure. Next, carefully examine the recommended backend structure in the code block under the heading "prefer something like this:". Notice how folders like auth/ and users/ contain their own dedicated controller, service, model, and routes files. Finally, read the summary of the backend responsibilities, which reinforces the role of each layer: routes, controller, service, repository, and model. (Note: "repository" is often used interchangeably with the data access part of the "service" or "model" layer in this context).
In this hybrid approach, your backend structure might look like this:
server/
└── src/
    ├── app.js          # Express app setup
    ├── server.js       # Server entry point
    ├── config/         # Database connection, env variables
    ├── middleware/     # Shared middleware (e.g., global error handler)
    ├── utils/          # Shared utilities
    └── modules/        # Or 'features'
        ├── products/
        │   ├── product.routes.js
        │   ├── product.controller.js
        │   ├── product.service.js
        │   └── product.model.js
        └── users/
            ├── user.routes.js
            ├── user.controller.js
            ├── user.service.js
            └── user.model.js
This structure keeps all the code related to a single feature together, making the project much easier to navigate and maintain as it scales. For the projects you aim to build, starting with the simple layered approach is fine, but keeping this feature-based evolution in mind is key to "thinking like a developer."
Conclusion
You've now moved from planning your data to planning your code. A well-designed folder structure is not just about being tidy; it's a critical piece of software architecture that makes your application more robust, maintainable, and scalable.
Key Takeaways:
- Monolithic Structure: For most MERN apps, a single repository with
client/andserver/folders is the standard. - Layered Backend Architecture: Separating your backend code into Routes, Controllers, Services, and Models is crucial for separating concerns.
- Clear Responsibilities: Routes handle endpoints, Controllers manage request/response flow, Services execute business logic, and Models interact with the database.
- Scalability with Features: For larger applications, consider grouping your layers within feature-specific folders (e.g.,
products/,users/) to improve co-location and maintainability.
You now have the blueprint for both your data and your code. In our next lesson, we will begin our journey into Module 2 by taking this structure and bringing it to life. We will set up a scalable Node.js project with Express, configure our environment, and write the first lines of our server.