Hello! Let's dive into the next crucial topic for building polished desktop applications.
In our last lesson, we brought your first Qt application to life by connecting a button's clicked signal. However, we positioned that button using setGeometry(x, y, width, height). This method, known as absolute positioning, is simple but very rigid. If you tried resizing the window, you would have noticed the button stayed fixed in place, which isn't ideal for a professional-looking application that needs to work on various screen sizes.
Today, we'll learn the proper way to handle this. Our learning outcome is to lay out GUI components using Qt's layout managers (e.g., QVBoxLayout, QHBoxLayout, QGridLayout). These are powerful tools that automatically arrange and resize widgets, ensuring your user interface is responsive and well-organized. Given your experience with web development using Next.js, you can think of Qt layouts as being conceptually similar to CSS Flexbox and Grid—they provide a declarative way to manage the positioning and spacing of UI elements.
We'll explore these concepts both through Qt Creator's visual designer for a hands-on feel and by writing the C++ code to understand what's happening "under the hood."
1. Why Layouts are Essential
Before we jump into using layouts, it's important to understand why they are the standard practice, while absolute positioning is generally avoided.
Absolute positioning forces you to manually calculate the exact pixel coordinates and size for every single widget. This approach has several major drawbacks:
- Not Responsive: The UI does not adapt when the window is resized.
- High Maintenance: If you add, remove, or resize one widget, you may have to manually recalculate the position of many others.
- Not Portable: The layout can break on different operating systems or with different screen resolutions and font sizes.
Layout managers solve all these problems by taking control of the geometry of the widgets they manage.
To see the difference in practice, let's start with a quick overview from the official Qt documentation.
Layout Management | Qt Widgets | Qt 6
The official Qt documentation provides a concise introduction to its layout system. This reading explains the core benefits of using layouts.
Please read the 'Introduction' section. Focus on the list of tasks that a layout manager handles automatically, such as positioning, default sizes, and resize handling.
2. The Main Layout Managers: A Visual Introduction
Qt provides several layout managers, but three of them form the backbone of most UIs:
QHBoxLayout: Arranges widgets in a horizontal row.QVBoxLayout: Arranges widgets in a vertical column.QGridLayout: Arranges widgets in a grid of rows and columns.
This image provides a perfect visual summary of how each one works.
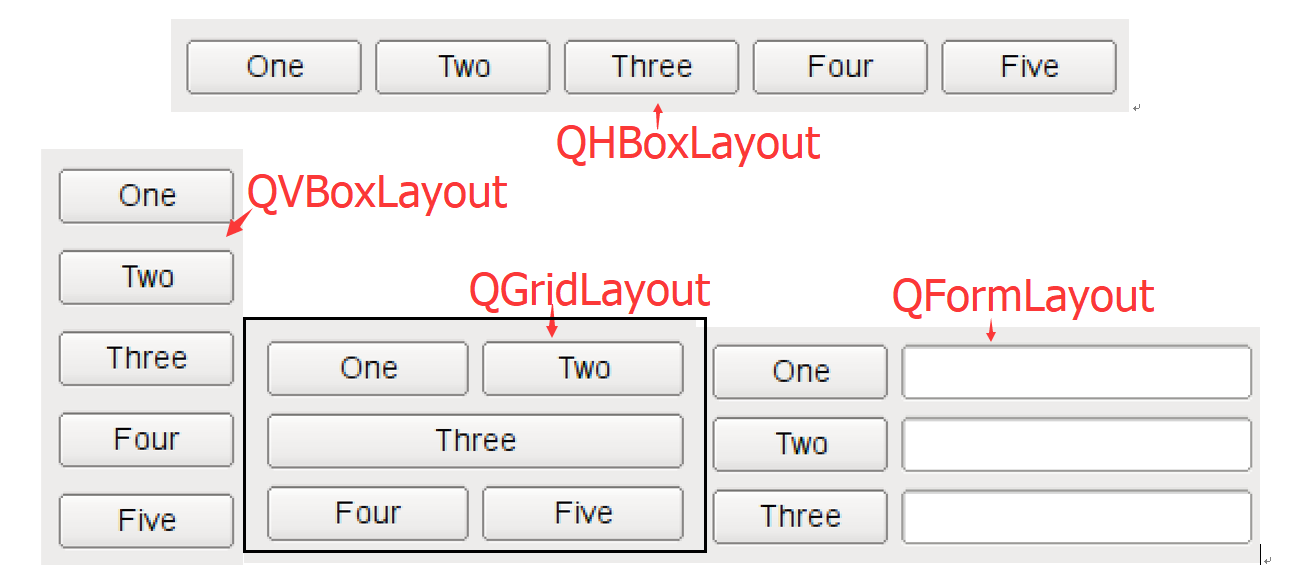
3. Building Layouts in Qt Creator
The most intuitive way to start working with layouts is through Qt Creator's Design view. It allows you to drag and drop layouts and widgets and see the results instantly.
The following video is an excellent practical guide. We'll watch it in segments to focus on the key concepts.
This video from the Velcode channel provides a clear, step-by-step demonstration of using layouts in the Qt Creator designer.
Watch the segment from 00:12 to 02:42. This will show you the basic function of Vertical (QVBoxLayout) and Horizontal (QHBoxLayout) layouts and how they automatically align and resize widgets.
As you saw, layouts act as containers. When you drop a widget into a layout, the layout takes ownership of its position and size.
Controlling Space: Spacers and Stretch Factors
What if you don't want widgets to expand to fill all available space? For example, you might want a group of buttons to stay clustered at the top of a window. You can control this using Spacers and Stretch Factors.
- Spacers (
QSpacerItem): These are invisible widgets that expand to take up as much space as possible, pushing other widgets together. A vertical spacer will push widgets up and down, while a horizontal spacer pushes them left and right. - Stretch Factors: This is a property of a layout that determines how space is distributed proportionally among its widgets. If one widget has a stretch factor of 2 and another has a stretch factor of 1, the first widget will get twice as much extra space when the window is resized.
Let's see how these work in practice.
Let's continue with the Velcode video to see how spacers and stretch factors are used to fine-tune a layout.
Please watch two more segments from the video: Spacers (02:42 - 05:38): Focus on how adding a vertical spacer pushes the buttons to the top and prevents them from spreading out vertically. Layout Stretch (08:24 - 11:39): This part is crucial. Pay close attention to the 'layoutStretch' property in Qt Creator and see how changing the comma-separated values (e.g., '4,3,2,1') affects the relative sizes of the buttons as the window is resized.
Creating Grids with QGridLayout
For more complex arrangements, like a calculator keypad or a form, a grid is the perfect tool. QGridLayout allows you to place widgets into specific cells, and even have a widget span multiple rows or columns.
Finally, let's look at the grid layout in the same video.
Watch the segment from 05:38 to 07:37. It demonstrates how to use a QGridLayout. Notice the interesting point that a grid can also be created by nesting horizontal and vertical layouts, which helps solidify your understanding of how these components can be combined.
4. Implementing Layouts in C++
While the designer is great for prototyping, you will often need to create layouts programmatically in C++. This is where your object-oriented programming experience will be very helpful. The layout classes in Qt have a clear inheritance structure.

Let's look at how to implement the layouts we've just seen.
Layout management in Qt5 - ZetCode
The ZetCode tutorial provides clear, complete C++ examples for each layout type. It's a great resource for seeing the code in action.
Skim through the following sections to see the C++ implementation for each layout manager: Qt5 QVBoxLayout: Notice the use of new QVBoxLayout, addWidget(), and finally setLayout(). Buttons: This example shows a QHBoxLayout and also introduces addStretch() to push the buttons to one side. Qt5 QGridLayout: See how addWidget() takes additional row and column arguments to place widgets in the grid.
Your Turn: Code It Yourself
Now, let's apply this to our project. In your MainWindow constructor, you can replace the setGeometry code from the last lesson with a proper layout.
-
Open your project in Qt Creator.
-
Go to
mainwindow.cpp. -
Include the necessary headers at the top:
#include <QPushButton> #include <QHBoxLayout> #include <QVBoxLayout> #include <QWidget> -
In the
MainWindow::MainWindowconstructor, replace your old button code with the following to create a nested layout:// In MainWindow::MainWindow(QWidget *parent) ui->setupUi(this); // Create a central widget that will hold the main layout QWidget *centralWidget = new QWidget(this); this->setCentralWidget(centralWidget); // Create two buttons for a horizontal layout QPushButton *okButton = new QPushButton("OK"); QPushButton *cancelButton = new QPushButton("Cancel"); // Create a horizontal layout and add the buttons to it QHBoxLayout *hLayout = new QHBoxLayout; hLayout->addStretch(1); // Add a stretchable space to push buttons to the right hLayout->addWidget(okButton); hLayout->addWidget(cancelButton); // Create a vertical layout QVBoxLayout *vLayout = new QVBoxLayout; vLayout->addStretch(1); // Add a stretchable space to push the H-layout to the bottom vLayout->addLayout(hLayout); // Nest the horizontal layout inside the vertical one // Set the main layout for the central widget centralWidget->setLayout(vLayout); // Connect a signal to a slot (e.g., to close the window) connect(cancelButton, &QPushButton::clicked, this, &MainWindow::close);
Now, when you compile and run your application, you will see two buttons neatly aligned at the bottom-right of the window. If you resize the window, they will stay in the bottom-right corner. This is the power of layouts!
Conclusion
You've now mastered a fundamental skill for building professional desktop applications in Qt. Manually positioning elements is fragile and not scalable; layout managers provide the robust, responsive foundation that modern UIs require.
Key Takeaways:
- Layout managers are the standard for creating responsive and maintainable UIs in Qt, automating the positioning and resizing of widgets.
- The three main layout classes are
QHBoxLayout(horizontal),QVBoxLayout(vertical), andQGridLayout(grid-based). - You can use spacers (
addStretch()) and stretch factors to control how empty space is distributed within a layout. - Layouts can be nested inside each other (
addLayout()) to build complex and hierarchical user interfaces. - You can create layouts visually in Qt Creator's Design view or programmatically in C++ code by creating layout objects, adding widgets, and setting the layout on a parent widget.
Next Up
We now know how to arrange widgets, but so far we've mostly used QPushButton. In the next lesson, we'll expand our toolkit by learning to build a simple UI with a variety of widgets like QPushButton, QLabel, and QLineEdit. This will allow us to create interactive forms that can accept user input, which is a core requirement for almost any desktop application.