Hello! Welcome back to our course on C/C++ development.
In our last lesson, you successfully built your first interactive Qt application. You arranged widgets using layouts, accessed them in C++ code, and made a QPushButton perform an action using Qt Creator's "Go to slot..." feature. This was a great practical shortcut to see immediate results.
Today, we're going to pull back the curtain and explore the powerful mechanism that makes this interaction possible: Qt's Signals and Slots. This is one of the most fundamental and celebrated features of the framework. Our goal is to understand this system so you can connect a button's clicked signal to a slot that performs an action manually, giving you far more control and a deeper understanding of your application's architecture. This knowledge is crucial for building any non-trivial event-driven program.
1. The Core Idea: Decoupled Communication
In GUI programming, a common task is making one object react when another object's state changes. For example, when a user clicks a button, a window should close. A traditional approach in C/C++ uses "callbacks," which are essentially pointers to functions. However, this can become complex and isn't always type-safe.
Qt provides a more elegant and robust solution: Signals and Slots.
- A signal is a message that an object emits when a particular event occurs. The object doesn't know or care who receives the message.
- A slot is a function that is designed to receive and handle a specific signal.
This creates a "loosely coupled" system. The signal-emitting object (e.g., a button) and the slot-receiving object (e.g., your main window) don't need to know about each other's implementation details.
To get the official definition, let's turn to the Qt documentation.
The official Qt documentation provides the best introduction to the philosophy behind Signals and Slots.
Please read the 'Introduction' and 'Signals and Slots' sections (the first two main sections on the page). Focus on why this mechanism is an alternative to callbacks and the benefits of loose coupling.
The key takeaway is that you can connect a single signal to multiple slots, or multiple signals to a single slot, creating flexible and reusable components. Imagine a QPushButton; its clicked() signal could be connected to a slot that saves a file, a slot that updates a progress bar, and another that logs the action—all without the button object being aware of any of them.
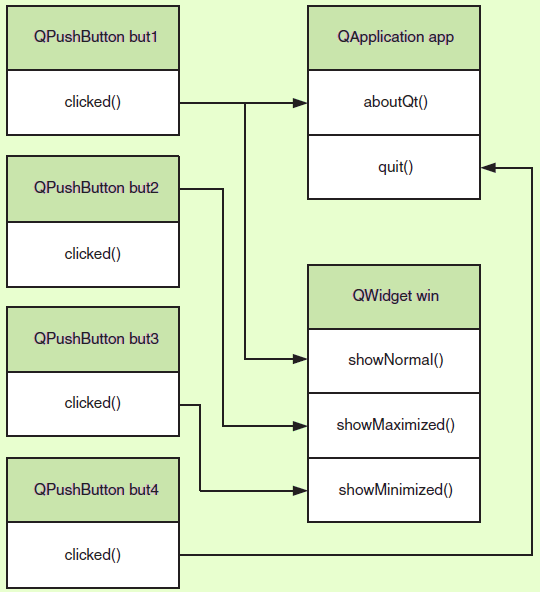
2. The QObject Foundation and Syntax
The signals and slots mechanism is not a native C++ feature; it's provided by Qt's QObject class. For any of your custom classes to use signals or slots, it must:
- Inherit from
QObject(or one of its subclasses, likeQWidgetorQMainWindow). - Include the
Q_OBJECTmacro at the top of the class definition. This macro invokes the Meta-Object Compiler (moc), a preprocessor that generates the necessary C++ code to make signals and slots work.
Let's see how this looks in practice.
Qt 6 - Episode 4 - QObject and Moc
This video from the VoidRealms channel clearly explains the role of QObject and demonstrates how to declare signals and slots within a custom class.
Watch the segment from 09:16 to 11:25. Pay close attention to the special signals: and public slots: keywords. A crucial point to notice is that signals are only declared (like an interface), while slots are implemented like any other C++ member function.
As the video showed, the syntax is straightforward:
- Declare signals under the
signals:keyword. They are function declarations without an implementation. - Declare slots under a
public slots:,protected slots:, orprivate slots:section. They are regular functions that you will implement. - To trigger a signal, you use the
emitkeyword (e.g.,emit mySignal();).
3. Manual Connections with QObject::connect()
In the last lesson, when you used "Go to slot...", Qt Creator generated a slot with a special name: on_widgetName_signalName(). Qt's build system automatically connects these specially-named slots.
Now, we will learn the manual and more versatile method: QObject::connect(). This function allows you to create connections anywhere in your code. The modern, type-safe syntax looks like this:
connect(sender, &SenderClass::signalName, receiver, &ReceiverClass::slotName);
It takes four arguments:
- sender: A pointer to the object that will emit the signal.
- signal: A pointer to the signal member function.
- receiver: A pointer to the object that will receive the signal.
- slot: A pointer to the slot member function.
Let's refactor the "Greeter" application from the previous lesson to use this manual approach.
Your Turn: Refactor the "Greeter" App
-
Open your project from the last lesson.
-
Delete the old slot: In
mainwindow.h, remove the declaration foron_greetButton_clicked(), and inmainwindow.cpp, delete its implementation. -
Declare a new slot: In
mainwindow.h, inside thepublic slots:section (create one if it doesn't exist), declare a new slot with a name of your choosing.// mainwindow.h public slots: void performGreeting(); -
Implement the new slot: In
mainwindow.cpp, implement this new function. The logic is identical to what you had before.// mainwindow.cpp void MainWindow::performGreeting() { QString name = ui->nameLineEdit->text(); QString greeting = "Hello, " + name + "!"; ui->greetingLabel->setText(greeting); } -
Make the connection: In the
MainWindowconstructor inmainwindow.cpp, right after theui->setupUi(this);line, add theconnectcall.// mainwindow.cpp MainWindow::MainWindow(QWidget *parent) : QMainWindow(parent) , ui(new Ui::MainWindow) { ui->setupUi(this); // This line sets up the UI objects // Manually connect the button's clicked signal to our new slot connect(ui->greetButton, &QPushButton::clicked, this, &MainWindow::performGreeting); }Here,
ui->greetButtonis the sender,&QPushButton::clickedis the signal,this(theMainWindowinstance) is the receiver, and&MainWindow::performGreetingis our new slot.
Now, compile and run your application. It should behave exactly as before, but the connection is now explicit and more maintainable.
4. A More Modern Approach: Using Lambda Expressions
Your background in languages like TypeScript and Python has likely exposed you to anonymous functions or lambdas. Modern C++ supports them as well, and they are incredibly useful with Qt's signal-slot mechanism for simple, one-off actions.
Instead of defining a named slot in the header and a separate implementation, you can define the action inline within the connect call.
You could replace the connect call in your constructor with this:
// An alternative connection using a C++ lambda expression
connect(ui->greetButton, &QPushButton::clicked, this, [this]() {
    QString name = ui->nameLineEdit->text();
    QString greeting = "Hello, " + name + "!";
    ui->greetingLabel->setText(greeting);
});
Here, the lambda function [this](){ ... } acts as the slot. The [this] part is the "capture list," which gives the lambda access to the members of the MainWindow object (like ui). This pattern is very common for keeping simple UI logic concise and localized.
Conclusion
You have now mastered the fundamental communication pattern in Qt. You've moved beyond the "magic" of automatic connections to understand and implement the underlying mechanism yourself.
Key Takeaways:
- Signals and Slots are Qt's type-safe, loosely coupled communication system, based on the
QObjectclass. - The
Q_OBJECTmacro is mandatory for any class using this system. - A signal is declared with the
signals:keyword and triggered withemit. - A slot is a normal C++ function that can be connected to a signal.
- The modern, type-safe way to connect them is:
QObject::connect(sender, &Sender::signal, receiver, &Receiver::slot);. - For simple actions, C++ lambdas provide a concise and powerful alternative to defining named slots.
Next Up
This lesson concludes our introduction to building desktop applications with Qt. You now have the foundational skills to create interfaces and wire up their logic.
In our next module, we'll make a significant shift from the screen to the physical world, directly addressing your goal of working with automation and embedded systems. We will begin our exploration of the Arduino ecosystem, learning how its C++-based language allows you to control hardware, read from sensors, and bring your code to life.