Welcome to the first step in building your "Smart Warehouse Operations System" course. This initial lesson is designed for your "Internship Onboarding" module and focuses on getting your students—our new interns—set up with the essential tools of the trade. The goal is to establish a professional local Java development environment, which forms the bedrock for all subsequent project work.
We will cover the fundamental components of the Java platform (JDK, JRE, JVM), walk through the installation of the Java Development Kit (JDK 17+), and finish by setting up IntelliJ IDEA, a powerful and widely-used Integrated Development Environment (IDE). By the end of this session, your students will have a complete, verified toolchain, ready to start coding.
1. Understanding the Java Platform: JDK, JRE, and JVM
Before your interns install anything, it's crucial they understand what they are setting up. The Java platform has three core components that work together to enable Java development and execution.
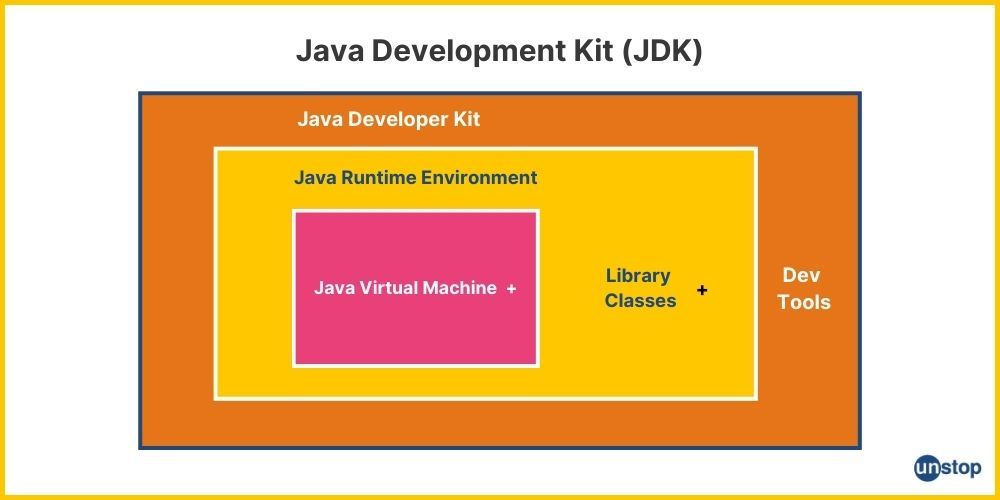
Let's break down these components:
- Java Virtual Machine (JVM): This is the heart of Java's platform independence ("write once, run anywhere"). The JVM is an abstract computing machine that executes compiled Java code (bytecode). Each operating system (Windows, macOS, Linux) has its own JVM implementation, but they all understand the same bytecode.
- Java Runtime Environment (JRE): The JRE is the software package that provides everything needed to run a Java application. It contains the JVM, core Java libraries (like
java.lang,java.util), and other supporting files. If a user only wants to run Java programs, they only need the JRE. - Java Development Kit (JDK): This is the full toolkit for developing Java applications. As the diagram shows, the JDK includes the entire JRE, plus essential development tools. The most important of these is the Java compiler (
javac), which transforms your human-readable Java source code (.javafiles) into executable bytecode (.classfiles) that the JVM can understand.
For your interns, who will be building the warehouse system, the JDK is non-negotiable.
How to Install JDK (on Windows, Mac OS, Ubuntu) and Get Started with Java Programming
To reinforce this concept, have your students read a brief section that clarifies the distinction between JDK and JRE.
In the article, focus on the short section titled "JDK" or "JRE"?. This text succinctly explains why developers need the full JDK.
2. Installing the Java Development Kit (JDK)
Now for the first hands-on task: installing the JDK. The course requires JDK 17 or newer. It's a good practice to use a Long-Term Support (LTS) version, as they receive updates for several years, ensuring stability. JDK 17 and JDK 21 are both excellent LTS choices.
The following video from the Telusko channel provides a great explanation of why choosing an LTS version like JDK 17 is a sound decision for new projects.
#2 Java Development Kit (JDK) Setup
This segment explains the Java release cycle and the significance of LTS versions.
Watch the portion of the video from the discussion on versions to understand why JDK 17 is recommended over a non-LTS version like 19.
Installation and Configuration
The installation process varies slightly depending on the operating system. The following resources provide detailed, step-by-step guides with screenshots. Advise your students to follow the guide that matches their OS.
Download and Install JDK on Windows, Mac and Linux - GeeksforGeeks
This GeeksforGeeks article is a comprehensive guide for installing the JDK and, crucially, for setting up the necessary environment variables.
Have your students follow the guide for their specific operating system: For all users: Start by reading the Java JDK Download section to get the installer from the official Oracle or OpenJDK website. Windows users: Follow the detailed instructions in the section Install JDK on Windows. Pay close attention to Step 2: Setup the Environment Variables, as this is a common point of error. Linux users: Follow the steps under Install JDK on Linux. macOS users: Follow the guide in the section Install JDK on macOS. After installation, every student must complete the final verification step to confirm the setup was successful.
Instructor's Note: Setting the PATH environment variable is critical. It tells the operating system where to find the java and javac executables. If it's not set correctly, students will see a "javac: command not found" error. The Telusko video provides an excellent visual demonstration of how to diagnose and fix this on Windows. It's a valuable troubleshooting reference for your students.
#2 Java Development Kit (JDK) Setup
This video segment clearly demonstrates how to set environment variables on Windows.
If students on Windows encounter issues, direct them to watch the segment from this video, which covers setting the PATH variable.
3. Setting up a Modern IDE: IntelliJ IDEA
While it's possible to write Java code in a simple text editor and compile from the command line, a professional developer uses an Integrated Development Environment (IDE). An IDE combines a code editor, compiler, debugger, and other tools into a single, powerful application that streamlines the development workflow.
For this course, we'll use IntelliJ IDEA Community Edition, a free and incredibly powerful IDE from JetBrains that is a favorite in the industry.
Installing IntelliJ IDEA
The installation process is straightforward. The video below walks through every step, from downloading the installer to creating the first project.
How to Download and Install IntelliJ IDEA and Setup for Java on Windows 10/11 2025
This video provides a complete walkthrough of installing IntelliJ IDEA and configuring it for a Java project.
Ask your students to follow these steps in the video: Download and Install: Watch the first part, which covers downloading and installing IntelliJ IDEA Community Edition. Create a New Project & Configure JDK: The next segment shows how to create a new project. This is a key step. The video demonstrates how IntelliJ can automatically download a JDK if one isn't found. While we've installed it manually for foundational knowledge, this is a powerful convenience feature to be aware of. Students should ensure their manually installed JDK 17 (or 21) is selected here. Run the First Program: Finally, watch how to run the code to confirm everything is working inside the IDE.
During the IntelliJ installation, your students will see a configuration screen with several options.
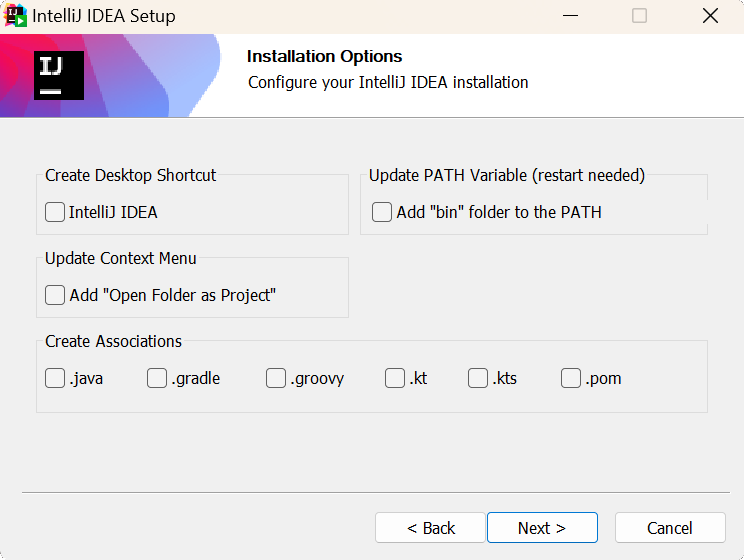
Here are the recommended options for your interns to select:
- Create Desktop Shortcut: Recommended for easy access.
- Update PATH Variable: Check "Add 'bin' folder to the PATH". This allows running IntelliJ from the command line, which can be useful.
- Update Context Menu: "Add 'Open Folder as Project'" is a convenient quality-of-life feature.
- Create Associations: Checking
.javais a good idea, so Java files are associated with IntelliJ.
Conclusion
In this lesson, you've laid the groundwork for your students' entire internship experience. They now understand the roles of the JDK, JRE, and JVM and have successfully installed and configured a complete, professional Java development environment consisting of the Java Development Kit and the IntelliJ IDEA IDE. This setup is not just for an academic exercise; it mirrors the toolchain used by software engineering teams worldwide.
Key Takeaways:
- The JDK is for developing Java code, the JRE is for running it, and the JVM is the engine that executes it.
- Using an LTS version of the JDK (like 17 or 21) is a best practice for project stability.
- Correctly setting environment variables (
PATHandJAVA_HOME) is crucial for the command line and other tools to find the JDK. - An IDE like IntelliJ IDEA drastically improves developer productivity by integrating tools for coding, building, and debugging.
In the next lesson, we will continue the onboarding process by introducing a fundamental tool for team collaboration: Git. Your interns will initialize their first local repository, setting the stage for versioning the Smart Warehouse Operations System project.