In our previous lesson, you mastered a systematic method for finding the base exposure—the precise time needed to render meaningful detail in your print's highlights. This gives us the first crucial anchor point for a successful print. This lesson focuses on establishing the second anchor: the darkest possible black your paper and developer combination can produce.
We will determine the Time for Maximum Black (TMB), also known as the exposure required to achieve maximum density (Dmax). Understanding this limit is a critical calibration step. It defines the "floor" of your tonal range and prevents you from making prints with muddy, blocked-up shadows where detail should be. By knowing both your highlight exposure and your TMB, you define the full operational range of your printing system, a key parameter for creating predictable, high-quality results.
What is Maximum Black (Dmax)?
Every combination of photographic paper and developer has a saturation point. Beyond this point, no amount of additional exposure will make the print any blacker. Think of it like pouring water into a bucket: once the bucket is full, adding more water doesn't increase the volume inside the bucket; it just spills over. In printing, this "spillover" is excess exposure that doesn't deepen the blacks but continues to darken and "crush" your mid-tones and highlights, destroying detail.
The TMB is the minimum exposure time required to reach this point of maximum black. Finding this value is a fundamental calibration of your specific materials.
Performing the TMB Test
The process for finding the TMB involves exposing a test strip to the full, unfiltered light of your enlarger. This is typically done by placing a piece of clear, developed film (like the leader of a roll) in the negative carrier. If you don't have one, an empty negative carrier will also work.
The following video provides an excellent, practical walkthrough of this entire process. You will see not only how to perform the test but also how to critically evaluate the results and verify them—a key part of any good engineering process.
DARKROOM WORKS - TESTING FOR DMAX
This video from the "Shoot Film Like a Boss" channel provides a complete demonstration of testing for Dmax (TMB). The presenter's method, which includes a rigorous verification step, is particularly valuable.
First, watch the introduction from the beginning. The presenter explains the concept of Dmax and why it's important, using the film rebate (the clear part of the negative) as the source for the test. Next, observe the practical setup. He places the film rebate over the paper to ensure he is testing for the absolute maximum light transmission. Watch him create and process the first test strip using linear time increments. This next part is crucial. Watch his evaluation and verification. He initially believes 9 seconds is his TMB, but a second test proves him wrong. This is an excellent example of the importance of not just testing, but verifying your results. Finally, see how he establishes the final TMB and uses it to make a work print, showing how this calibration immediately pays off.
As you saw, the core of the evaluation is finding the first exposure step that is visually indistinguishable from the subsequent, longer-exposure steps. This indicates you have hit the saturation point.
For a more concise textual reference on this procedure, you can review the "Keeping in Contact" article.
Keeping in Contact | The Online Darkroom
This article from The Online Darkroom describes the process in the context of creating contact sheets, but the principle is identical.
Please read the section under the heading "Think of a Number". Focus on the description of making a test strip from a blank negative and the instruction to "look for the first stripe" that is the same black as the next. The advice to dry the strip before final judgment is also important, as prints often appear slightly lighter when dry (a phenomenon known as "dry-down").
A Systematic Approach to Calibration
While the hands-on method is effective, we can approach this calibration with even greater analytical rigor. The following article details a method for testing not just the TMB for a standard print, but for various contrast grades. This gives you a complete characterization of your paper's behavior.
Cat-and-Mouse with Exposure and Contrast - by Sroyon Mukherjee
This article by Sroyon Mukherjee on 35mmc.com offers a highly systematic method for calibrating your printing process. We will return to this article in later lessons, but for now, we will focus on its approach to testing for blacks.
Please read the section titled "Exposure compensation test". Pay close attention to the sub-section "Testing for blacks". The author calls this finding the "B step," which is conceptually identical to our TMB.
The author's "B-test" is exactly what we are discussing. Look at the image from his article, which shows the results of this test for different contrast grades.
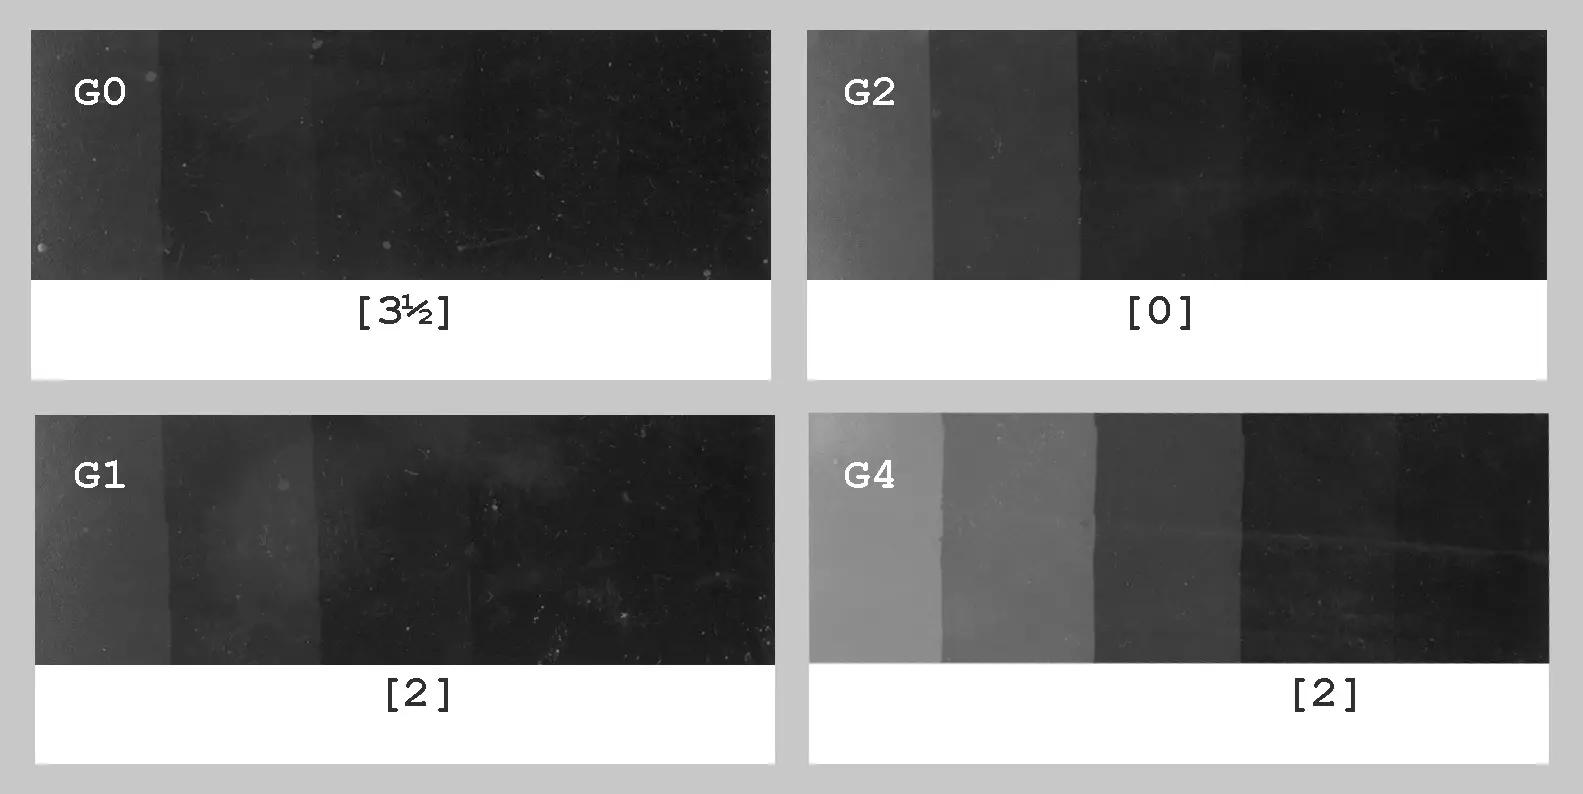
In this image, the author has identified the TMB for each contrast grade. For Grade 2 (G2), the TMB corresponds to the baseline exposure, marked as [0]. For Grade 1 (G1), it requires two additional stops of exposure ([2]) to reach maximum black. This demonstrates that TMB is not a single value; it can change with the contrast filter you use. This is a crucial insight that we will build upon in our next lesson.
Putting It All Together: Defining Your Paper's Range
Now, let's connect this lesson with the previous one. You have two critical pieces of data:
- Base Highlight Exposure: The time needed for just-perceptible detail in the highlights (e.g., 8 seconds).
- Time for Maximum Black (TMB): The time needed for the deepest black (e.g., 32 seconds).
The difference between these two values, measured in f-stops, represents the exposure range of your paper at a given contrast grade. In our example:
- 8 seconds to 16 seconds is +1 stop.
- 16 seconds to 32 seconds is another +1 stop.
- The total range is 2 stops.
This tells you that your paper (at this specific contrast grade, with this developer) can effectively render a scene that has a 2-stop range between its important highlights and shadows. This single number is incredibly powerful. It allows you to assess a negative and predict whether its density range will "fit" onto the paper, moving you from guesswork to a quantitative, engineering-based approach to printing.
Conclusion
You have now calibrated the two most important anchor points of the tonal scale for your printing system. You have a systematic method to determine both the "ceiling" (base highlight exposure) and the "floor" (time for maximum black) for any given print.
Key Takeaways:
- The Time for Maximum Black (TMB) is the minimum exposure needed to produce the deepest possible black for a specific paper-developer combination.
- TMB is found by making a test strip using a clear negative or empty carrier and identifying the point where increasing exposure no longer increases black density.
- Verifying your TMB with a two-step test (e.g., exposing one half for your presumed TMB and the other for double the time) is a robust way to confirm your result.
- The difference in f-stops between your base highlight exposure and your TMB defines the usable exposure range of your paper.
Next Lesson Preview:
We've seen a hint that contrast filters can change the TMB. In the next lesson, we will delve into why. You will learn how multigrade papers work, exploring the dual-emulsion technology that allows different colors of light from the enlarger to control the print's contrast, effectively stretching or compressing the tonal range to fit the specific needs of your negative.