Welcome to the first lesson of our module on linear data structures. In our previous module, we concluded by analyzing the trade-offs between arrays and hash maps. A key takeaway was that arrays, due to their contiguous memory layout, are inefficient for insertions or deletions in the middle of the sequence, requiring an shift of elements.
Today, we introduce the singly linked list, a fundamental data structure designed to overcome precisely that limitation. Instead of a continuous block of memory, a linked list is a chain of nodes scattered throughout memory, connected by pointers. This lesson will focus on implementing the essential operations for a singly linked list in Python: insertion, deletion, and reversal. Mastering these pointer manipulation techniques is crucial for tackling a wide range of interview problems.
The Anatomy of a Linked List
An array lets you access any element instantly if you know its index, but changing the array's structure is costly. A linked list makes the opposite trade-off. It excels at structural changes (insertions and deletions) but requires sequential traversal to access elements.
This fundamental difference arises from its structure. A linked list is composed of nodes. Each node contains two pieces of information:
- Data: The actual value being stored.
- Next: A reference (or "pointer") to the next node in the sequence. The final node's
nextpointer isNone(ornull), signaling the end of the list.
The video below provides an excellent conceptual overview, contrasting array inefficiencies with the flexibility of linked lists.
Linked List - Data Structures & Algorithms Tutorials in Python #4
This video from the channel codebasics begins by illustrating the performance issues with array insertions and then introduces the linked list as an elegant solution.
Watch the initial segment from the beginning. Pay close attention to the visualization of how memory is re-allocated and copied for an array, and then see how linked lists avoid this by simply redirecting pointers.
As the video explains, this structure gives linked lists their characteristic performance:
- Access by index/value: , because you must traverse the list from the
head. - Insertion/deletion at the beginning: , as it only requires updating the
headpointer. - Insertion/deletion at the end/middle: , because you must first traverse to the desired position.
Building a Linked List in Python
Let's translate this concept into Python code. Your experience with object-oriented programming in Django will be helpful here, as we'll define classes to represent the list's structure.
We'll start with the Node, the basic building block.
Linked list python implementation and operations guide
This article from Purple Tutor provides a clean, standard implementation of a Node class in Python.
Please read the section titled "Node class implementation". This will show you the simple class structure we will use as our foundation.
Here is the essential code for our Node and SinglyLinkedList classes. We will build upon the SinglyLinkedList class by adding methods for its core operations.
class Node:
    """An object for storing a single node of a linked list."""
    def __init__(self, data):
        self.data = data
        self.next = None

class SinglyLinkedList:
    """A class for the linked list itself."""
    def __init__(self):
        self.head = None


    # We will add other methods like print, insert, delete, etc. here.
Insertion Operations
Insertion involves creating a new node and carefully rearranging pointers to place it correctly within the list.
1. Inserting at the Beginning (Prepend)
This is the most efficient insertion operation in a singly linked list.
- Create a new node with the given data.
- Set the
nextpointer of the new node to point to the currentheadof the list. - Update the list's
headto be the new node.
This sequence of pointer updates takes constant time, .
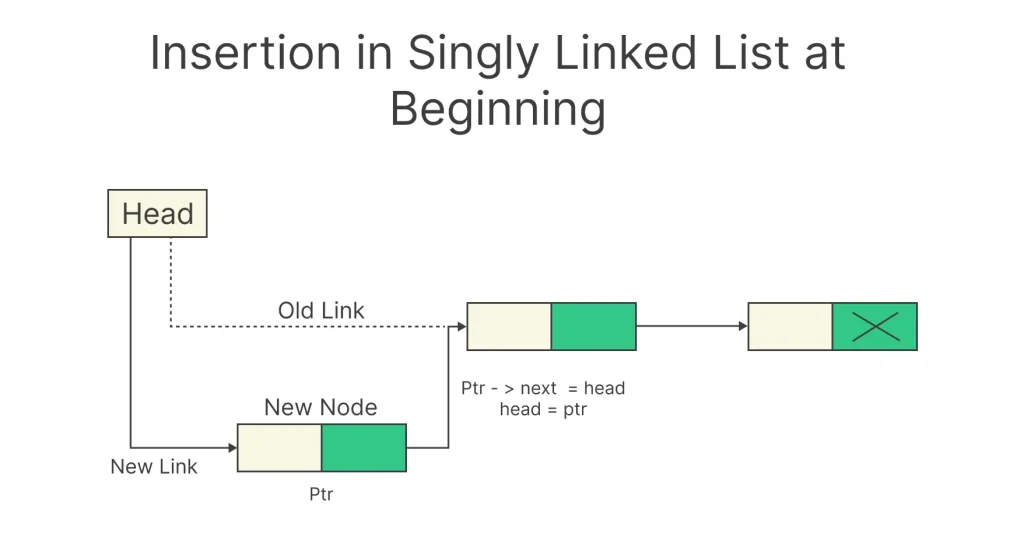
The following video demonstrates a practical implementation of this method.
Linked List - Data Structures & Algorithms Tutorials in Python #4
The codebasics video now moves from theory to practice, implementing the Node and LinkedList classes and then the insert_at_beginning method.
Watch the segment from implementation to testing. You'll see the Node and LinkedList classes being set up, followed by a line-by-line coding of insert_at_beginning and a helper print function to verify the result.
2. Inserting at the End (Append)
To insert at the end, you must first traverse the list to find the last node.
- If the list is empty, the new node simply becomes the
head. - If the list is not empty, start at the
headand follow thenextpointers until you reach the last node (the one whosenextisNone). - Set the
nextpointer of this last node to the new node.
Because this requires traversing the entire list, its time complexity is .
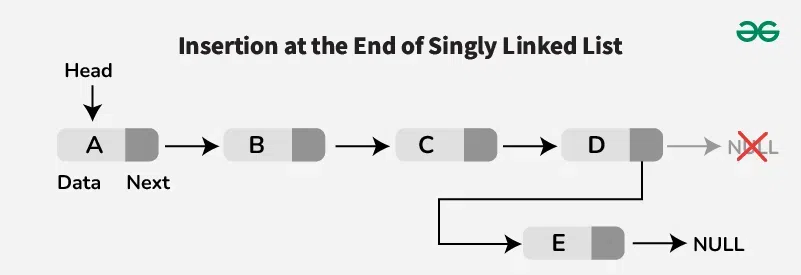
Linked List - Data Structures & Algorithms Tutorials in Python #4
Continuing with the same video, the presenter now implements the insert_at_end method.
Watch the explanation and implementation from inserting at end. Notice the while itr.next: loop, which is the key to traversing to the final node.
3. Inserting at a Specific Position
This is a generalization of the previous two cases and is also an operation.
- Handle edge cases: check for an invalid index or insertion at the beginning (index 0).
- Traverse the list to the node just before the target position (i.e., to index
i-1). - Create the new node.
- Set the new node's
nextpointer to thenextof the node ati-1. - Update the
nextpointer of the node ati-1to point to the new node.
Linked List - Data Structures & Algorithms Tutorials in Python #4
Finally, the video covers the insert_at method, which handles insertion at any valid index.
Watch the implementation of insert_at from this segment. The logic for stopping at index - 1 is critical to understand.
Deletion Operation
Deleting a node also requires careful pointer manipulation to "bypass" the node being removed. To delete a node at index i, you must traverse to the node at i-1 and set its next pointer to the node at i+1 (which is node_i.next).
Key steps for deleting a node at a given index:
- Handle edge cases: invalid index or deleting the head node (index 0).
- Traverse to the node at index
i-1. - Update the
nextpointer of this node tocurrent.next.next, effectively unlinking the node at indexi.
Python's garbage collector will automatically reclaim the memory of the unlinked node.
Linked List - Data Structures & Algorithms Tutorials in Python #4
The codebasics video provides a great walkthrough for implementing a remove_at method, including necessary validation.
Focus on the implementation of get_length and remove_at between these timestamps. The logic for validating the index and handling the special case of removing the head is very important for a robust solution.
Reversal: The Classic Interview Problem
Reversing a singly linked list is a quintessential coding interview question. It tests your grasp of pointer manipulation under pressure. You need to be ableto solve it both iteratively and recursively.
1. Iterative Reversal
The iterative approach is generally preferred in an interview setting because it's more space-efficient. It uses a three-pointer technique to walk down the list and reverse the links one by one.
prev: Tracks the previous node, which will become thenextnode forcurr. InitiallyNone.curr: The current node being processed. Initially thehead.temp_next: A temporary variable to store thenextnode before we overwritecurr.next.
The process within the loop is:
temp_next = curr.next(Save the next node)curr.next = prev(Reverse the pointer)prev = curr(Advance theprevpointer)curr = temp_next(Advance thecurrpointer)
The loop continues until curr becomes None. The new head of the reversed list will be prev.
Reverse Linked List - Iterative AND Recursive - Leetcode 206 - Python
The channel NeetCode offers one of the clearest explanations available for reversing a linked list. This video covers both the iterative and recursive methods.
First, watch the walkthrough of the iterative solution. The visualization of the prev and curr pointers moving down the list is exceptionally helpful for building intuition.
2. Recursive Reversal
The recursive solution can be more concise but is less intuitive for many. It also uses more memory due to the function call stack. The core idea is to solve a subproblem:
- Base Case: If the list is empty or has only one node, it's already reversed. Return the head.
- Recursive Step:
- Recursively call the function on the rest of the list (
head.next). This will reverse the entire tail of the list and return its new head (new_head). - Now,
headis a single node pointing to the last node of the original list. The reversed tail is disconnected. - To connect
headto the end of the reversed tail, we sethead.next.next = head. - Finally, we must break the original forward link by setting
head.next = None. - Return
new_headup the call stack.
- Recursively call the function on the rest of the list (
Reverse Linked List - Iterative AND Recursive - Leetcode 206 - Python
Now, watch the second part of the NeetCode video explaining the recursive approach.
Watch from this point to understand the logic of solving the subproblem and then re-attaching the current node. The concept of head.next.next = head is the most crucial part.
To solidify these two approaches, the following article provides a direct comparison.
Reverse a Linked List: Iterative & Recursive Tips
This blog post by Sean Coughlin provides Python code for both solutions and a helpful table comparing their trade-offs.
Read the section "Understanding the Solution" which gives a quick overview of the complexity. Examine the code for the recursive and iterative solutions. Finally, study the comparison table. This summarizes the space complexity, performance, and use cases you'd be expected to discuss in an interview.
Conclusion
In this lesson, we took a deep dive into the implementation of singly linked lists, one of the most fundamental data structures. You learned how its node-based, pointer-linked structure provides flexibility for insertions and deletions at the cost of slower, sequential access compared to an array.
Key Takeaways:
- A singly linked list consists of nodes, each containing data and a
nextpointer to the subsequent node. - Insertion and deletion at the beginning are operations, as they only require updating the
headpointer. - Operations in the middle or at the end are because they require traversing the list from the head.
- Reversing a linked list is a classic problem with two main solutions:
- Iterative: Uses a three-pointer approach (
prev,curr,temp_next), has space complexity, and is generally preferred. - Recursive: Solves the problem by reversing a sub-list and re-attaching the head. It is often more concise but has space complexity due to the call stack.
- Iterative: Uses a three-pointer approach (
You now have the foundational skills for manipulating linked lists. In our next lesson, we will build upon this by exploring the fast and slow pointer technique, a powerful pattern for solving common linked list problems like cycle detection and finding the middle element.