Introduction
Welcome back! In our last lesson, you did a fantastic job defining the Node and LinkedList classes and manually building your first linked list. You learned how to traverse the list by following the next pointers from the head to the end.
While building a list by hand is a great way to understand the structure, it's not practical. Today, we'll make our LinkedList class truly useful. Your learning outcome for this lesson is to implement insertion and deletion operations for a singly linked list. We will write methods to add and remove nodes programmatically, which is a fundamental skill for working with this data structure and a common topic in technical interviews.
We'll build up our LinkedList class step-by-step, adding methods for:
- Inserting a node at the beginning, end, and a specific index.
- Removing a node from a specific index.
1. The Starting Point: Our LinkedList Class
Let's start with the code we developed in the previous lesson. This will be our foundation for adding the new methods.
class Node:
    """An object for storing a single node of a linked list."""
    def __init__(self, data):
        self.data = data
        self.next = None

class LinkedList:
    """Manages the linked list operations."""
    def __init__(self):


        # An empty list starts with no head node
        self.head = None

    def print_list(self):
        """Traverses and prints the data of each node."""
        current_node = self.head
        ll_string = ""
        while current_node:
            ll_string += str(current_node.data) + " -> "
            current_node = current_node.next
        ll_string += "None"
        print(ll_string)


# Example from previous lesson:
llist = LinkedList()
llist.head = Node("A")
node_b = Node("B")
node_c = Node("C")

llist.head.next = node_b
node_b.next = node_c

print("Original manually-built list:")
llist.print_list()
2. Insertion Operations
Now, let's add methods to our LinkedList class to insert new nodes without having to manipulate the .next attributes manually.
2.1. Inserting at the Beginning
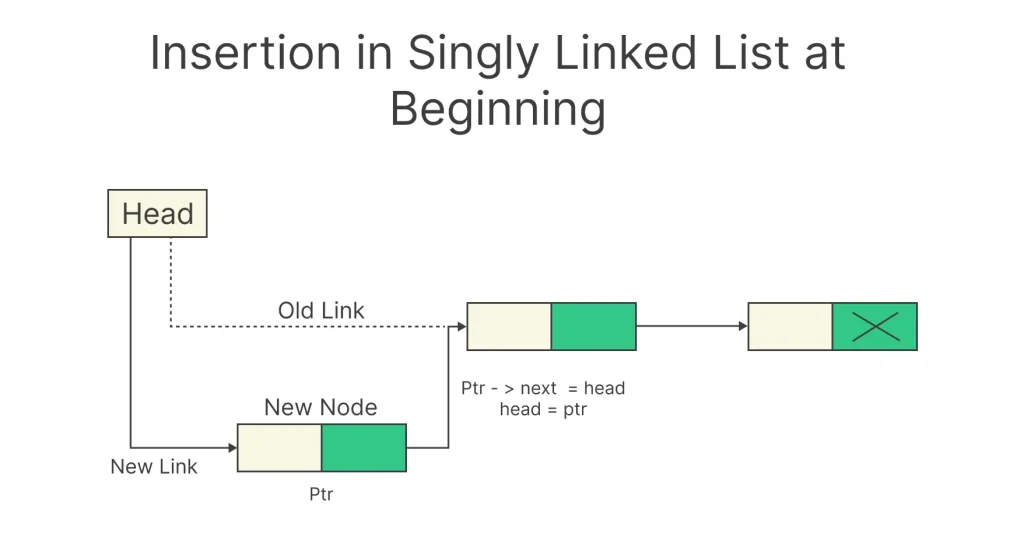
This is the most efficient insertion operation. To add a new node at the start, we only need to perform two steps:
- Make the new node's
nextpointer point to the currentheadof the list. - Update the list's
headto be the new node.
This process is visualized clearly in the following image.
The video below walks through the implementation of this method.
Linked List - Data Structures & Algorithms Tutorials in Python #4
Let's watch a segment from the video 'Linked List - Data Structures & Algorithms' by codebasics. It provides a clear demonstration of implementing the insert_at_beginning method.
Watch from 08:39 to 09:36. Focus on how the new_node is created and how the self.head attribute is updated.
Here is the code to add to your LinkedList class:
# Add this method inside the LinkedList class
def insert_at_beginning(self, data):


    # 1. Create a new node with the given data
    new_node = Node(data)


    # 2. Set the new node's next pointer to the current head
    new_node.next = self.head


    # 3. Update the list's head to be the new node
    self.head = new_node
2.2. Inserting at the End
To insert a node at the end, we need to find the last node in the list first. This involves traversing the list until we find a node whose next pointer is None.
There are two scenarios to consider:
- If the list is empty: The new node simply becomes the
head. - If the list is not empty: We traverse to the last node and set its
nextpointer to the new node.

The next video segment demonstrates how to implement this.
Linked List - Data Structures & Algorithms Tutorials in Python #4
Continuing with the codebasics video, let's see how to implement insert_at_end. Pay attention to the special check for an empty list and the while loop used for traversal.
Watch from 12:21 to 13:53. Observe how the code handles an empty list (self.head is None) and then traverses the list using while itr.next to find the last element.
Let's add the insert_at_end method to our LinkedList class.
# Add this method inside the LinkedList class
def insert_at_end(self, data):
    new_node = Node(data)


    # 1. If the list is empty, the new node is the head
    if self.head is None:
        self.head = new_node
        return


    # 2. Otherwise, traverse to the last node
    last_node = self.head
    while last_node.next:
        last_node = last_node.next


    # 3. Set the last node's next pointer to the new node
    last_node.next = new_node
3. Deletion and Positional Insertion
For more advanced operations like deleting a node or inserting one in the middle, we need to know the list's length to validate the target index. Let's add a helper method for that first.
3.1. Helper Method: get_length
This method will simply iterate through the list and count the nodes.
# Add this method inside the LinkedList class
def get_length(self):
    count = 0
    current_node = self.head
    while current_node:
        count += 1
        current_node = current_node.next
    return count
3.2. Deleting a Node at a Specific Index
To delete a node, we need to find the node before it and "bypass" the node we want to remove. For example, to remove B from A -> B -> C, we need to change A's next pointer to point directly to C.
The logic involves these steps:
- Handle edge cases: an invalid index (less than 0 or greater than or equal to the length) or an empty list.
- Handle a special case: if the index is 0, we are deleting the
head. We just need to move theheadpointer to the next node. - For any other index, traverse the list until you reach the node just before the one you want to delete.
- Update the previous node's
nextpointer to skip over the target node.
This video segment provides a detailed walkthrough of implementing a remove_at method.
Linked List - Data Structures & Algorithms Tutorials in Python #4
Now, let's learn how to remove a node from a specific index. This segment from the codebasics video explains the logic, including index validation and handling the removal of the head.
Watch from 16:33 to 20:23. The key idea here is stopping at the node before the one you want to remove (at index - 1). Focus on how the pointers are rewired: itr.next = itr.next.next.
Here's the implementation for the remove_at method.
# Add this method inside the LinkedList class
def remove_at(self, index):


    # 1. Handle invalid index
    if index < 0 or index >= self.get_length():
        print("Error: Invalid index")
        return


    # 2. Handle removing the head node
    if index == 0:
        self.head = self.head.next
        return


    # 3. Traverse to the node *before* the one to be removed
    count = 0
    current_node = self.head
    while current_node:
        if count == index - 1:


            # Bypass the node at the target index
            current_node.next = current_node.next.next
            break
        current_node = current_node.next
        count += 1
3.3. Inserting a Node at a Specific Index
This operation is very similar to deletion. We traverse to the node before the target index and rewire the pointers to insert the new node.
The logic:
- Handle edge cases: invalid index or index 0 (for which we can just use our
insert_at_beginningmethod). - Traverse to the node at
index - 1. - Set the new node's
nextpointer to point to thenextnode of our current position. - Set the current node's
nextpointer to point to the new node.
Linked List - Data Structures & Algorithms Tutorials in Python #4
Finally, let's look at insert_at. This is the most general insertion method. The logic is very similar to remove_at, as you'll see.
Watch from 21:22 to 24:02. Again, note the traversal to index - 1 and the two-step pointer update to 'wedge' the new node into the list.
Let's add the insert_at method.
# Add this method inside the LinkedList class
def insert_at(self, index, data):
    if index < 0 or index > self.get_length():
        print("Error: Invalid index")
        return

    if index == 0:
        self.insert_at_beginning(data)
        return

    count = 0
    current_node = self.head
    while current_node:
        if count == index - 1:
            new_node = Node(data)
            new_node.next = current_node.next
            current_node.next = new_node
            break
        current_node = current_node.next
        count += 1
4. Your Turn: Putting It All Together
You've now learned how to implement all the essential insertion and deletion methods for a linked list. Let's put them to the test.
Instructions:
- Copy all the methods we've written (
insert_at_beginning,insert_at_end,get_length,remove_at,insert_at) into yourLinkedListclass. - Run the code block below.
- Predict the output at each
print_list()call before you run it, to check your understanding of how the list is changing.
# Create an instance of your completed LinkedList class
my_ll = LinkedList()


# Build the list
my_ll.insert_at_end("apples")
my_ll.insert_at_end("bananas")
my_ll.insert_at_end("cherries")
print("After inserting at end:")
my_ll.print_list()  # Expected: apples -> bananas -> cherries -> None


# Insert at the beginning
my_ll.insert_at_beginning("apricots")
print("\nAfter inserting at beginning:")
my_ll.print_list()  # What do you expect here?


# Insert at a specific index
my_ll.insert_at(2, "blueberries")
print("\nAfter inserting at index 2:")
my_ll.print_list()  # And here?


# Remove a node
my_ll.remove_at(3)
print("\nAfter removing node at index 3:")
my_ll.print_list()  # What's the final list?
This exercise demonstrates the power and flexibility of your new methods. You can now modify the list from any position without needing to perform manual pointer assignments.
For a complete reference, you can look at the "Linked list operations in Python" section of the Programiz article, which contains a full LinkedList class with similar methods.
Linked List Operations: Traverse, Insert and Delete - Programiz
This article from Programiz provides a complete Python implementation of a LinkedList class, which is a great reference to consolidate what we've learned.
Review the code block under the heading 'Linked list operations in Python'. Compare their implementation of methods like insertAtBeginning, insertAtEnd, and deleteNode with what we've written today. Note that their deleteNode takes a position, just like our remove_at.
Conclusion
Excellent work today! You have transformed your basic LinkedList class into a powerful tool by implementing methods for insertion and deletion. This is a huge step forward in your understanding of data structures.
Key Takeaways:
- Insertion at the beginning is very fast (a constant number of steps) because you only need to update the
head. - Insertion at the end requires traversing the entire list to find the last node.
- Insertion and deletion at a specific index also require traversal, and the key is to stop at the node before the target position to rewire the
nextpointers. - Handling edge cases like an empty list, an invalid index, or operating on the
headnode is crucial for robust code.
Preview of the Next Lesson:
We've mentioned that some operations are "fast" and others require "traversing the entire list." In the next lesson, we will formalize this analysis. You will learn to analyze the time complexity of linked list operations versus list/array operations. This will help you understand the trade-offs between these two fundamental data structures and decide which one is better for a given problem.