Hello! Welcome back.
In our last lesson, you successfully opened your Binance Futures account and transferred a starting balance to it. You are now set up and ready to move from preparation to planning. As a trader, one of the most critical skills you can develop is risk management, and that begins before you ever place an order.
Today's lesson focuses on a vital tool for this planning phase: the Binance Futures calculator. Our goal is to learn how to use the Binance Futures calculator to assess potential P&L and liquidation price. Think of it as your flight simulator; it allows you to test out trade ideas and understand the potential outcomes—both good and bad—without risking any capital. By the end of this lesson, you'll be able to confidently plan a trade by calculating its potential profit and, more importantly, its primary risk.
1. Finding and Opening the Calculator
First things first, let's locate the tool. The calculator is conveniently placed within the Futures trading interface on both the Binance website and the mobile app.
How To Use The Binance Futures Trading Calculator (Complete Guide For Beginners)
This short clip from the video 'How To Use The Binance Futures Trading Calculator' by Femi Olaniyan shows you exactly where to find the calculator icon on both the desktop and mobile versions of Binance.
Watch from 01:17 to 02:10. The video clearly points out the calculator icon on the web interface and then shows you where to tap on the mobile app to access it.
Once you open it, you'll see several tabs: PNL, Target Price, Liquidation Price, Max Open, and Open Price. For today, we will master the two most important ones for planning a single trade: PNL (Profit and Loss) and Liquidation Price.
2. Calculating Potential Profit and Loss (P&L)
The P&L tab lets you answer the question: "If I open this trade and the price moves to my target, how much will I make or lose?" It's a great way to understand the potential return on a trade idea.
To do this, you need to provide a few key pieces of information:
- Leverage: The multiplier for your trade.
- Entry Price: The price at which you plan to buy (for a long) or sell (for a short).
- Exit Price: The price at which you plan to sell (for a long) or buy back (for a short).
- Quantity: The total size of your position in USDT (Your Margin * Leverage).
The calculator will then show you:
- Initial Margin: The actual amount of money from your wallet needed to open the position.
- P&L: The estimated profit or loss in USDT.
- ROE (Return on Equity): The percentage return on your initial margin.

The following video provides a clear walkthrough.
Binance Futures Calculator... Complete Tutorial On How To Use Binance Calculator In Futures Trading
The video 'Binance Futures Calculator... Complete Tutorial' by Soheil PKO offers a concise demonstration of how to use the P&L tab for both a profitable (long) and losing trade scenario.
Watch from 00:30 to 02:20. Pay close attention to how the Entry Price, Exit Price, and Quantity are used to calculate the P&L and ROE. Notice what happens to the P&L when the exit price is lower than the entry price for a long position.
Your Turn: Plan a "Long" Trade
Now, let's apply this. Go to your Binance Futures trading screen and open the calculator.
- Select the PNL tab and the Long option.
- Set the leverage slider to 20x.
- Let's imagine you want to buy BTC when it hits $65,000. Enter this as your
Entry Price. - You believe the price will go up to $67,000. Enter this as your
Exit Price. - If you transferred, say, $25 to your futures wallet for practice, your
Quantity(Position Size) would be 20x your margin. Let's plan to use $20 as margin, so enter 400 in theQuantity (USDT)field (since 20 * 20 = 400). - Click Calculate.
What does the calculator show for your Initial Margin, P&L, and ROE%? You've just simulated a potential trade without any risk.
3. Calculating Your Liquidation Price
This is the most critical function of the calculator for risk management. It answers the question: "If the trade goes against me, at what price will Binance automatically close my position and I lose my margin?" Knowing this price is non-negotiable.
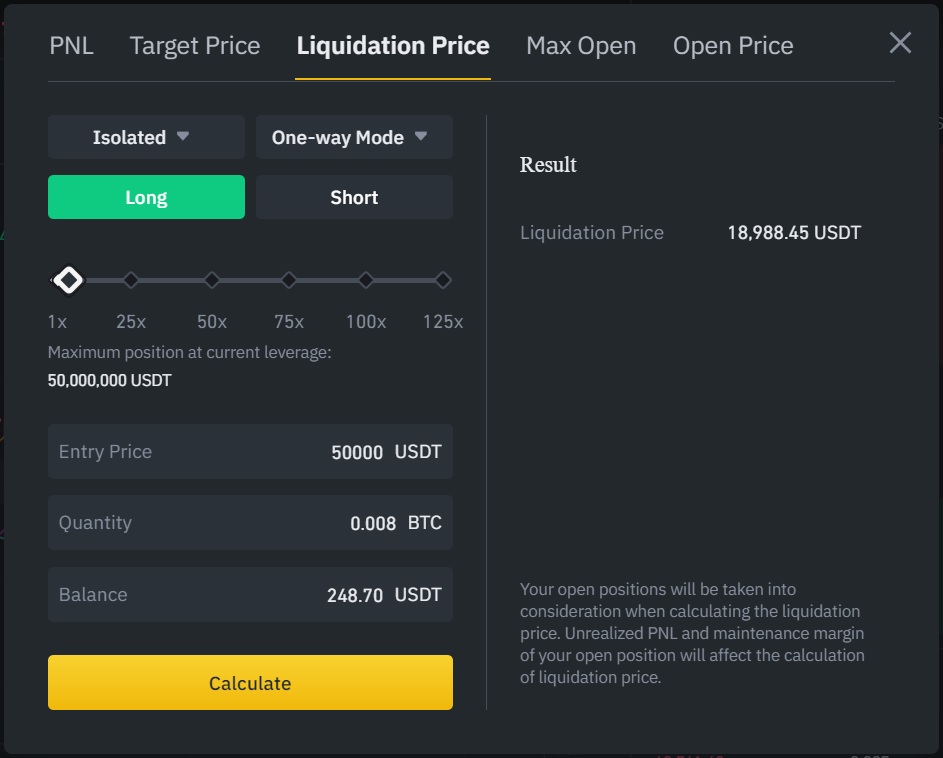
For this calculation, you'll need:
- Margin Mode: Choose between Cross and Isolated. For now, as a beginner, it's best to always use Isolated margin. This limits your risk to only the margin you assign to that specific trade, rather than your entire futures wallet balance.
- Leverage, Entry Price, Quantity: Same as before.
- Wallet Balance: The total amount of USDT you have in your USDⓈ-M Futures wallet.
Let's see this in action.
Binance Futures Calculator... Complete Tutorial On How To Use Binance Calculator In Futures Trading
We'll return to the 'Binance Futures Calculator... Complete Tutorial' video to see how the Liquidation Price tab works.
Watch from 03:24 to 04:55. The video explains how to input your trade details to find the liquidation price. It also touches on the difference between Cross and Isolated margin, reinforcing why Isolated is a safer starting point.
Your Turn: Assess the Risk
Now, let's calculate the risk for the same trade we planned above.
- Select the Liquidation Price tab.
- Choose Isolated margin mode and the Long option.
- Set the leverage to 20x.
- Enter the same
Entry Priceof $65,000 andQuantityof 400 USDT. - In the
Balancefield, enter the actual total balance of your USDⓈ-M Futures wallet (e.g., $25). - Click Calculate.
The price it shows is your point of liquidation. If the price of Bitcoin drops to this level, your position will be closed, and you will lose the initial margin ($20) you committed to the trade. By knowing this price, you can decide if the risk is acceptable before you enter.
Conclusion
Well done. You've just learned how to use one of the most powerful risk management tools available on Binance. Planning a trade is just as important as executing it, and the calculator is central to that process.
Key Takeaways:
- The Binance Futures calculator is an essential tool for planning trades and managing risk.
- The P&L tab helps you estimate potential profit, loss, and return on equity (ROE) for a trade idea.
- The Liquidation Price tab is critical for understanding your risk. It tells you the exact price point at which your leveraged position will be automatically closed.
- For beginners, using Isolated Margin mode is recommended to contain risk to a single position.
Always use the calculator to model your trades before you place them. It's a professional habit that will serve you well throughout your trading journey.
What's Next?
You've opened your account, funded it, and now you know how to plan a trade and assess its risk. The final step in this introductory module is to put it all together. In our next lesson, we will walk through the process of placing your very first practice trades. The learning outcome will be to place a leveraged long (buy) and short (sell) futures position.