Hello! Welcome to the seventh lesson in our module on Professional Python for Data Engineering.
In our last lesson, we built powerful decorators for logging and performance monitoring and used profiling tools to find bottlenecks. In doing so, we relied on third-party libraries like loguru and tenacity. As our projects grow more complex, they will depend on an increasing number of these external packages, each with its own specific version.
This raises a critical question: how do we manage these dependencies to ensure our code works reliably everywhere—on our machine, on a colleague's machine, and in production?
This lesson addresses the learning outcome: Manage project dependencies and environments using pip and virtual environments.
We will tackle the problem of "dependency hell," where different projects require conflicting versions of the same library. You'll learn how to create isolated, reproducible environments for each project. This practice is a cornerstone of professional software development and is non-negotiable for building robust data pipelines.
1. The Core Problem: Dependency Conflicts
Imagine you're working on two data projects:
- Project A: An older, stable pipeline that requires
pandas==1.5.3. - Project B: A new project using features only available in
pandas==2.2.1.
If you install these libraries on your main system (globally), you can only have one version of pandas at a time. Installing version 2.2.1 will break Project A, and downgrading to 1.5.3 will break Project B. This is a classic dependency conflict.
Virtual environments solve this by creating an isolated "sandbox" for each project. Each sandbox has its own Python interpreter and its own set of installed libraries, completely separate from all other projects.
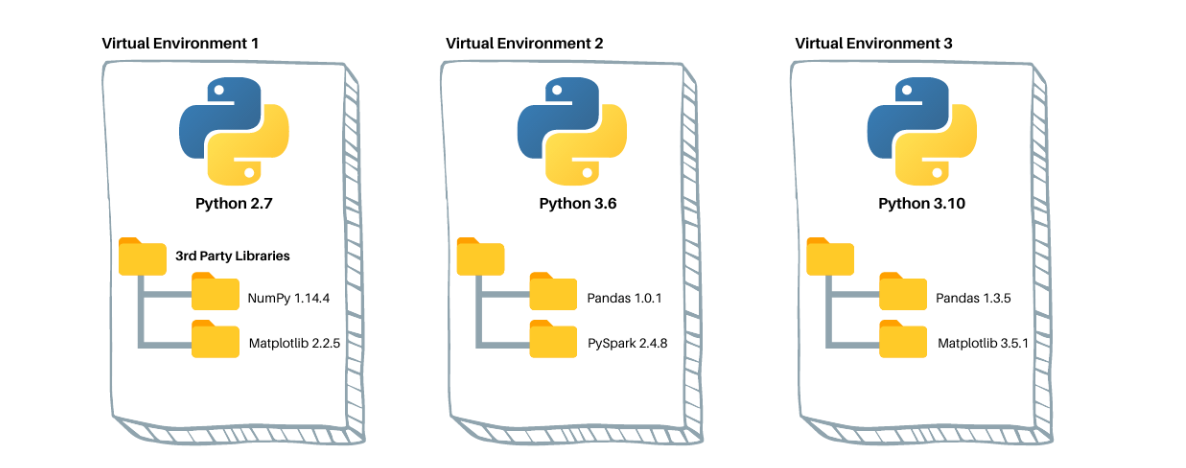
To understand the problems that virtual environments solve in more detail, let's start with a short article.
Python Virtual Environments: A Primer
The article 'Python Virtual Environments: A Primer' from Real Python clearly explains the common issues that arise when dependencies are not isolated. Understanding these problems is key to appreciating the solution.
Please read the section titled 'Why Do You Need Virtual Environments?'. Focus on the four main problems it outlines: system pollution, dependency conflicts, reproducibility issues, and installation privilege lockouts.
2. Creating and Using a Virtual Environment
Now that we understand the "why," let's get hands-on with the "how." Python has a built-in module called venv that is the standard tool for creating virtual environments.
The workflow is straightforward and involves four key steps:
- Create the environment.
- Activate it.
- Work within it (e.g., install packages, run code).
- Deactivate it when you're done.
The following video provides a concise overview of this entire process.
The Importance of Virtual Environments for Data Engineers
The video 'The Importance of Virtual Environments for Data Engineers' from Kahan Data Solutions provides a great demonstration of the venv workflow from a data engineering perspective.
Watch the segment from 02:57 to 06:06. It will walk you through: Creating a new virtual environment using python -m venv <env_name>. Activating it on macOS/Linux and mentioning the difference for Windows. Installing a package (dbt-snowflake) inside the environment and confirming it's isolated. Deactivating the environment.
Let's break down those commands.
Step 1: Create the Environment
In your project's root directory, run the following command in your terminal:
# For macOS/Linux
python3 -m venv venv

# For Windows
python -m venv venv
This command creates a new directory named venv (a common convention) which contains a copy of the Python interpreter and a site-packages directory for your project's libraries.
Step 2: Activate the Environment
Activating the environment modifies your terminal session to use the Python interpreter and tools from inside the venv directory.
# For macOS/Linux (using bash/zsh)
source venv/bin/activate

# For Windows (using Command Prompt)
venv\Scripts\activate

# For Windows (using PowerShell)
venv\Scripts\Activate.ps1
After activation, your terminal prompt will typically change to show the name of the environment, like (venv). This is your visual cue that the virtual environment is active.
Step 3: Install Packages with pip
With the environment active, you can now use pip, Python's package installer. Any packages you install will go into your environment's isolated site-packages directory.
# Install the latest version of the requests library
pip install requests

# Install a specific version of pandas
pip install pandas==2.2.1

# View the packages installed in the current environment
pip list
If you run pip list, you'll see only the packages you've just installed (and their dependencies), not the packages installed globally or in other projects.
Step 4: Deactivate the Environment
When you're finished working on your project, you can deactivate the environment.
deactivate
Your terminal prompt will return to normal, and running python or pip will now use your system's global Python installation again.
3. Ensuring Reproducibility with requirements.txt
Creating an isolated environment is only half the battle. To collaborate with others or deploy your application, you need a way to reproduce that same environment elsewhere. You can't just share the venv folder—it can be large and contains paths specific to your machine.
The standard solution is a file named requirements.txt. This file is a simple list of all the packages and their exact versions needed for your project.
Freezing Your Dependencies
To generate this file, activate your virtual environment and run the pip freeze command, redirecting its output into a file:
pip freeze > requirements.txt
If you open requirements.txt, you'll see something like this:
certifi==2024.7.4
charset-normalizer==3.3.2
idna==3.7
numpy==1.26.4
pandas==2.2.1
python-dateutil==2.9.0.post0
pytz==2024.1
requests==2.32.3
six==1.16.0
tzdata==2024.1
urllib3==2.2.1
This file is the exact blueprint of your environment. It should be committed to your version control system (like Git) along with your source code.
Recreating an Environment
Now, when a colleague checks out your project, they can create an identical environment with just a few commands:
# 1. Create a fresh virtual environment
python -m venv venv

# 2. Activate it
source venv/bin/activate

# 3. Install all packages from the requirements file
pip install -r requirements.txt
The -r flag tells pip to install all the packages listed in the specified file. This simple workflow is fundamental to collaborative and professional Python development.
Let's watch a video that puts this all together.
The Importance of Virtual Environments for Data Engineers
The same data engineering video from Kahan Data Solutions provides an excellent demonstration of the pip freeze and pip install -r requirements.txt workflow.
Watch from 06:06 to the end. The video shows you how to: Generate a requirements.txt file from an active environment. Create a brand new, empty environment. Use the requirements.txt file to perfectly replicate the first environment's dependencies in the new one.
4. Best Practices Checklist
Here is a summary of best practices to follow when working with virtual environments.
- ✅ One Environment Per Project: Always create a new virtual environment for each new project.
- ✅ Use
.gitignore: Add the name of your virtual environment directory (e.g.,venv/) to your project's.gitignorefile. You should never commit the virtual environment itself to version control. - ✅ Activate Before Working: Always activate the correct environment before installing packages or running your code.
- ✅ Freeze Dependencies: Keep your
requirements.txtfile up-to-date. After youpip installorpip uninstalla package, immediately runpip freeze > requirements.txtto record the change. - ✅ Treat Environments as Disposable: You should be able to delete your
venvdirectory and recreate it perfectly at any time using yourrequirements.txtfile.
Test your understanding!
You've just cloned a data pipeline project from your company's GitHub repository. The project contains a src/ directory with the Python code and a requirements.txt file. There is no venv directory.
What are the three essential command-line steps you need to take before you can run the project's main script (src/run_pipeline.py)?
Show answer
- Create a virtual environment:
python -m venv venv - Activate the virtual environment:
source venv/bin/activate(or the equivalent for your operating system). - Install the project's dependencies:
pip install -r requirements.txt
After these steps, you can confidently run the script with python src/run_pipeline.py.
Conclusion
Congratulations! You now have a solid grasp of one of the most fundamental practices in professional Python development. Managing dependencies and environments correctly is essential for building reliable, reproducible, and collaborative data engineering projects.
Key Takeaways:
- Virtual Environments (
venv) are isolated sandboxes that prevent dependency conflicts between projects. - The standard workflow is to create, activate, install packages using
pip, and then deactivate. - The
requirements.txtfile is the blueprint of your environment, allowing you or others to perfectly reproduce it. - Use
pip freeze > requirements.txtto save your environment's state andpip install -r requirements.txtto restore it. - Always add your virtual environment directory to
.gitignoreand treat it as a disposable asset.
Preview of the Next Lesson:
Now that we have the tools to create isolated and reproducible project setups, we can focus on ensuring the quality and correctness of our code. In our next lesson, we will "Write and run unit tests for data processing logic using pytest." You'll learn how to write automated tests that verify your functions behave as expected, a critical skill for building data pipelines you can trust.