¡Hola! Welcome back to the course.
In our last lesson, we established a crucial security habit: securely storing API keys in a .env file and keeping them out of version control. This protects our credentials, which is the first step in responsibly interacting with external services.
Now, we're ready to build the mechanism that will actually use those keys to communicate with APIs over the internet. This brings us to a fundamental concept in modern web development: asynchronous programming. When you build AI agents, almost everything they do—querying an AI model, fetching data from a website, or updating a spreadsheet—involves a network request. These requests don't complete instantly.
This lesson is designed to teach you how to handle these asynchronous operations in Node.js using the async/await syntax with the fetch API. Mastering this will give you the power to make your programs perform tasks that rely on external data without freezing up, which is the backbone of any AI agent you'll build.
The Problem: Waiting for the Network
Imagine you're at a busy coffee shop. You place your order (a network request), but instead of the barista making you stand at the counter and wait motionlessly, they give you a buzzer. You're now free to find a table, check your phone, or talk to a friend. When your coffee is ready, the buzzer goes off, and you go pick it up.
This is the essence of asynchronous programming. Synchronous (or blocking) code would be like being forced to stare at the barista until your coffee is done, unable to do anything else. JavaScript, especially in Node.js, is built for the "buzzer" model because waiting for network responses, file reads, or database queries can be slow and unpredictable.
To manage this, JavaScript has evolved its tools. Let's start with a short video that introduces the history, from clunky "callbacks" to the modern approach we'll be using.
Callbacks, Promises, Async Await | JavaScript Fetch API Explained
This video from Dave Gray's channel, titled "Callbacks, Promises, Async Await | JavaScript Fetch API Explained," provides excellent context on why we need asynchronous patterns. It starts by explaining the problem of "callback hell" and introduces Promises as the first major improvement.
Watch from the beginning until 03:57. Focus on understanding the problem that asynchronous patterns like Promises were created to solve. You don't need to memorize the callback syntax, just appreciate why developers wanted a better way.
As the video explains, Promises were a huge step forward. A Promise is an object that represents the eventual completion (or failure) of an asynchronous operation. It's the "buzzer" from our coffee shop analogy. It can be in one of three states:
- Pending: The operation hasn't finished yet (your coffee is being made).
- Fulfilled: The operation completed successfully (your coffee is ready!).
- Rejected: The operation failed (they're out of almond milk).
Introducing fetch: Your Tool for Network Requests
The primary way we'll make network requests is with the fetch API. It's built directly into modern versions of Node.js (including the version 22+ we installed) and it is Promise-based. When you call fetch, it immediately returns a Promise in the pending state.
Let's see this in action. The next segment of the video demonstrates using fetch and handling the resulting Promise with .then(), the traditional method before async/await became popular.
Callbacks, Promises, Async Await | JavaScript Fetch API Explained
Continuing with the same video, this part shows how the fetch API works and how you chain .then() calls to process the response once the Promise is fulfilled.
Watch from 14:55 to 19:10. Pay attention to how fetch returns a Promise that is initially 'pending' and how .then() is used to access the response and then the data.
The .then() syntax works, but as you can imagine, chaining multiple steps can still become difficult to read. This is where async/await comes in.
async/await: The Modern, Readable Approach
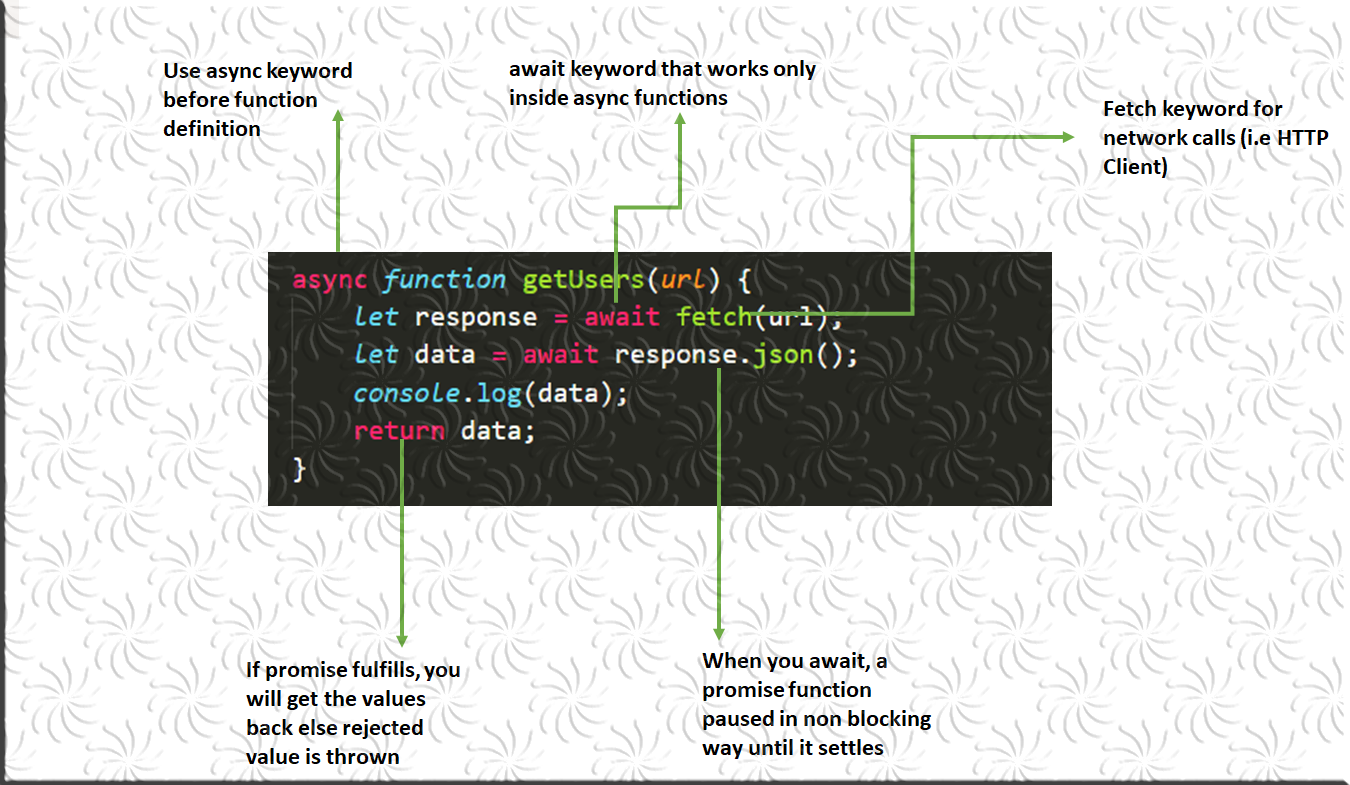
async/await is a modern feature built on top of Promises that lets you write asynchronous code that looks and behaves like synchronous code. This makes it incredibly intuitive and is the standard for modern JavaScript development.
There are two keywords:
async: You place this before a function declaration. It does two things:- It ensures the function always returns a Promise.
- It allows you to use the
awaitkeyword inside it.
await: You place this before any Promise-based function (likefetch). It "pauses" the execution of yourasyncfunction until the Promise settles (is fulfilled or rejected) and then returns the result.
This article from javascript.info provides a fantastic, concise explanation with clear code examples.
This article, titled "Async/await," breaks down the two keywords and provides a perfect example of rewriting a fetch call from using .then() to using async/await.
Read the sections "Async functions," "Await," and the example that rewrites showAvatar() using async/await. This will solidify your understanding of the syntax and its benefits.
Let's Code It
Time to get your hands dirty. Let's use async/await to fetch some data from a public API.
-
In your
my-first-node-projectfolder, create a new file calledfetch-test.js. -
Add the following code. We'll use JSONPlaceholder, a free fake API for testing.
// fetch-test.js async function getTodo() { console.log('Fetching a todo item...'); // The 'try...catch' block is for error handling, which we'll cover next. try { // 1. Make the network request. 'await' pauses here until we get a response. const response = await fetch('https://jsonplaceholder.typicode.com/todos/1'); // 2. 'await' pauses again to parse the response body as JSON. const data = await response.json(); // 3. Now we have the data! console.log('Todo Item:', data); } catch (error) { console.error('Something went wrong:', error); } } // Call the function to run it. getTodo(); -
Run the file from your terminal:
node fetch-test.js
You should see the script log "Fetching a todo item..." and then, after a brief moment, the data for the first "todo" item from the API. Notice how readable the code inside the try block is!
Essential: Proper Error Handling
A common mistake is to assume a fetch call only fails if the network is down. This is not true! An API can respond with an error status like 404 Not Found or 401 Unauthorized. The fetch Promise will still fulfill in these cases because a response was successfully received from the server.
This is why you must always check the response status. The Response object from fetch has a handy boolean property called response.ok which is true for successful statuses (like 200 OK) and false for error statuses (like 404 or 500).
To handle both network errors and API errors gracefully, we use a try...catch block combined with a check for response.ok.
This article from ScrapingBee has an excellent section on this.
How to make HTTP requests in Node.js with fetch API
This article, "How to make HTTP requests in Node.js with fetch API," provides a robust, production-ready pattern for error handling.
Read the sections "Fetch does not throw on HTTP errors" and "Error handling with async and await." This is one of the most important parts of the lesson. Internalize why you need to check response.ok.
Let's update our fetch-test.js to include this robust error handling.
// fetch-test.js

async function getTodo() {
  console.log('Fetching a todo item...');

  try {
    const response = await fetch('https://jsonplaceholder.typicode.com/todos/1');

    // This is the crucial check!
    if (!response.ok) {
      // If the response is not ok, throw an error to be caught by the 'catch' block.
      throw new Error(`HTTP error! Status: ${response.status}`);
    }

    const data = await response.json();
    console.log('Todo Item:', data);

  } catch (error) {
    // This 'catch' now handles both network failures and bad HTTP statuses.
    console.error('Error fetching data:', error);
  }
}

getTodo();
This pattern—wrapping await fetch(...) in try...catch and checking !response.ok—is the standard you should use for all future API calls.
Test your understanding!
Now, it's your turn to write one from scratch.
Your task:
- Create a new
asyncfunction calledgetUser. - Inside this function, use
fetchto get data for a user fromhttps://jsonplaceholder.typicode.com/users/3. - Implement the full
try...catcherror handling pattern, including theif (!response.ok)check. - If the request is successful, parse the JSON data and log only the user's
nameandemailto the console. - Call your
getUser()function to run the code.
Show answer
Your fetch-test.js file could look like this:
async function getUser() {
  console.log('Fetching user data...');

  try {
    const response = await fetch('https://jsonplaceholder.typicode.com/users/3');

    if (!response.ok) {
      throw new Error(`HTTP error! Status: ${response.status}`);
    }

    const userData = await response.json();

    console.log('User found!');
    console.log('Name:', userData.name);
    console.log('Email:', userData.email);

  } catch (error) {
    console.error('Error fetching user:', error);
  }
}

getUser();
When you run node fetch-test.js, the output should be:
Fetching user data...
User found!
Name: Clementine Bauch
Email: Nathan@yesenia.net
Conclusion
Fantastic! You've just mastered one of the most powerful and essential patterns in modern JavaScript. You learned why asynchronous operations are necessary and how to handle them cleanly and safely.
Here are the key takeaways from this lesson:
- Asynchronous operations prevent your application from freezing while waiting for slow tasks like network requests.
- The
fetchAPI is the modern, built-in tool for making HTTP requests in Node.js, and it returns a Promise. async/awaitprovides a highly readable, synchronous-looking syntax for working with Promises.- For robust code, always wrap your
awaitcalls in atry...catchblock and check theresponse.okproperty to handle both network errors and API errors.
We are now fully equipped to interact with a real AI API. We know how to store our key securely (from the last lesson) and we know how to make a network request (from this lesson).
In our next lesson, we will combine these skills to send our very first prompt to the Claude API using Node.js and log the response. Let's get started