Hello! Welcome to the final lesson in our Coordinate Geometry module.
In the last lesson, we saw how to find the exact point where two lines cross by setting up and solving their equations simultaneously. This was a great example of combining your algebra and geometry skills.
Today, we will consolidate everything you've learned in this module to tackle a classic, multi-step exam problem. Our learning outcome is to apply coordinate geometry methods to find the equation of a perpendicular bisector. This type of question is a fantastic test of your understanding because it requires you to bring together midpoints, gradients, perpendicular lines, and forming equations all in one logical process.
1. What is a Perpendicular Bisector?
The name "perpendicular bisector" tells you everything you need to know about its properties. Let's break it down:
- Perpendicular: It meets a line segment at a right angle (90°). This means its gradient will be the negative reciprocal of the original line segment's gradient.
- Bisector: It cuts the line segment into two equal halves. This means it must pass through the midpoint of the line segment.
These two properties give us a clear, step-by-step method to find the equation of any perpendicular bisector.
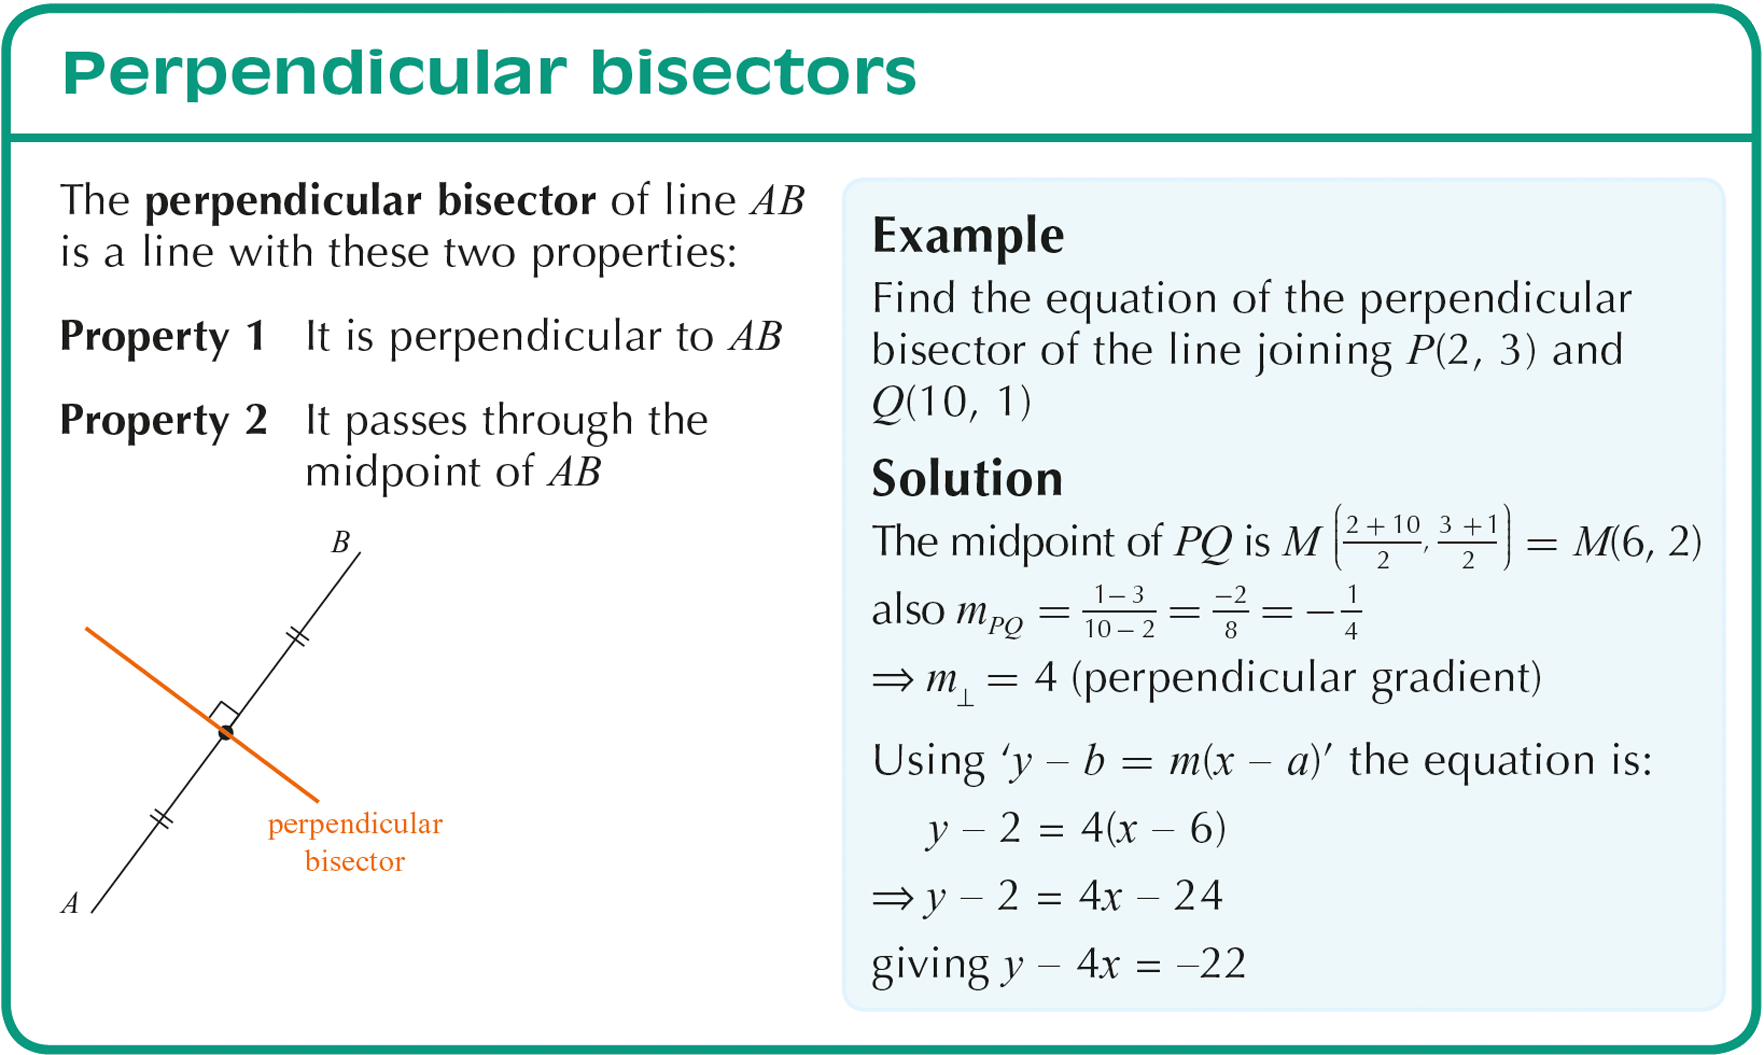
The process for solving these problems is always the same:
- Calculate the Midpoint of the line segment.
- Calculate the Gradient of the original line segment.
- Find the Perpendicular Gradient using the negative reciprocal rule.
- Construct the Equation of the perpendicular bisector using its gradient (from step 3) and the point it passes through (the midpoint from step 1).
Let's see this systematic process in action.
2. A Complete Worked Example
Seeing the method applied to an exam-style question is the best way to learn it. Pay close attention to how each of the four steps is executed in order.
Everything you need to know about IGCSE Coordinate Geometry in 53 minutes
The 'Ginger Mathematician' channel provides a very clear, exam-focused walkthrough of a typical perpendicular bisector problem. This video will take you through the entire process from start to finish.
Watch the segment from 00:21:00 to 00:25:30. The presenter breaks the problem down into the key steps: finding the gradient of the original line, finding the midpoint, calculating the perpendicular gradient, and finally forming the equation.
As you saw in the video, the method is a reliable recipe. Once you identify that a question is asking for a perpendicular bisector, you should immediately think of this four-step process.
3. An Efficient Method for Forming the Equation
In your previous work, you've noted a tendency to sometimes choose a harder path to a solution. For step 4 of our process—forming the equation—there's a more direct formula than the standard y = mx + c that can help you avoid unnecessary calculations and potential arithmetic errors.
This formula is the point-gradient form: .
It's extremely useful because you can plug in the gradient () and the coordinates of a point on the line () directly, without needing to first solve for the y-intercept, .
This article from B28 Maths Tutor explains the point-gradient formula and how it can be more efficient. It also provides a full worked example of a perpendicular bisector problem that uses it.
First, read the section 'Alternative form of straight line equation: y – y₁ = m(x – x₁)'. Note how it allows you to write the equation in one step. Then, scroll down and read the section 'Finding the equation of a perpendicular bisector'. Observe how they use the y – y₁ = m(x – x₁) formula in the solution to save time.
Using is often the "smarter, not harder" method, especially when the midpoint coordinates or the gradient are fractions, as it neatly contains them within brackets from the start.
4. Rearranging for the Final Answer
A common requirement in exams is to give your final answer in a specific format, such as or , where a, b, c, and d are integers. This final step requires careful algebraic manipulation, especially when dealing with fractions.
Coordinate Geometry : Equation of a perpendicular bisector : ExamSolutions
Let's watch a short clip from ExamSolutions that focuses specifically on this final algebraic rearrangement.
Watch from 00:06:18 to 00:07:38. The presenter starts with the equation in the y – y₁ = m(x – x₁) format and demonstrates how to multiply through to eliminate fractions and group terms to match the required format.
This skill is crucial for securing the final accuracy marks on a question. The key is to multiply the entire equation by the denominators of any fractions to eliminate them before you start rearranging.
Test your understanding!
Let's bring everything together.
Problem:
A line segment joins point A and point B. Find the equation of the perpendicular bisector of the line segment AB. Give your answer in the form .
Follow the 4-step process:
- Find the midpoint of AB.
- Find the gradient of AB.
- Find the perpendicular gradient.
- Use the point-gradient formula to find the equation and rearrange it into the required format.
Show answer
Step 1: Midpoint
The midpoint M is found by averaging the x and y coordinates:
Step 2: Gradient of AB
Step 3: Perpendicular Gradient
The perpendicular gradient, , is the negative reciprocal of 3.
Step 4: Equation of the Perpendicular Bisector
We use the point-gradient formula with our perpendicular gradient and our midpoint .
Now, we rearrange to the form . First, multiply by 3 to eliminate the fraction:
Finally, move the term to the left and the constant to the right:
The final answer is ** **.
Conclusion
Congratulations on completing the Coordinate Geometry module! You have successfully mastered a topic that weaves together multiple core skills.
Key Takeaways:
- A perpendicular bisector is a line that passes through the midpoint of a line segment at a right angle.
- There is a reliable four-step process for finding its equation: calculate the midpoint, calculate the original gradient, find the perpendicular gradient, and then form the equation.
- Using the point-gradient formula is often the most efficient way to form the equation, especially when fractions are involved.
- Always be prepared to rearrange your final equation into the specific format requested by the exam question.
Preview of the Next Lesson:
We are now moving on to a new module: Graphs of Functions and Transformations. In the next lesson, we will begin exploring the world beyond straight lines, learning how to sketch and identify key features of quadratic, cubic, and reciprocal functions. This will be a great opportunity to build on your knowledge of algebra and apply it in a new, visual way.