Introduction
Hello! In our last lesson, you refactored your cleanup.sh script to use functions, making your code more modular and reusable. This was a fantastic step toward writing professional-quality scripts. However, to change which files to archive or where to put them, you still had to edit the script's variables directly.
Today, we'll solve that problem by learning how to accept and parse command-line arguments in a script. This will allow you to make your scripts interactive and configurable from the terminal, just like standard Linux commands (e.g., cp <source> <destination>). For your goal of becoming a Full Stack Developer, this is a vital skill. Deployment tools, testing frameworks, and command-line interfaces (CLIs) for web frameworks all rely heavily on parsing arguments.
By the end of this lesson, you'll be able to create scripts that can be run like ./myscript.sh -v -o /path/to/output file1.txt, making them truly flexible and powerful.
1. The Basics: Positional Parameters
The simplest way for a script to accept input is through positional parameters. When you run a script with arguments, Bash automatically assigns them to special variables based on their position.
$0: The name of the script itself.$1: The first argument.$2: The second argument, and so on.$#: The total number of arguments passed to the script.$@: All arguments, with each one treated as a separate, quoted string. This is usually what you want.$*: All arguments, treated as a single string.

Let's watch a video that demonstrates this concept by creating a simple script to add a new user.
Shell Scripting - Positional Parameters (Add User Script)
This video from HackerSploit provides a clear and practical introduction to positional parameters. It shows how to use $0 and $1 to make a script take a username as an argument from the command line.
Watch from the beginning to 09:20. Pay close attention to: The explanation of how parameters are assigned based on their position (e.g., add-user user1). How the variables $0 and $1 are used inside the script. The moment of realization around 08:20 when the presenter remembers that you don't prompt the user for input; you provide the data directly on the command line.
As you saw, positional parameters are straightforward for simple tasks. However, they have significant limitations. What happens if the user provides arguments in the wrong order, or forgets one?
To explore this, let's read about why this simple method can be unreliable for more complex scripts.
How to Use Bash Getopts With Examples
This article from KodeKloud clearly illustrates the downsides of relying solely on positional parameters.
Read the section 'Limitations of Positional Parameters'. Notice how the example script fails or produces nonsensical output when arguments are missing or swapped. This motivates the need for a more robust parsing method.
2. A More Robust Method: Parsing Options with getopts
For building flexible scripts that can handle options (also called flags or switches, like -v for verbose or -f <file>), the standard tool is the Bash built-in command getopts. It allows you to parse options in any order and easily handle options that require their own arguments.
getopts typically runs inside a while loop and works with a case statement to process each option it finds.
Here are the key components:
while getopts "optstring" opt: This is the loop structure.getoptsprocesses one option per loop."optstring": Defines the valid option letters. A colon (:) after a letter means that option requires an argument (e.g.,"f:v"means-fneeds an argument, but-vdoes not).opt: The variable that holds the option letter being processed (e.g.,forv).
$OPTARG: When an option requires an argument,getoptsplaces that argument in this special variable.$OPTIND: The index of the next argument to be processed. We'll use this later to handle non-option arguments.
Let's examine a well-structured example script that puts all these pieces together.
How to Handle Command Line Arguments in Bash
This article from OneUptime provides an excellent, well-commented script that demonstrates a complete getopts implementation. It includes a usage function, default values, and error handling.
Read the section 'Using getopts for Short Options' and study the 'Basic getopts Usage' code block. Pay special attention to: The optstring "vf:o:h" and how the colons indicate which options need arguments. How the case statement handles each option. How $OPTARG is used to get the value for the -f and -o options. The special ? and : cases for handling invalid options and missing arguments.
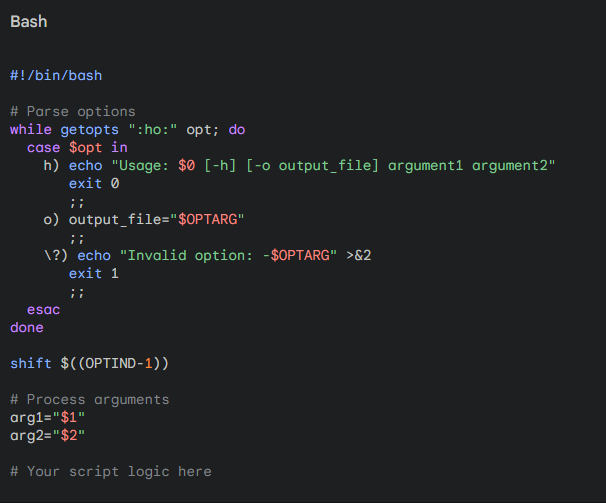
3. Handling Arguments After the Options
getopts stops parsing as soon as it encounters the first non-option argument (an argument that doesn't start with a -). But what about those arguments? For example, in the command my-script -v file1.txt file2.txt, how do you access file1.txt and file2.txt?
The solution is to "shift" away all the options that getopts has already processed. This is done with a special command:
shift $((OPTIND - 1))
After you run this command, all the options (-v in our example) are gone from the list of arguments, and $1 will now be file1.txt, $2 will be file2.txt, and so on. You can then process these remaining positional arguments as needed. The article from OneUptime (LINK) you just read shows this command right after the while loop.
Do-It-Yourself: Make Your Cleanup Script Configurable
It's time to apply what you've learned. You will upgrade the cleanup_functional.sh script from the previous lesson to accept its configuration from the command line.
Your Goal: Create a new script named cleanup_advanced.sh. It should be able to run like this:./cleanup_advanced.sh -a "backups" -p "*.log" -p "*.tmp"
Requirements:
-
Create the
cleanup_advanced.shscript. Start by copying yourcleanup_functional.shscript. -
Define Default Values: At the top of your script, set default values for the archive directory and file patterns.
ARCHIVE_DIR="archive" PATTERNS_TO_ARCHIVE=() # An empty array to hold patterns -
Implement
getopts:- Write a
while getoptsloop to parse the following options:-a <dir>: Specifies the name of the archive directory.-p <pattern>: Specifies a file pattern to archive (e.g.,"*.log"). This option can be used multiple times.-h: Displays a help/usage message and exits.
- Your
optstringshould be"a:p:h". - Inside the
casestatement:- For
-a, update theARCHIVE_DIRvariable with the value from$OPTARG. - For
-p, add the pattern from$OPTARGto yourPATTERNS_TO_ARCHIVEarray. You can do this withPATTERNS_TO_ARCHIVE+=("$OPTARG"). - For
-h, create ausagefunction that prints help text, and then callexit 0. - Include a case for invalid options (
?).
- For
- Write a
-
Handle Positional Arguments:
- After the
getoptsloop, addshift $((OPTIND - 1)). - Any remaining arguments on the command line should also be treated as file patterns. Add them to your
PATTERNS_TO_ARCHIVEarray. You can do this with a simpleforloop over the remaining arguments ($@).
- After the
-
Add a final check: If the
PATTERNS_TO_ARCHIVEarray is still empty after parsing all options and arguments, it means the user didn't specify what to archive. In this case, print an error and the usage message, thenexit 1. -
Modify the Main Logic:
- Remove the old hardcoded variables.
- Your main logic should now call
setup_archive_dirwith the (potentially updated)ARCHIVE_DIR. - Then, loop through the
PATTERNS_TO_ARCHIVEarray and call yourarchive_filesfunction for each pattern.
Testing Your Script:
First, set up your test environment again:
# Go to your practice directory
cd ~/automation_practice


# Clean up any old files/dirs
rm -rf archive backups


# Create fresh test files
touch app-2024-01.log app-2024-02.log temp_file.tmp data.csv script.js
Now, try running your script in different ways:
# Test with help flag
./cleanup_advanced.sh -h


# Test with no patterns (should show an error)
./cleanup_advanced.sh -a my_backups


# Test with options
./cleanup_advanced.sh -a backups -p "*.log" -p "*.tmp"


# Check the contents of the 'backups' directory. It should contain the log and tmp files.
ls backups


# Test with remaining arguments
# First, recreate the files
touch app-2024-01.log temp_file.tmp
./cleanup_advanced.sh "*.log" "*.tmp"


# Check the contents of the default 'archive' directory.
ls archive
Click here for a skeleton of the script to guide you.
#!/usr/bin/env bash


# --- Functions from previous lesson ---
# (copy your setup_archive_dir and archive_files functions here)
# ...

usage() {
    echo "Usage: $0 [-a ARCHIVE_DIR] [-p PATTERN] [PATTERN...]"
    echo "  -a ARCHIVE_DIR   Specify the archive directory (default: archive)."
    echo "  -p PATTERN       Specify a file pattern to archive (can be used multiple times)."
    echo "  -h               Display this help message."
    echo "Any additional arguments are also treated as patterns."
}


# --- Default values ---
ARCHIVE_DIR="archive"
PATTERNS_TO_ARCHIVE=()


# --- Parse Options ---
while getopts "a:p:h" opt; do
    case ${opt} in
        a)
            ARCHIVE_DIR="$OPTARG"
            ;;
        p)
            PATTERNS_TO_ARCHIVE+=("$OPTARG")
            ;;
        h)
            usage
            exit 0
            ;;
        \?)
            echo "Invalid Option: -$OPTARG" 1>&2
            usage
            exit 1
            ;;
    esac
done


# --- Handle Remaining Arguments ---
shift $((OPTIND - 1))


# Add any remaining positional args to the patterns array
if [[ $# -gt 0 ]]; then
    PATTERNS_TO_ARCHIVE+=("$@")
fi


# --- Validation ---
if [[ ${#PATTERNS_TO_ARCHIVE[@]} -eq 0 ]]; then
    echo "Error: No file patterns specified." 1>&2
    usage
    exit 1
fi


# --- Main Logic ---
TARGET_DIR="."
FULL_ARCHIVE_PATH="$TARGET_DIR/$ARCHIVE_DIR"

setup_archive_dir "$FULL_ARCHIVE_PATH"

for pattern in "${PATTERNS_TO_ARCHIVE[@]}"; do
    archive_files "$pattern" "$FULL_ARCHIVE_PATH"
done

echo "Cleanup complete."
Conclusion
Excellent work! You've now learned how to create truly interactive and configurable Bash scripts. This elevates your scripts from simple, hardcoded task runners to flexible tools that can be adapted to different situations without changing the code.
Key Takeaways:
- Positional parameters (
$1,$2, etc.) are simple for scripts that take fixed inputs in a fixed order. getoptsis the standard, robust tool for parsing command-line options (e.g.,-f,-v) in any order.- The
optstringdefines valid options, and a colon (:) marks an option that requires an argument. - The argument for an option is found in the
$OPTARGvariable. - Use
shift $((OPTIND - 1))to remove the parsed options and access the remaining positional arguments.
In our next lesson, we will focus on how to handle errors and exit codes to make scripts robust. Now that your script accepts user input, it's critical to validate that input and ensure your script behaves predictably and safely, even when given bad data.