Introduction
Welcome to the next lesson! In our previous session, you built a solid foundation for viewing and navigating files using cat, less, head, and tail. You even had a small preview of today's topic when you used the >> operator to append a line to a log file.
Today, we'll unlock one of the most powerful and fundamental features of the Linux command line: I/O redirection and pipes. You will learn how to take the output of any command and send it somewhere else—like a file—or even use it as the input for another command. This lets you chain simple tools together to perform complex tasks, a core philosophy of Linux.
Mastering this will significantly level up your efficiency, whether you're managing system configurations or, more directly related to your goals, processing log files and automating tasks for your Django projects.
The Three Standard Streams
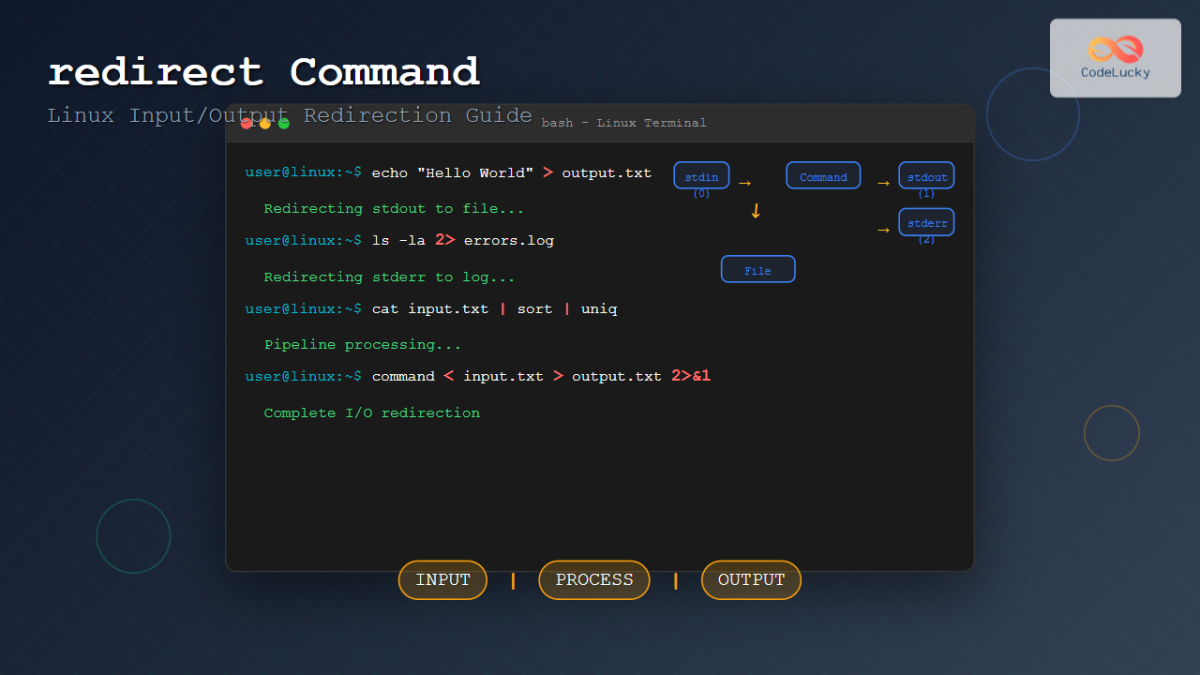
Before we can redirect anything, we need to understand what we're redirecting. In Linux, every process you run automatically gets three communication channels, called standard streams.
- Standard Input (stdin): The channel for feeding data into a program. By default, this is your keyboard. Its file descriptor number is
0. - Standard Output (stdout): The channel for the program's normal output. By default, this is your terminal screen. Its file descriptor number is
1. - Standard Error (stderr): A separate channel for error messages. By default, this also goes to your terminal screen, which is why you see errors and normal output mixed together. Its file descriptor number is
2.
The video below provides a great conceptual overview of these streams.
Linux Sysadmin Basics 04 -- Shell Features -- Pipes and Redirection
Watch this segment from the 'Linux Sysadmin Basics' video by tutoriaLinux. It clearly explains the three standard streams and their corresponding file descriptor numbers, which are the foundation for redirection.
Watch from 01:39 to 04:17. The key takeaway is understanding that every command has these three distinct channels for input, output, and errors.
This diagram provides a great visual summary of how these streams work.
Redirecting Output to Files
Now that you know about stdout and stderr, let's learn how to control where they go. Instead of printing to the screen, we can send them to a file. This is called output redirection.
Redirecting Standard Output (stdout)
You can redirect the normal output of a command using two main operators:
>: Redirects stdout to a file. Warning: This will overwrite the file if it already exists.>>: Redirects stdout and appends it to the end of the file. This will not delete existing content.
The following video demonstrates this in practice.
Linux Sysadmin Basics 04 -- Shell Features -- Pipes and Redirection
Let's continue with the tutoriaLinux video. This next part will show you live demonstrations of redirecting standard output with both > and >>, highlighting the crucial difference between them.
Watch from 04:17 to 07:33. Pay close attention to the example where a file is accidentally overwritten. It's a classic mistake, and seeing it will help you remember to use >> when you want to add to a file, especially for logging.
Redirecting Standard Error (stderr)
What if you only want to capture the errors? This is extremely useful for debugging. Since stderr is stream 2, we explicitly tell the shell to redirect it using 2>.
2>: Redirects stderr to a file (overwrites).2>>: Redirects stderr and appends it to a file.
This next segment of the video shows you exactly how to do that.
Linux Sysadmin Basics 04 -- Shell Features -- Pipes and Redirection
This final clip from the tutoriaLinux video shows how to isolate and redirect error messages, which is a key skill for troubleshooting.
Watch from 07:33 to 09:15. Notice how the normal output (if any) still appears on the screen, but the error message is sent to the file.
Redirecting Both stdout and stderr
Sometimes you want to capture everything—both normal output and errors—in a single log file. There are a couple of ways to do this. A traditional way is > log.txt 2>&1, but since you are on a modern Fedora system using the Bash shell, there's a simpler syntax.
The article below from Fedora Magazine is perfect for learning the modern, preferred way to handle this.
Bash Shell Scripting for beginners (Part 2) - Fedora Magazine
This article, 'Bash Shell Scripting for beginners (Part 2),' is from Fedora Magazine, making it highly relevant to your system. We'll read the sections on redirecting all output.
Read the section titled 'All Output &>, &>> and |&'. It introduces the &> operator for overwriting a file with both stdout and stderr, and &>> for appending. This is the cleanest and most modern syntax to use in your scripts.
Chaining Commands with Pipes
Redirection is powerful, but the true magic happens when you connect commands to each other using pipes. The pipe operator, |, takes the standard output of the command on its left and uses it as the standard input for the command on its right.
This allows you to build sophisticated workflows by combining small, single-purpose utilities. For example, instead of a single ls command that tries to do everything (listing, sorting, filtering, paging), you can use ls to list, grep to filter, sort to sort, and less to page the output.
Linux Sysadmin Basics 04 -- Shell Features -- Pipes and Redirection
The tutoriaLinux video provides an excellent explanation of the philosophy behind pipes and demonstrates how they allow small, specialized tools to work together.
Watch from 12:15 to 16:03. The video uses the ps aux | less example, which is a perfect real-world use case for making the massive output of the ps command manageable.
Your Turn: Practice with Pipes and Redirects
Time to put this theory into practice! Open your terminal and let's get hands-on.
1. Set up your practice area:
First, navigate to your home directory and create a workspace.
cd ~
mkdir -p command_chaining_practice
cd command_chaining_practice
2. Redirection Practice:
- Save System Info: Run the
lscpucommand, which prints your CPU architecture information. Save this output to a file calledsystem_info.txt.lscpu > system_info.txt - Capture an Error: Now, try to
cata file that doesn't exist and redirect the resulting error message intoerror_log.txt. Notice that nothing appears on your screen.
Verify the files were created and have the correct content:cat non_existent_file.txt 2> error_log.txtcat system_info.txt cat error_log.txt - Append More Info: Let's add memory information to our
system_info.txtfile using the append operator>>.
Now view the file. You should see the CPU info followed by the memory info.free -h >> system_info.txtcat system_info.txt
3. Piping Practice:
-
Find Python-related Processes: This is a very common task for a developer. List all running processes on your system and use
grepto filter for any lines containing "python". This is how you could check if your Django development server is running.ps aux | grep python(Note: You might see the
grepcommand itself in the output. We'll learn how to filter that out in a later lesson!) -
Chain Multiple Commands: Let's create a more complex chain. We'll list the contents of the
/usr/bindirectory (which contains many executable programs), count how many items there are, and save that count to a file.ls /usr/bin- lists the files.wc -l- counts the number of lines it receives as input.ls /usr/bin | wc -l > file_count.txt cat file_count.txt -
Challenge: Find the 10th file alphabetically in your
/etcdirectory.
Hint: You'll needls,sort,head, andtailall piped together!Click to reveal the solution
ls /etc | sort | head -n 10 | tail -n 1Explanation:
ls /etclists the files,sortsorts them alphabetically,head -n 10takes the first 10 from that sorted list, andtail -n 1takes the last one from that group of 10, which is the 10th file overall.
Conclusion
Excellent work! You've just learned one of the most transformative concepts of the Linux command line. By understanding and using pipes and redirection, you can move beyond single commands and start building powerful, customized data-processing workflows.
Key Takeaways:
- Standard Streams: Every command has an input (
stdin), output (stdout), and error (stderr) stream. - Output Redirection:
>overwrites a file with a command'sstdout.>>appendsstdoutto a file.
- Error Redirection:
2>overwrites a file withstderr.2>>appendsstderrto a file.&>redirects bothstdoutandstderr(modern Bash).
- Pipes (
|): The|operator chains commands by sending thestdoutof one command to thestdinof the next.
You got a glimpse of the grep command today. It's an incredibly useful tool for filtering text. In our next lesson, we will dive deep into grep and regular expressions, unlocking the ability to search for complex patterns in files and command output—an essential skill for any developer sifting through code or logs.