Hello! Welcome back to your course on Linux system administration for web developers.
In our last lesson, you learned how to use ip and nmcli to view your Fedora system's network configuration. You can now identify your network devices, check your IP address, and inspect the details of your connection profiles.
Today, we'll move from viewing to doing. You'll learn how to modify a network connection using nmcli. Specifically, we'll tackle one of the most common and important sysadmin tasks: changing a connection from using an automatic (DHCP) IP address to a fixed, static IP address.
This skill is directly relevant to your goal as a web developer. When you're running a Django development server on your machine, you'll often want to test it from other devices, like a smartphone or another computer. A static IP ensures your Fedora machine's address doesn't change, making it a reliable target for testing.
By the end of this lesson, you will be able to modify a network connection to set a static IP address using the nmcli command.
1. From Automatic to Manual: DHCP vs. Static IP
Most computers on a home or office network get their IP address automatically from the router. This process is called DHCP (Dynamic Host Configuration Protocol). It's convenient because it requires no configuration, but the IP address can change, for example, after a reboot.
For a server—even a local development server—this isn't ideal. We need a predictable address. This is where a static IP comes in. You manually assign a permanent IP address, gateway, and DNS server to the machine.
To do this, you'll need to know:
- IP Address: The new, static address you want to assign.
- Subnet Mask/Prefix: Defines the size of your local network (e.g.,
255.255.255.0or/24). - Gateway: The IP address of your router, which connects your local network to the internet.
- DNS Server: The server that translates domain names (like
google.com) into IP addresses.
2. Modifying a Connection with nmcli
In the last lesson, you used nmcli connection show to view connection details. Today, we'll use its counterpart: nmcli connection modify.
The following guide provides a concise, step-by-step breakdown of the commands needed to set a static IP. It's an excellent reference for the process we're about to undertake.
Fedora 43 : Initial Settings : Networking
This article from Server World lays out the exact nmcli commands for setting a static IP, gateway, and DNS on a Fedora system. We will use this as our foundational guide.
Read the section under '[1] Set static IP address to the server.' Pay close attention to the sequence of nmcli connection modify commands. Notice how each one targets a specific part of the IPv4 configuration: ipv4.addresses, ipv4.gateway, ipv4.dns, and finally, ipv4.method.
As you saw in the article, the process involves modifying several properties of the connection profile one by one. While you can issue separate commands for each property, nmcli also allows you to set them all in a single command for efficiency.
Let's watch a video demonstration from Red Hat that shows how to switch a connection from auto (DHCP) to manual (static) and apply the IP address and gateway settings in one step.
Moving from network scripts to Network Manager (nmcli) | Into the Terminal 118
This video demonstrates the practical application of the nmcli connection modify command, combining several changes into a single line. This is a common workflow for system administrators.
Watch from 09:38 to 14:06. Pay close attention to the single nmcli connection modify command executed at 11:20. The presenter combines the method, address, and gateway settings. Also, note the use of nmcli con up at 12:45 to apply the pending changes without needing to take the interface down first.
3. Do-It-Yourself: Set a Static IP on Your System
Now it's time to put this into practice on your own Fedora machine. We will walk through the entire process, from gathering information to verifying the final result.
Warning: Executing these commands will temporarily disconnect your network. This is normal. Since you are working on your local machine, you won't be locked out.
Step 1: Plan Your Configuration
Before making changes, you need to know what to change.
-
Find your active connection name. You'll need this for all subsequent commands.
nmcli connection show --activeNote the name in the
NAMEcolumn. Let's assume it's"Wired connection 1". -
Gather your current network details. Your static configuration should be similar to your current one.
nmcli connection show "Wired connection 1"Look for these lines and write down the values:
ipv4.method: Should beauto.IP4.ADDRESS[1]: Your current IP and prefix (e.g.,192.168.1.15/24).IP4.GATEWAY: Your router's IP (e.g.,192.168.1.1).IP4.DNS[1]: Your current DNS server.
-
Choose a new Static IP. You must pick an address that is on the same network but is not likely to be assigned to another device by DHCP. A safe bet is to pick an address with a high last number.
- For example, if your current IP is
192.168.1.15, a good choice for a static IP would be192.168.1.200.
- For example, if your current IP is
Step 2: Apply the Static Configuration
Now, use nmcli to modify your connection. Remember to use sudo because these are system-wide changes. Replace "Wired connection 1" with your actual connection name and use the IP addresses you just gathered and chose.
# Set the static IP address and subnet prefix
sudo nmcli connection modify "Wired connection 1" ipv4.addresses 192.168.1.200/24


# Set the gateway (your router's IP)
sudo nmcli connection modify "Wired connection 1" ipv4.gateway 192.168.1.1


# Set the DNS servers (we'll use Google's and Cloudflare's public DNS)
sudo nmcli connection modify "Wired connection 1" ipv4.dns "8.8.8.8 1.1.1.1"


# IMPORTANT: Switch the method from DHCP to manual
sudo nmcli connection modify "Wired connection 1" ipv4.method manual
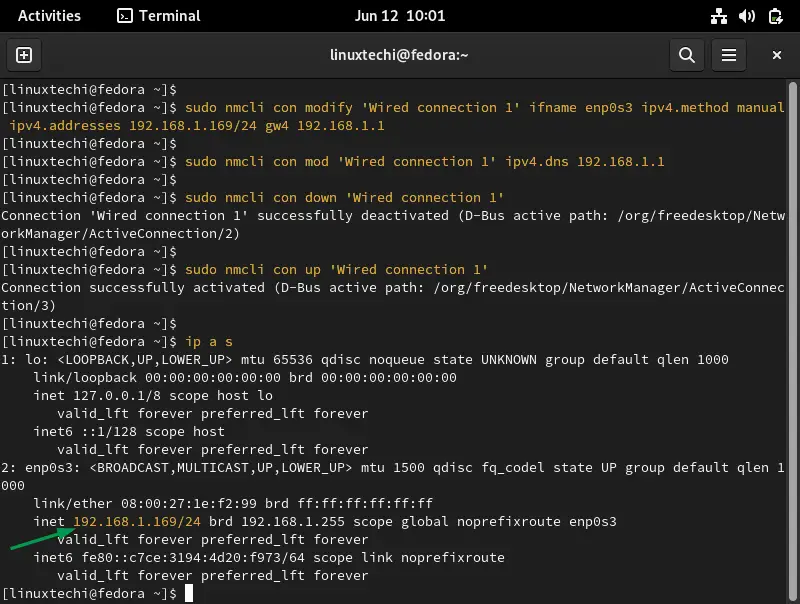
This screenshot illustrates a similar process.
Step 3: Activate and Verify
Your changes are saved but not yet active. Apply them by reactivating the connection.
# This command re-applies the configuration. Your connection will drop and reconnect.
sudo nmcli connection up "Wired connection 1"
Now, verify everything:
- Check your IP address. The
inetfield should show your new static IP.ip a - Test connectivity to your gateway.
ping -c 3 192.168.1.1 - Test internet connectivity.
ping -c 3 8.8.8.8
If all pings are successful, congratulations! You've successfully configured a static IP.
Step 4: How to Revert to DHCP
Knowing how to undo a change is just as important. Switching back to DHCP is simple.
# Set the method back to auto
sudo nmcli connection modify "Wired connection 1" ipv4.method auto


# It's good practice to clear the manual settings you added
sudo nmcli connection modify "Wired connection 1" ipv4.addresses ""
sudo nmcli connection modify "Wired connection 1" ipv4.gateway ""
sudo nmcli connection modify "Wired connection 1" ipv4.dns ""


# Re-activate the connection to get a new IP from your router
sudo nmcli connection up "Wired connection 1"


# Verify you're back on an automatic IP
ip a
For now, feel free to switch back to DHCP. You can re-apply the static configuration whenever you start a development session.
Conclusion
In this lesson, you took a significant step in managing your Fedora system's network. You've gone from simply reading information to actively configuring it.
Key Takeaways:
- Static IPs provide a stable, predictable network address, which is crucial for any kind of server.
- The primary command for changing network settings is
nmcli connection modify. - You must configure four main properties for a basic static IPv4 setup:
ipv4.method,ipv4.addresses,ipv4.gateway, andipv4.dns. - Changes are applied by reactivating the connection with
nmcli connection up <name>.
You now have a solid foundation for network configuration. In the next lesson, we will explore tools like ping and traceroute in more detail to test network reachability and diagnose connectivity problems.