Hello! Let's continue our dive into containerized Django deployment.
In the last lesson, you successfully ran your stateless Django application in a rootless container. That was a huge step! However, most real-world applications aren't stateless; they need to store data in a database.
Today, we'll tackle a fundamental challenge of working with containers: data persistence. By the end of this lesson, you will be able to manage persistent data for a PostgreSQL database using a Podman volume. This ensures that your database's information survives even when the container is stopped, removed, or recreated.
1. The Problem: Ephemeral Containers
By design, containers are ephemeral, or temporary. When you run a container, Podman creates a writable layer on top of the base image. Any changes you make—like a database creating its data files—are written to this layer. However, when you remove the container with podman rm, that writable layer is destroyed, and all the data within it is lost forever.
This is fine for a stateless web server, but it's a disaster for a database. Imagine your users' data disappearing every time you update your application! To understand this problem visually, let's watch a short segment that demonstrates what happens to data in a PostgreSQL container without a persistent storage solution.
Docker Volumes Explained (PostgreSQL example)
In this video, 'Docker Volumes Explained' by Hussein Nasser, the presenter clearly demonstrates why container data is lost when a container is removed. Although he uses Docker, the principle is identical for Podman.
Watch from the beginning to 05:41. Pay close attention to the sequence: he creates a container, adds a table, then stops, removes, and recreates the container, only to find the table is gone.
This is the exact problem we need to solve. We need a way to store the database files outside of the container's ephemeral filesystem.
2. The Solution: Podman Volumes
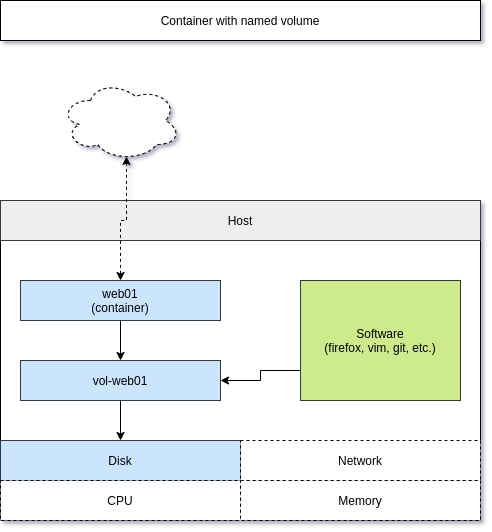
Podman provides a mechanism called volumes to manage persistent data. A volume is a storage location managed by Podman that exists on the host machine and is mounted into a container.
There are two primary types of volumes you'll encounter:
- Named Volumes: These are the preferred method for managing persistent application data, especially for databases. You create a volume with a specific name (e.g.,
postgres_data), and Podman manages its location on the host filesystem (~/.local/share/containers/storage/volumes/for rootless users). This decouples your data from the host's directory structure, making your setup more portable and easier to manage. - Bind Mounts: This involves mounting a specific file or directory from your host machine into the container (e.g., mounting
~/django_podman_projectinto/appinside the container). This is extremely useful for development, as it allows you to edit code on your host and see the changes live in the container.
For our PostgreSQL database, a named volume is the ideal choice. To learn more about the commands for managing these volumes, let's turn to a helpful guide.
How to Use Podman Volumes - OneUptime
This article, 'How to Use Podman Volumes', provides an excellent overview of creating and managing volumes. We'll focus on the sections that introduce the core concepts and commands.
Please read the sections titled 'Creating and Managing Volumes' and 'Mounting Volumes in Containers'. Focus on understanding the purpose of these commands: podman volume create podman volume ls podman volume inspect podman volume rm The -v mydata:/path/in/container syntax used with podman run.
3. Hands-On: A Persistent PostgreSQL Database
Now, let's put theory into practice. We will create a named volume and use it to run a PostgreSQL container. We will then add some data, remove the container, and launch a new one using the same volume to prove our data has been preserved.
Step 1: Create a Named Volume
First, open your terminal and create a named volume for our PostgreSQL data.
podman volume create postgres_data
You can verify that the volume was created by listing all available volumes:
podman volume ls
You should see postgres_data in the list. You can also inspect it to see where Podman is storing it on your host machine.
podman volume inspect postgres_data
Step 2: Run PostgreSQL with the Volume
Now, let's run the PostgreSQL container, mounting our new volume to the location where PostgreSQL stores its data. According to the official PostgreSQL image documentation, this location is /var/lib/postgresql/data.
podman run -d \
--name postgres-db \
-e POSTGRES_PASSWORD=mysecretpassword \
-p 5432:5432 \
-v postgres_data:/var/lib/postgresql/data \
docker.io/library/postgres:15
Let's break down the -v flag:
-v postgres_data:/var/lib/postgresql/data: This tells Podman to take the named volumepostgres_dataand mount it inside the container at the/var/lib/postgresql/datadirectory.
A Note on SELinux: When using bind mounts on Fedora (e.g., -v /path/on/host:/path/in/container), you must append :Z to the flag (e.g., -v /some/dir:/some/dir:Z). This tells SELinux to relabel the host directory so the container is allowed to write to it. However, with named volumes, Podman handles the SELinux labels automatically, so :Z is not needed.
Step 3: Create Some Data
With our container running, let's connect to it and create a database and a table.
First, execute an interactive shell inside the running container to access the psql client:
podman exec -it postgres-db psql -U postgres
You are now inside the PostgreSQL command-line interface. Let's create a table and insert a row:
-- Create a table for some notes
CREATE TABLE notes (id SERIAL PRIMARY KEY, content TEXT NOT NULL);

-- Insert a note into the table
INSERT INTO notes (content) VALUES ('My data is now persistent!');

-- Verify the data was inserted
SELECT * FROM notes;
You should see your new note in the output. Now, exit psql by typing \q and pressing Enter.
Step 4: Test Persistence
This is the moment of truth. Let's stop and completely remove the container.
podman stop postgres-db
podman rm postgres-db
Now, check your running containers (podman ps)—postgres-db is gone. But what about our volume?
podman volume ls
The postgres_data volume is still there, holding our precious data.
Step 5: Relaunch and Verify
Let's start a new PostgreSQL container, but attach it to our existing volume.
podman run -d \
--name postgres-reborn \
-e POSTGRES_PASSWORD=mysecretpassword \
-p 5432:5432 \
-v postgres_data:/var/lib/postgresql/data \
docker.io/library/postgres:15
Now, connect to this new container and check for our data:
podman exec -it postgres-reborn psql -U postgres
Inside psql, run the select query again:
SELECT * FROM notes;
Success! Your output should be:
 id |         content
----+-----------------------------
  1 | My data is now persistent!
(1 row)
The data survived the destruction of the original container because it was stored safely in the Podman volume. Type \q to exit.
Step 6: Clean Up
To finish, let's clean up our environment by stopping the container and removing both the container and the volume.
# Stop and remove the container
podman stop postgres-reborn && podman rm postgres-reborn


# Remove the named volume
podman volume rm postgres_data
Conclusion
Excellent work! You have now mastered one of the most critical concepts in containerization: data persistence.
Key Takeaways:
- Container filesystems are ephemeral and data is lost when a container is removed.
- Podman volumes provide a way to store data persistently on the host machine.
- Named volumes are the recommended method for application data like databases, as they are managed by Podman and are highly portable.
- The
podman volumecommand suite (create,ls,inspect,rm) is used to manage named volumes. - You attach a volume to a container using the
-v <volume_name>:<path_in_container>flag in thepodman runcommand.
Preview of the Next Lesson:
We now have the two main components of our Django application: a container for the web app and a way to create a persistent database container. The final piece of the puzzle is orchestrating them—making them run together, communicate with each other, and start up with a single command. In the next lesson, we will learn how to use Podman Compose to define and orchestrate the Django, PostgreSQL, and Nginx services.