Hello! Welcome to the next stage of our journey into containerized Django development.
In our last lesson, you successfully built a custom container image for your Django application using podman build. You now have a self-contained, portable image tagged as django-app:1.0 sitting on your local machine.
Today, we're going to bring that image to life. Our goal is to run your Django application in a rootless container with port mapping. This means we'll start a container from your image and make the Django development server running inside it accessible from the web browser on your Fedora host.
Let's get started.
1. Understanding Rootless Containers
Before we run our first command, it's essential to understand one of Podman's most significant features, especially on Fedora: rootless containers.
Unlike traditional Docker setups that require a daemon running as the root user, Podman allows you, as a regular user, to build and run containers without any special privileges.
What does this mean for you?
- Enhanced Security: If a process inside your container is compromised, it only has the permissions of your user account on the host machine, not
root. This dramatically limits the potential for system-wide damage. - Clearer Ownership: Files created by the container are owned by you, simplifying permissions management.
This image illustrates the fundamental difference in how user IDs are mapped between the host and the container in "rootfull" versus "rootless" modes.
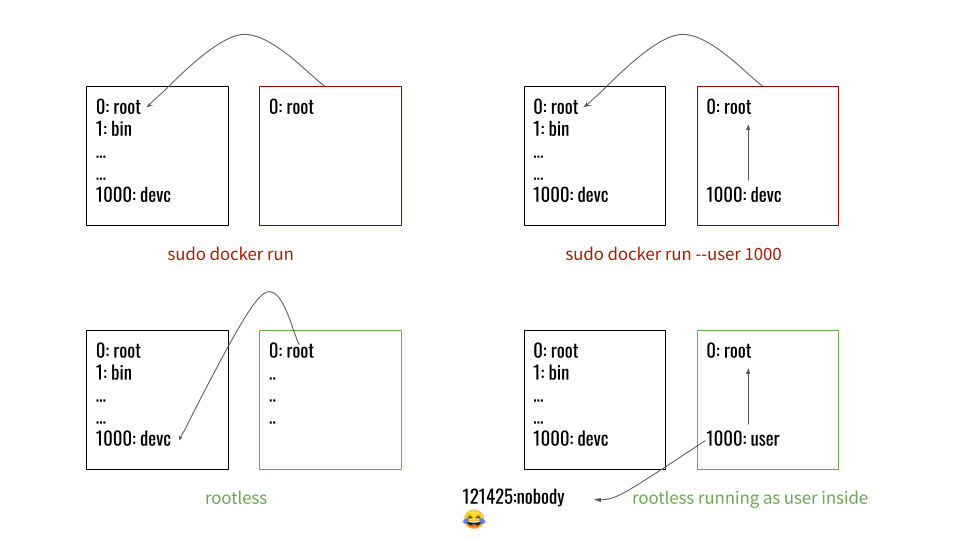
One key implication of this security model is that rootless containers, by default, cannot bind to "privileged" ports on the host system (any port below 1024). This is a standard security feature in Linux. Since our Django app will run on a high-numbered port (8000), this won't be a problem for us.
To hear a great explanation of this concept, let's turn to a video from the Red Hat team.
Containers and Podman for beginners | Into the Terminal 154
This clip from the 'Containers and Podman for beginners' video explains the rationale and benefits of running containers as a non-root user.
Watch the segment from 32:48 to 35:08. Focus on the discussion about why running containers as rootless is the recommended default for security and the implications this has for binding to privileged ports like port 80.
2. Running Your Container with Port Mapping
Now that you understand the rootless context, let's run your container. The command for this is podman run. A container has its own isolated network environment. To access a service running inside it (like your Django app on port 8000), you must explicitly "map" a port from your host machine to the port inside the container.
This process is a common source of confusion, so let's read an excellent guide that walks through the entire debugging process.
Debugging Container Networking Problems
The 'Obey the Testing Goat!' book has a fantastic chapter on containerization. This section details the exact problem of network connectivity and how to solve it. It will solidify your understanding of why port mapping is necessary and how it works.
Please read the sections titled 'Debugging Container Networking Problems', 'Docker Port Mapping', and 'Essential Googling the Error Message'. Don't worry about running the commands in the article, as your Dockerfile is already correctly configured. Instead, focus on understanding the logic: Why can't you access the server running inside the container by default? What is the purpose of the -p (port mapping) flag? Why is it necessary to have the Django runserver listen on 0.0.0.0:8000 instead of the default 127.0.0.1:8000? (You already did this in your Dockerfile CMD instruction; this reading explains why it was crucial).
As you just read, two things are essential:
- Using the
-p <host_port>:<container_port>flag to bridge the network gap. - Binding the application to
0.0.0.0so it accepts connections from outside its own loopback interface.
This diagram provides a visual for the port mapping concept:

3. Your Turn: Launch the Django Application
It's time to put everything together and run your application. We will use the podman run command with a few helpful flags.
Open your terminal and make sure you are in your project directory (~/django_podman_project).
Run the following command:
podman run -d --name django-web -p 8000:8000 localhost/django-app:1.0
Let's break down that command:
podman run: The command to start a new container from an image.-dor--detach: Runs the container in the background and prints the container ID. Without this, your terminal would be attached to the container's output.--name django-web: Assigns a convenient, human-readable name to your running container. This makes it easier to manage (e.g.,podman logs django-web).-p 8000:8000: This is the port mapping. It maps port 8000 on your Fedora host to port 8000 inside the container (where Django'srunserveris listening).localhost/django-app:1.0: The name and tag of the image you want to run, which you built in the last lesson.
Verification Steps
After running the command, a long string of characters (the container ID) will be printed to your terminal. How do you know if it's working?
1. Check Running Containers
Use the podman ps command to list all currently running containers.
podman ps
You should see output similar to this, confirming your django-web container is Up and running, and that port 8000 is correctly mapped.
CONTAINER ID  IMAGE                           COMMAND               CREATED        STATUS        PORTS                   NAMES
c4a9a08e1a1b  localhost/django-app:1.0:latest  ...                   5 seconds ago  Up 5 seconds  0.0.0.0:8000->8000/tcp  django-web
2. Check the Logs
View the output from inside the container using the podman logs command with the container's name.
podman logs django-web
You should see the familiar output from Django's development server, confirming that the application started successfully inside the container.
Watching for file changes with StatReloader
Performing system checks...

System check identified no issues (0 silenced).
...
Django version 4.2.x, using settings 'core.settings'
Starting development server at http://0.0.0.0:8000/
Quit the server with CONTROL-C.
3. Test with curl
Perform a quick check from the command line using curl.
curl http://localhost:8000
This should return the HTML of your Django project's welcome page.
4. The Final Test: Your Browser
Open your web browser and navigate to: http://localhost:8000
You should see your Django application's default page, served from within your rootless container!
To stop your container, you can use the podman stop command:
podman stop django-web
Conclusion
Fantastic work! You have successfully run your Django application inside a secure, rootless Podman container and made it accessible on your local machine.
Key Takeaways:
- Rootless containers provide significant security benefits by running as an unprivileged user.
- The
podman runcommand starts a container from an image. - Containers have isolated networks, requiring port mapping (
-p <host_port>:<container_port>) to expose services. - Applications inside a container must bind to
0.0.0.0to be accessible via mapped ports. - Flags like
-d(detach) and--nameare essential for managing containers effectively. - You can inspect running containers with
podman psand view their output withpodman logs.
Preview of the Next Lesson:
Your Django application is running, but a real-world web application also needs a database. Running a database in another container and getting it to communicate with your Django container adds a new layer of complexity. In our next lesson, "Use Podman Compose to define and orchestrate the Django, PostgreSQL, and Nginx services," we will introduce podman-compose, a powerful tool that lets you define and manage multi-container applications with a single configuration file.