Welcome to the third lesson in our module on Spring Framework Fundamentals. In our last session, we explored the "why" behind the Spring framework, diving into the core principles of Inversion of Control (IoC) and Dependency Injection (DI). You learned that by ceding control of object creation to the Spring IoC container, we can build loosely coupled, flexible, and more testable applications.
This naturally leads to the next question: how do we tell the container which objects it should manage? This lesson bridges that gap between principle and practice. We will focus on stereotype annotations—the primary mechanism you'll use to declare your classes as Spring-managed components, or "beans." We'll explore the general-purpose @Component annotation and then see how its specializations, @Service and @Repository, help us create a clean, layered application architecture.
1. From "new" to "Let Spring Do It"
In the previous lesson, we discussed the problem of tight coupling, where a class is responsible for creating its own dependencies, like this:
public class ArticleController {
    private final ArticleRepository articleRepository;

    public ArticleController() {
        // The controller is tightly coupled to this specific implementation.
        this.articleRepository = new ArticleRepository();
    }
}
We established that the solution is DI, where dependencies are provided from an external source. The Spring IoC container is that source. The following video by Dan Vega provides a fantastic, hands-on demonstration of this entire process. We will use it as a guide throughout this lesson.
First, let's watch Dan set up the problem. He builds a simple blog application, initially creating dependencies manually with the new keyword. Pay close attention to how the ArticleController depends on ArticleRepository, and how ArticleRepository in turn depends on a SimpleSlugService.
Dependency Injection Spring: How to use Dependency Injection in Spring Boot
This video, "Dependency Injection Spring: How to use Dependency Injection in Spring Boot," walks through a complete example of refactoring a tightly coupled application.
Watch from the beginning as Dan builds a simple REST API for a blog. Notice the use of new in the constructors of ArticleController and ArticleRepository. This section perfectly illustrates the tightly-coupled design we discussed previously. Then, continue as he writes unit tests and explains how this design makes testing difficult. The dependencies are chained (Controller -> Repository -> Service), making a true unit test of the controller nearly impossible without also testing its dependencies. This segment highlights the practical problems that DI and IoC are designed to solve.
As the video demonstrates, creating objects manually leads to a tangled web of dependencies that is hard to manage and even harder to test. The ArticleControllerTest ends up testing the ArticleRepository and SimpleSlugService implicitly, which defeats the purpose of a unit test.
2. Telling Spring What to Manage: @Component and Friends
The solution, as Dan begins to show, is to refactor the code to accept dependencies through the constructor and then let Spring "inject" them. But for Spring to inject a dependency, it must first know about it. It needs to have an instance of that class in its container.
We give Spring this knowledge by marking our classes with stereotype annotations. These annotations act as labels, telling the Spring container, "Hey, this class is a component of my application. I want you to create an instance of it, manage its lifecycle, and inject it where it's needed."
The most fundamental stereotype annotation is @Component.
This article from Baeldung clearly explains how Spring discovers these annotated classes through a process called component scanning.
Please read the sections on Component Scanning and @Component. The key takeaway is that Spring scans your application's packages for classes marked with @Component (and other stereotype annotations) and automatically registers them as beans in the IoC container.
When Spring starts, it scans the configured packages (by default, the package of your main application class and all sub-packages) for any class annotated with @Component or its derivatives. For each one it finds, it creates a single instance (by default) and holds it in the container, ready to be injected elsewhere.
3. Layering Your Application: @Repository, @Service, and @Controller
While you could theoretically mark every Spring-managed class with @Component, it's a best practice to use more specific annotations that describe the class's role or "stereotype" in the application. This leads to a well-structured, layered architecture that is common in enterprise Java.
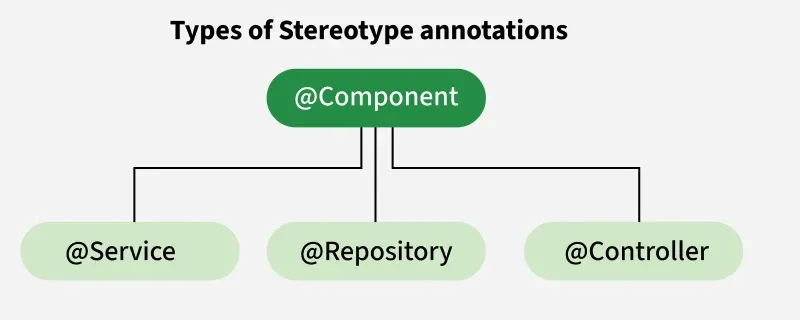
The primary specialized stereotypes are:
@Repository: Used on classes in the persistence or data access layer (DAO). These classes are responsible for all communication with the database.@Service: Used on classes in the service or business layer. These classes contain the core business logic and often coordinate multiple repositories.@Controller(or@RestController): Used on classes in the presentation layer. They handle incoming web requests (like from a browser or mobile app), delegate to services, and return responses. We will cover this in detail in Module 9.
All these annotations are themselves annotated with @Component, meaning they behave just like @Component for the purpose of bean registration, but they also add semantic meaning and, in some cases, extra functionality.
Let's watch Dan Vega apply this. He refactors his code to use constructor injection, then sees the application fail because Spring doesn't know about ArticleRepository or SimpleSlugService. He then fixes it by adding the appropriate stereotype annotations.
Dependency Injection Spring: How to use Dependency Injection in Spring Boot
Continuing with Dan Vega's video.
Watch as he refactors the ArticleController to accept an ArticleRepository in its constructor. See the application fail with a "bean...could not be found" error. This is a classic Spring problem. He then adds the @Repository annotation to ArticleRepository, and the application starts successfully. This is the "aha!" moment of DI in action. This part is crucial. Finally, he does the same for the SimpleSlugService, marking it with the generic @Component annotation because it doesn't fit neatly into the "repository" or "service" layer—it's a general utility. This final step shows how to handle custom components.
4. Why Bother with Specializations?
At this point, you might be asking: "If @Service, @Repository, and @Controller are all just types of @Component, why not just use @Component everywhere?"
This is an excellent question, and the answer has two parts: semantics and special features. The following video provides one of the clearest explanations of these differences.
Difference between Component Service Repository Controller & RestController annotation | Code Decode
This video from the "Code Decode" channel directly compares the stereotype annotations.
First, watch the introduction to understand the concept of stereotype annotations as "special labels". The intro sets the stage well. Next, see the presenter look inside the annotations' source code to prove that @Service, @Repository, and @Controller are all meta-annotated with @Component. This part confirms their relationship.
Semantics: @Service vs. @Component
For @Service, the primary benefit is semantic. It clearly communicates the intended role of the class. When another developer (or your future self) sees @Service, they immediately know it contains business logic. While it is technically identical to @Component today, using it makes your code more self-documenting. Spring may also add @Service-specific functionality in future versions.
Difference between Component Service Repository Controller & RestController annotation | Code Decode
Continuing with the "Code Decode" video.
Watch the section on the @Service annotation. The key takeaway is that, at present, it is functionally the same as @Component but serves as a clear marker for the business logic layer. This segment clarifies its role.
Special Features: The Power of @Repository
For @Repository, there is a significant technical benefit in addition to the semantic meaning: automatic exception translation.
Persistence technologies like JDBC can throw technology-specific checked exceptions (e.g., SQLException). If your service layer calls the repository directly, it would need to try-catch these SQLExceptions, tightly coupling your business logic to your persistence technology.
When you annotate a class with @Repository, Spring applies a mechanism that automatically intercepts these platform-specific exceptions and re-throws them as Spring's own generic, unchecked DataAccessException. This means your service layer only needs to worry about handling a single, technology-agnostic exception type, making your code cleaner and more portable.
Difference between Component Service Repository Controller & RestController annotation | Code Decode
Continuing with the "Code Decode" video.
This is the most important part of the video. The presenter gives an excellent explanation of @Repository's exception translation feature, explaining how it converts checked exceptions like SQLException into a runtime DataAccessException. This detailed explanation is key to understanding the practical value of @Repository. Finally, watch the summary to reinforce the differences and when it is (and isn't) appropriate to interchange the annotations. The recap brings it all together.
Conclusion
Today, you've taken a significant step from understanding the theory of IoC/DI to applying it in practice. You now have the tools to structure a Spring application cleanly and tell the IoC container exactly what components it needs to manage.
Key Takeaways:
- Spring uses component scanning to automatically detect classes that it should manage as beans.
@Componentis the generic stereotype annotation that marks a class as a candidate for bean registration.@Service,@Repository, and@Controllerare specialized versions of@Componentused to define the logical layers of an application (business logic, data access, and presentation, respectively).- Using specialized annotations improves code clarity and communicates intent to other developers.
- The
@Repositoryannotation provides the added benefit of automatic exception translation, which decouples your business logic from specific persistence technologies.
In our next lesson, we will formalize the process of wiring these beans together. While you've seen it happen implicitly in the videos, we'll focus explicitly on dependency injection, exploring constructor injection and the @Autowired annotation to complete the picture of how Spring builds your application.