Welcome to the final lesson in our microservices module! In our previous session, we established a dynamic "phonebook" for our services using Eureka, allowing them to discover and communicate with each other without hardcoded addresses. However, this solves only internal communication. A crucial question remains: how do external clients, like a web or mobile app, interact with our sprawling system? Exposing every microservice directly would be a security and management nightmare.
This lesson addresses that exact problem. We will introduce an API Gateway, which acts as a single, unified entry point for all external requests. You will learn to implement this pattern using Spring Cloud Gateway, creating a robust "front door" that intelligently routes incoming traffic to the appropriate downstream microservice. This is the final architectural piece needed to complete our foundational microservices system.
1. The Role of an API Gateway
An API Gateway is a server that sits between your client applications and your collection of backend services. It acts as a reverse proxy, accepting all application programming interface (API) calls, and forwarding them to the appropriate microservice.
This pattern provides several key benefits:
- Single Entry Point: Clients only need to know the address of the gateway, not every individual service. This simplifies client-side code and configuration.
- Encapsulation: The internal structure of the microservices is hidden from the client. You can refactor, add, or remove services without impacting the client.
- Cross-Cutting Concerns: The gateway is the ideal place to handle logic that applies to multiple services, such as authentication, security, rate limiting, logging, and monitoring.
The diagram below illustrates this concept. Clients send requests to the API Gateway, which might handle authentication before routing the request to the correct internal service.

Clients (laptops, mobile devices) communicate with a single API Gateway, which handles authentication and routes requests to the appropriate backend microservices (Service A, Service B).
The following video provides an excellent high-level overview of why an API Gateway is so critical in a distributed architecture.
Microservices API Gateway Tutorial | Spring Cloud | Java Spring Boot
This video from the "Think Constructive" channel explains the problem an API Gateway solves and its role as a single point of entry for various client applications.
Watch the segment from API Gateway concept to understand the "what" and "why" of this architectural pattern.
2. How Spring Cloud Gateway Works
Spring Cloud Gateway is a modern, reactive, and powerful library for building API gateways in the Spring ecosystem. It processes requests through a specific flow:
- A client sends a request to the Gateway.
- The Gateway Handler Mapping checks if the request matches any defined Route. A route is the basic building block, defined by an ID, a destination URI, and a collection of Predicates.
- A Predicate is a condition that must be met for the route to be matched. For example, a request must have a certain path (
/api/users/**) or a specific header. - If a route is matched, the request is passed to the Gateway Web Handler, which sends it through a filter chain.
- Filters can modify the incoming request before it's sent to the downstream service or modify the outgoing response before it's sent back to the client.
This internal processing flow is visualized perfectly in the official Spring Cloud Gateway diagram.
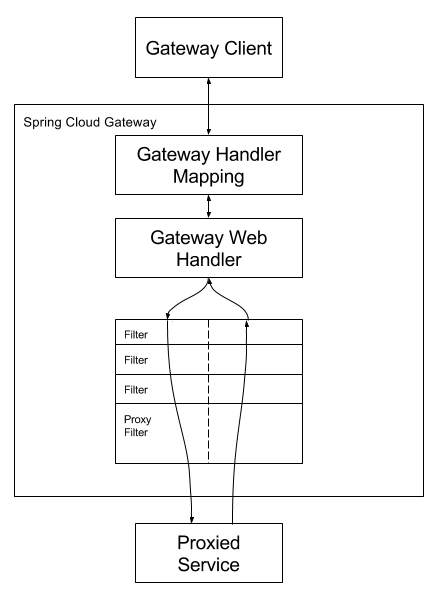
A request from a Gateway Client is first matched by the Gateway Handler Mapping. It's then processed by the Gateway Web Handler, which applies a chain of pre-filters, sends the request to the Proxied Service, and then applies post-filters to the response.
For a clear explanation of these components, watch the following segment.
Building an API Gateway in Java with Spring Cloud Gateway
This video by Dan Vega clearly breaks down the features of Spring Cloud Gateway and walks through the request lifecycle diagram you just saw.
Watch the clip from Spring Cloud Gateway features to solidify your understanding of routes, predicates, and the filter chain.
3. Setting Up the Gateway Project
Let's create our API Gateway. This will be a new Spring Boot application that, crucially, will also be a Eureka client so it can discover our backend services.
- Navigate to start.spring.io.
- Create a Maven project with Java.
- Add two dependencies:
- Gateway (under Cloud Routing)
- Eureka Discovery Client (under Cloud Discovery)
The video below walks through this exact setup process.
Microservices API Gateway Tutorial | Spring Cloud | Java Spring Boot
This practical segment demonstrates how to create the API Gateway project using Spring Initializr and explains the role of each dependency.
Follow the steps shown from implementing the gateway. You will create the project, import it into your IDE, and see the pom.xml dependencies. The instructor also adds the @EnableDiscoveryClient annotation (though this is no longer strictly required with modern Spring Boot versions, it's good practice to be aware of).
4. Configuring Routes with Eureka Integration
Now for the core of our implementation: telling the gateway how to route requests. We will use the declarative approach by defining routes in the application.yml file. This method is clean, powerful, and keeps configuration separate from code.
Our goal is to configure the gateway to route requests to the services we registered with Eureka in the last lesson. For example, a request to http://<gateway-host>:<port>/user-service/** should be forwarded to an available instance of our user-service.
This is where the magic of Spring Cloud and Eureka comes together. Instead of hardcoding the uri of our downstream service (e.g., http://localhost:8081), we will use the load-balanced URI scheme: lb://<service-name>.
The lb:// prefix tells Spring Cloud Gateway to query the Eureka server to find a healthy instance of the service named <service-name> and forward the request there. This makes our routing dynamic and resilient to changes in service locations.
Let's configure our gateway. Open its src/main/resources/application.properties or application.yml file.
# application.yml

# Gateway Server Port
server:
  port: 9000

# Give the gateway a name for Eureka
spring:
  application:
    name: api-gateway

  # Configure Routes
  cloud:
    gateway:
      routes:
        # Route for the User Service
        - id: user-service-route
          uri: lb://user-service  # "lb" stands for load balancer. Gateway will ask Eureka for the service location.
          predicates:
            - Path=/users/**   # Match any request starting with /users/

        # Route for the Order Service
        - id: order-service-route
          uri: lb://order-service
          predicates:
            - Path=/orders/**

# Tell the gateway where to find the Eureka server
eureka:
  client:
    service-url:
      defaultZone: http://localhost:8761/eureka
The video below provides a complete walkthrough of this configuration process, demonstrating how to set up routes for multiple services that are registered with Eureka.
Microservices API Gateway Tutorial | Spring Cloud | Java Spring Boot
This is a crucial section that connects the gateway to the Eureka server from our previous lesson. It demonstrates setting up the server port, application name, Eureka client URL, and defining the routes.
Watch carefully from configuring routes. The instructor uses application.properties, but the concepts map directly to the YAML format shown above. Pay close attention to how spring.cloud.gateway.routes are defined with an ID, a uri using the lb:// scheme, and a Path predicate.
5. Testing and Monitoring the Gateway
With the gateway configured and running (along with your Eureka server and downstream microservices), you can now test the entire flow. Use a tool like Postman or curl to send a request to the gateway's address, not the individual service's address.
For example, if your user-service has an endpoint at GET /users/1, you would now make a request to GET http://localhost:9000/users/1. The gateway will match the /users/** predicate and forward the request to the user-service instance it discovers from Eureka.
The final part of the "Think Constructive" video demonstrates this testing process beautifully.
Microservices API Gateway Tutorial | Spring Cloud | Java Spring Boot
This part shows the complete system in action. The presenter starts all the services, shows them in the Eureka dashboard, and then sends requests via the gateway's port (9000) to each downstream service.
Watch from testing the gateway to see the end result of your configuration.
For debugging, Spring Cloud Gateway exposes helpful information through Spring Boot Actuator. By including the Actuator dependency and enabling its web endpoints, you can view all active routes.
Lab 1: Routing - Configure & Monitor Gateway Routes
This resource explains how to use Actuator endpoints for monitoring your gateway.
First, ensure you have the spring-boot-starter-actuator dependency in your pom.xml. Then, add the necessary configuration to expose the endpoints as shown in the section "Monitor routes and route metrics". Once configured, you can access http://localhost:9000/actuator/gateway/routes in your browser to see a JSON representation of all routes loaded by your gateway. This is incredibly useful for verifying that your application.yml configuration has been correctly parsed and applied.
Conclusion
Congratulations on completing the core curriculum of this course! You have built a complete, albeit simple, microservices architecture. You've gone from Java fundamentals to creating independent services, enabling them to communicate dynamically, and finally, exposing them to the outside world through a secure and manageable API Gateway.
Key Takeaways:
- An API Gateway serves as the single entry point for a microservices system, simplifying client interactions and centralizing cross-cutting concerns.
- Spring Cloud Gateway uses a system of Routes, Predicates, and Filters to process incoming requests.
- Routes can be configured declaratively in
application.yml, which is flexible and keeps configuration separate from code. - The
lb://<service-name>URI scheme is the key to integrating Spring Cloud Gateway with a service registry like Eureka, enabling dynamic, load-balanced routing. - The Actuator endpoint
/actuator/gateway/routesis an essential tool for debugging and monitoring your gateway's configuration.
You now possess the foundational knowledge for enterprise Java backend development. The next steps in your journey would involve exploring resilience patterns (like circuit breakers, which we briefly saw mentioned), advanced security configurations, containerization with Docker, and automated deployment pipelines. You have built an excellent foundation upon which to add these more advanced skills.