Hello! In our last lesson, we successfully enabled communication between two microservices using Spring's RestTemplate and WebClient. However, we identified a significant weakness in our approach: we hardcoded the network addresses (like http://localhost:8082) of our services. This is brittle and unworkable in a real-world environment where services can be scaled, restarted, or moved, causing their addresses to change dynamically.
Today, we will solve this fundamental problem. We'll introduce the concept of a Service Registry, which acts as a dynamic phonebook for our microservices. Instead of knowing each other's addresses, services will register themselves with this central registry and discover others by a logical name.
This lesson will guide you through setting up and registering a service with a discovery server. Specifically, we will use Netflix Eureka, a popular and battle-tested service registry that integrates seamlessly with the Spring Cloud ecosystem. This is a crucial step in building a resilient and scalable microservices architecture.
1. The Role of a Service Registry
In a distributed system, service discovery is the process by which services locate each other on the network. A service registry is the heart of this process. The pattern is straightforward:
- Registration: When a microservice (a "client") starts up, it registers its network location (IP address and port) with the service registry (the "server") under a specific application name (e.g.,
order-service). It also sends periodic "heartbeats" to let the registry know it's still alive. - Discovery: When another service needs to communicate with
order-service, it doesn't need to know its physical address. Instead, it asks the registry: "Where can I find an instance oforder-service?" - Invocation: The registry returns a list of available instances for
order-service. The calling service can then use this information to make a direct HTTP request.
This client-server interaction is elegantly illustrated in the following diagram.
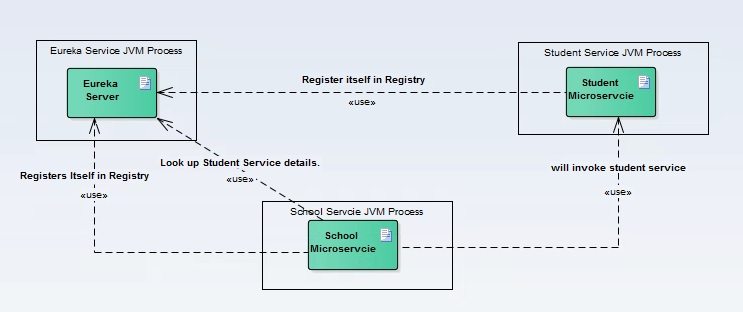
This pattern, known as client-side service discovery, makes our architecture dynamic. If we add more instances of Student Service for scaling, they simply register with Eureka, and the School Service will automatically discover them without any configuration changes.
For a great conceptual overview, the following video explains this "phonebook" analogy and sets the stage for our practical implementation.
Introducing Spring Cloud EUREKA | HOW TO DISCOVER MICROSERVICES ? Service Discovery | SPRING BOOT #6
This video from the Selenium Express channel provides an excellent, easy-to-understand analogy for why a discovery service is necessary and how it works.
Watch the initial segment that introduces the problem and the solution using a simple phone number analogy, which maps directly to microservice URLs: The Story So Far.
2. Setting Up the Eureka Server
Our first task is to create the central registry itself. This will be a standalone Spring Boot application with the Eureka Server dependency.
The official Spring guide "Service Registration and Discovery" provides a clear, step-by-step walkthrough. We will follow its structure.
Getting Started | Service Registration and Discovery - Spring
This guide is our primary reference for building both the Eureka server and client. It provides the exact dependencies and configurations needed.
First, read the section "Starting with Spring Initializr" to understand the project setup. You will need to create a new Spring Boot project for the server. The only dependency required is Eureka Server. Next, follow the instructions in the section "Start a Eureka Service Registry". This section covers two critical steps: Adding the @EnableEurekaServer annotation to your main application class. This single annotation transforms your Spring Boot application into a Eureka server. Configuring the application.yml (or application.properties) file.
Let's pause to understand the configuration properties from the guide, as they are essential and address common pitfalls.
server.port: 8761: This sets the server to run on port8761, which is the conventional default for Eureka.eureka.client.register-with-eureka: false: By default, a Eureka-aware application (even a server) will try to register itself with the Eureka server defined in its configuration. Since this application is the server, we disable this behavior to prevent it from trying to register with itself.eureka.client.fetch-registry: false: This property tells the client not to fetch the registry information from a server. Again, since this application is the server, it holds the registry and doesn't need to fetch it from anywhere else.
These properties are necessary for a standalone, single-node Eureka server. In a production environment with multiple Eureka servers for high availability, these would be set to true to allow the servers to register with each other.
The "Selenium Express" video you watched earlier contains a fantastic deep dive into exactly why these properties are needed, explaining the errors that occur if you omit them.
Introducing Spring Cloud EUREKA | HOW TO DISCOVER MICROSERVICES ? Service Discovery | SPRING BOOT #6
This video provides a very practical demonstration of the errors you'll encounter without the correct configuration and why those errors happen.
Watch the segment from understanding peer awareness, where the instructor explains that a Eureka server, by default, assumes it has peers (other Eureka servers) and tries to sync with them. This is the core reason why we need to explicitly tell our single server not to fetch or register. The remainder of the video, up to 01:02:00, provides an extremely detailed explanation of this behavior under different port configurations, which you may find useful for deeper understanding.
Once you have created your Eureka server project, added the annotation, and set the properties, you can run it. Open your browser and navigate to http://localhost:8761. You should see the Eureka dashboard, ready to accept registrations.
3. Registering a Microservice as a Eureka Client
Now that our registry is running, let's register one of our existing microservices with it. We'll make it a "Eureka Client".
The process is simple and involves two steps: adding a dependency and providing configuration.
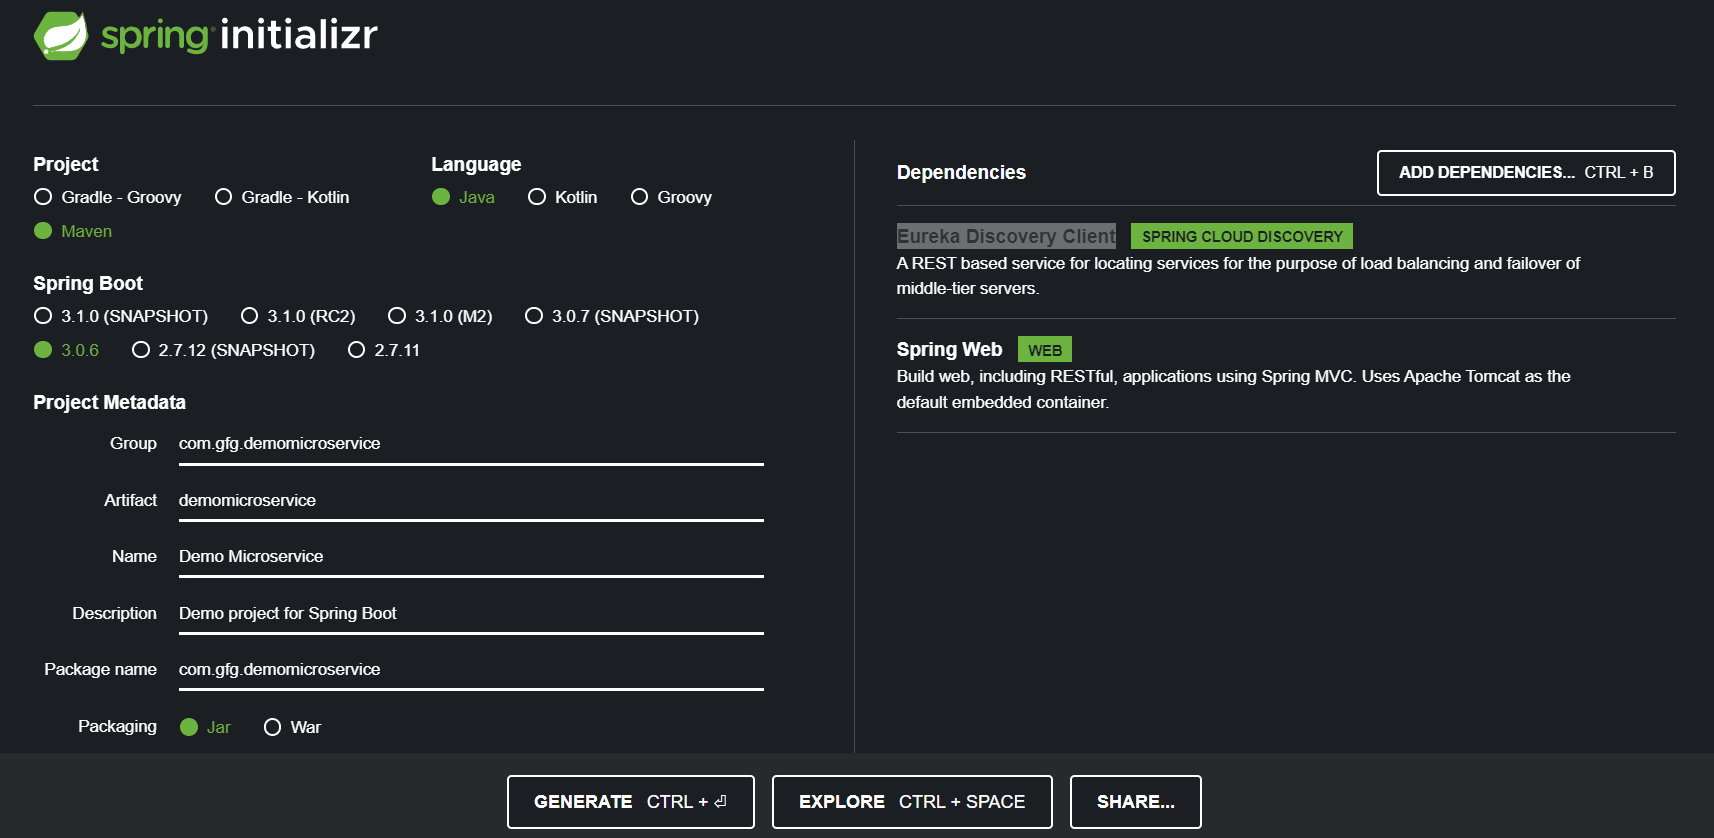
For an existing project, you just need to add the spring-cloud-starter-netflix-eureka-client dependency to your pom.xml. Once this dependency is on the classpath, your application automatically tries to contact a Eureka server on startup.
Now, we need to tell it where to find our server. Let's return to the Spring guide.
Getting Started | Service Registration and Discovery - Spring
This guide shows how to configure a service to register with the Eureka server we just built.
Read the section "Talking to the Registry". Focus on the configuration for Service A. You only need to add two properties to your client's application.yml: spring.application.name: This sets the logical service ID that will be used for discovery. Choose a meaningful, lowercase name (e.g., order-service). eureka.client.service-url.defaultZone: This property tells your client the address of the Eureka server. In our case, it's http://localhost:8761/eureka.
After adding the dependency and these properties to your microservice, start it up. Then, refresh the Eureka dashboard at http://localhost:8761. You should now see your application listed under "Instances currently registered with Eureka"!
The "Selenium Express" video also provides a great visual walkthrough of this client registration process.
Introducing Spring Cloud EUREKA | HOW TO DISCOVER MICROSERVICES ? Service Discovery | SPRING BOOT #6
This section of the video shows the client registration in action, including how multiple instances of the same service appear on the dashboard.
Watch from registering a client to see the address-service get registered and appear on the dashboard. The instructor then starts a second instance, demonstrating how Eureka handles multiple instances of the same service.
4. Dynamic Discovery with DiscoveryClient
Simply registering a service is only half the story. The real power comes when another service can discover it. In our last lesson, we hardcoded a URL. Now let's replace that with a dynamic lookup using Spring Cloud's DiscoveryClient.
The DiscoveryClient is an abstraction that lets you query the service registry for services by name. Let's finish the Spring guide to see how it's used.
Getting Started | Service Registration and Discovery - Spring
This final part of the guide connects all the pieces by showing how a client (serviceb) discovers and calls another client (servicea).
Read the section "Service B Endpoint". Pay close attention to the code in ServiceBRestController. Notice how: DiscoveryClient is injected into the constructor. discoveryClient.getInstances("servicea") is called to get a list of all available instances of servicea. serviceInstance.getUri() is used to retrieve the base URI of an instance (e.g., http://localhost:8081). This dynamic URI is then used with a RestClient (or RestTemplate/WebClient) to make the actual call.
This final step closes the loop and fully replaces the fragile, hardcoded URL from our previous lesson with a resilient, dynamic discovery mechanism.
5. Best Practices and Production Considerations
While our current setup is perfect for local development, a production environment requires more robustness. Here are a couple of important concepts you should be aware of, detailed in the OneUptime blog.
How to Build a Service Registry with Eureka in Spring - OneUptime
This blog post provides some excellent best practices for running Eureka in a real-world scenario.
Read the section "Best Practices". Focus on these two points: Configure Appropriate Heartbeat Intervals: The lease-renewal-interval-in-seconds property controls how often a client sends a heartbeat. If the server doesn't receive a heartbeat within the lease-expiration-duration-in-seconds, it removes the instance from the registry. Tuning these values is a trade-off between fast detection of failed services and network traffic. Enable Self-Preservation in Production: This is a critical feature. If a network partition occurs and the Eureka server stops receiving heartbeats from a large percentage of its clients, it will enter self-preservation mode and stop expiring leases. This prevents a temporary network issue from causing a cascading failure where all clients are de-registered. It is typically disabled in development but should be enabled in production.
Conclusion
Congratulations! You have successfully implemented one of the most fundamental patterns in microservices architecture. You've replaced fragile, hardcoded network addresses with a robust and dynamic service discovery mechanism.
Key Takeaways:
- Service Discovery allows microservices to find each other dynamically using logical names, eliminating the need for hardcoded URLs.
- Netflix Eureka provides a client-server architecture for service discovery. You created a Eureka Server to act as the central registry and configured a microservice to act as a Eureka Client.
- The
@EnableEurekaServerannotation is all that's needed to create a Eureka server. - Key server properties (
eureka.client.register-with-eureka: false,eureka.client.fetch-registry: false) are required for a standalone server to prevent it from trying to register with itself. - Key client properties (
spring.application.name,eureka.client.service-url.defaultZone) are used to define the service's name and locate the registry. - You can use Spring's
DiscoveryClientto programmatically look up service instances and build request URLs dynamically.
Now that our services can find each other, a new question arises: how do external users or frontend applications access our services? Should they know the address of every single microservice? This would be complex and insecure. The solution is to introduce a single entry point to our system.
In the next lesson, we will explore this by learning how to route requests to downstream services using an API Gateway, which will act as the front door to our entire microservices landscape.