Welcome back! Over the last few modules, you've built a secure, data-driven backend application, culminating in a robust authorization system using Spring Security. Now that your application has a solid feature set, our focus shifts to ensuring its quality, correctness, and maintainability. This is where automated testing becomes indispensable in professional software development.
This lesson marks our entry into the final module of the course: Application Testing. We'll start at the foundation of the testing pyramid with unit tests. You will learn how to write isolated tests for your service layer components—the core business logic of your application—using two of the most popular tools in the Java ecosystem: JUnit 5 and AssertJ. This will set the stage for building a reliable and robust enterprise application.
By the end of this lesson, you'll be able to write your first unit tests for a Spring service, verifying that your business logic works exactly as intended.
The "Why" and "What" of Unit Testing
In any large-scale application, a change in one part of the code can unintentionally break another. Manually testing every feature after every change is slow, error-prone, and simply doesn't scale. Automated tests are your safety net; they run quickly and consistently, giving you the confidence to refactor and add new features.
A unit test is the most fundamental type of test. It focuses on a single "unit" of code—typically a method or a class—in complete isolation from its dependencies. For example, when testing a service, we don't want to involve a real database or make actual network calls. The goal is to verify that the logic within that specific unit is correct.
Most unit tests follow a simple, readable structure known as Given-When-Then (or Arrange-Act-Assert):
- Given: Set up the preconditions. This involves creating objects, preparing input data, and configuring any "fake" dependencies the unit needs.
- When: Execute the action. This is the call to the specific method you are testing.
- Then: Verify the outcome. This involves checking the return value, the state of the object, or whether other methods were called as expected.
This structure makes tests act as living documentation, clearly describing the behavior of your code. The Amigoscode video provides a great introduction to this concept with a simple calculator example.
Software Testing Tutorial - Learn Unit Testing and Integration Testing
This segment from the "Software Testing Tutorial" introduces the basic structure of a unit test using the "Given-When-Then" pattern.
Watch the section from this clip where the instructor builds a simple test for a Calculator class. Pay close attention to how the test is structured into given, when, and then blocks.
Your Testing Toolkit: Spring Boot, JUnit 5, and AssertJ
Spring Boot greatly simplifies testing by providing a single starter dependency, spring-boot-starter-test, which bundles the essential libraries.
Software Testing Tutorial - Learn Unit Testing and Integration Testing
This part of the video explains what's included in Spring Boot's test starter, so you don't have to configure these libraries manually.
Watch from this section to see the dependencies that spring-boot-starter-test automatically pulls into your project, including JUnit 5, AssertJ, and Mockito.
The three key players we'll focus on today are:
- JUnit 5: The de-facto standard framework for running tests on the JVM. It provides the engine and annotations like
@Testto discover and execute our test methods. - AssertJ: A library that provides "fluent" assertions. While JUnit has its own assertion methods (e.g.,
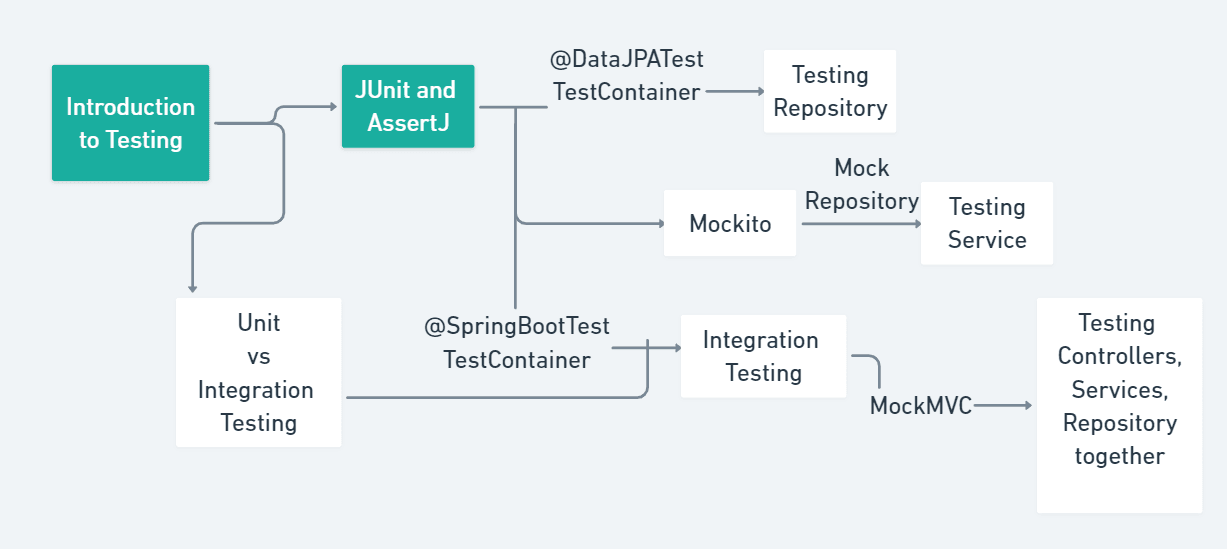
assertEquals(expected, actual)), AssertJ is widely preferred for its superior readability and more powerful, chainable API (e.g.,assertThat(actual).isEqualTo(expected)). - Mockito: A mocking framework. We'll touch on this briefly today and dive deep in our next lesson. It allows us to create fake implementations of our dependencies (like repositories) so we can test our service in isolation.
The following flowchart shows how these tools come together. Today, we're focusing on the core path of using JUnit and AssertJ, with a light introduction to Mockito to enable testing our service layer.
AssertJ: Writing Assertions That Read Like Sentences
The main reason for AssertJ's popularity is its readability. Compare these two assertions:
- JUnit:
assertEquals(50, result); - AssertJ:
assertThat(result).isEqualTo(50);
The AssertJ version reads more like a natural sentence, making it immediately clear what is being tested. It also provides a rich set of type-specific assertions that can be chained together.
This video from SivaLabs provides a concise comparison and highlights the power of AssertJ.
Java Testing Made Easy: Why using Assertj assertions much better?
This video, "Java Testing Made Easy," clearly contrasts standard JUnit assertions with the fluent, more expressive style of AssertJ.
Watch the first two sections of the video, from the beginning to this point. It will show you how to write basic AssertJ assertions and how the library provides context-aware suggestions based on the type of object you are asserting.
Writing a Unit Test for the Service Layer
Let's put theory into practice by writing a unit test for one of your services, for example, the UserService. A service class typically depends on a repository to interact with the database. To write a true unit test for the service, we must isolate it from the repository. We do this by creating a mock—a simulated version of the repository that we can control directly in our test.
The javaguides.net article provides a complete and excellent walkthrough for unit testing a service layer. We will follow its structure to test our own service.
Spring Boot Unit Testing Service Layer using JUnit and ...
This article by Ramesh Fadatare is a perfect guide for our goal. It demonstrates how to set up a test class, mock dependencies, and write various test cases for a service layer.
First, read the introduction to understand the setup. The key takeaway is in the section "Testing Service Layer Components", which explains why we need to mock the repository. Next, quickly review the example code for the Entity, Repository, and Service to understand the components being tested. This is analogous to your own User, UserRepository, and UserService. Finally, study the entire section "Unit Testing Service Layer" carefully. This is the most important part. As you read, pay attention to: The annotations at the top of the EmployeeServiceTests class: @ExtendWith(MockitoExtension.class), @Mock, and @InjectMocks. The @BeforeEach method used for setting up a reusable employee object. The "Given-When-Then" structure within each @Test method (commented in the code). How given(...).willReturn(...) is used to program the behavior of the mocked repository. How assertThat(...) from AssertJ is used in the "then" block to verify the results.
Step-by-Step: Your UserServiceTest
Now, let's apply the principles from the article to create a UserServiceTest.java file in your src/test/java directory, mirroring your main package structure.
1. Set up the Test Class
Your test class should start with these annotations.
import static org.assertj.core.api.Assertions.assertThat;
import static org.mockito.BDDMockito.given;

import org.junit.jupiter.api.BeforeEach;
import org.junit.jupiter.api.Test;
import org.junit.jupiter.api.extension.ExtendWith;
import org.mockito.InjectMocks;
import org.mockito.Mock;
import org.mockito.junit.jupiter.MockitoExtension;

@ExtendWith(MockitoExtension.class) // Enables Mockito
public class UserServiceTest {

    @Mock
    private UserRepository userRepository; // Create a mock UserRepository

    @InjectMocks
    private UserServiceImpl userService; // Create an instance of UserService and inject the mock

    private User user;

    @BeforeEach
    public void setup() {
        // Create a reusable User object before each test
        user = new User(/*... user details ...*/);
        user.setId(1L);
    }

    // ... your test methods will go here
}
@ExtendWith(MockitoExtension.class)integrates JUnit 5 with Mockito.@Mockcreates a mock object for theUserRepository. This is our fake dependency.@InjectMockscreates a realUserServiceImplobject and automatically injects the mockuserRepositoryinto it.
2. Test the getAllUsers Method
Let's write a test to verify that the getAllUsers method correctly retrieves a list of users.
// BDD-style test method name
@Test
public void givenUsersExist_whenGetAllUsers_thenReturnUserList() {
    // Given - precondition or setup
    User anotherUser = new User(/*... more details ...*/);
    anotherUser.setId(2L);

    // We tell our mock repository to return a list with two users when findAll() is called
    given(userRepository.findAll()).willReturn(List.of(user, anotherUser));

    // When - action or the behavior that we are going to test
    List<User> userList = userService.getAllUsers();

    // Then - verify the output
    assertThat(userList).isNotNull();
    assertThat(userList.size()).isEqualTo(2);
}
3. Test a Negative Scenario
Good tests cover both positive and negative paths. Let's test the case where no users exist.
@Test
public void givenNoUsersExist_whenGetAllUsers_thenReturnEmptyList() {
    // Given
    // We tell our mock repository to return an empty list
    given(userRepository.findAll()).willReturn(Collections.emptyList());

    // When
    List<User> userList = userService.getAllUsers();

    // Then
    assertThat(userList).isEmpty();
    assertThat(userList.size()).isEqualTo(0);
}
By writing these tests, you are verifying the behavior of your UserService without ever touching a database. The tests will run in milliseconds, providing instant feedback. The goal is to write enough tests to cover all the important logic in your service, which gives you a high degree of confidence in your code's correctness. Tools in your IDE can even show you which lines of code your tests have covered.

Conclusion
In this lesson, you've taken your first crucial step into automated testing in Java. You learned the fundamental principles of unit testing, saw how to structure tests for clarity using the "Given-When-Then" pattern, and wrote your first tests for a Spring service.
Key Takeaways:
- Unit tests are fast, isolated tests that verify a single unit of code.
- The Given-When-Then (or Arrange-Act-Assert) pattern is a convention for writing readable and maintainable tests.
- JUnit 5 is the framework that discovers and runs your tests (
@Test,@BeforeEach). - AssertJ is a fluent assertion library that improves test readability (
assertThat). - To unit test a service, you must mock its dependencies (like repositories) to ensure isolation. We used
@Mockand@InjectMocksfor this.
We've only scratched the surface of what's possible with mocking. You've seen how to set up a mock and define its return value using given(...).willReturn(...). In our next lesson, we will dive deep into the Mockito framework. You'll learn how to verify interactions with mocks, test exception-throwing scenarios, and capture arguments for more complex assertions. This will complete your foundational toolkit for writing professional-grade unit tests.