Hello! Welcome back.
In our last lesson, we put on our network architect hats and designed IP addressing schemes. You learned how to use CIDR notation to define network sizes and how to subnet a larger block into smaller, isolated networks for better organization and security. We planned where devices would live on the network by assigning them IP addresses.
But how does your computer find the IP address for google.com in the first place? We don't browse the web by typing in numbers like 142.250.190.78. This is where the Domain Name System (DNS) comes in. It's the internet's global address book.
Today, we will trace the path of a DNS lookup using the dig command and explain each step of the resolution process. This is a fundamental troubleshooting skill. When a service is unreachable, "is it DNS?" is one of the first questions an administrator asks. Mastering the dig command will give you the power to answer that question definitively.
1. The DNS Hierarchy: A Chain of Command
Before we start digging, let's understand the journey a DNS query takes. It’s not a simple one-step lookup; it’s a hierarchical process involving several types of servers. The phone book analogy is a good start, but it's more like a series of receptionists who keep redirecting your call until you reach the right person.
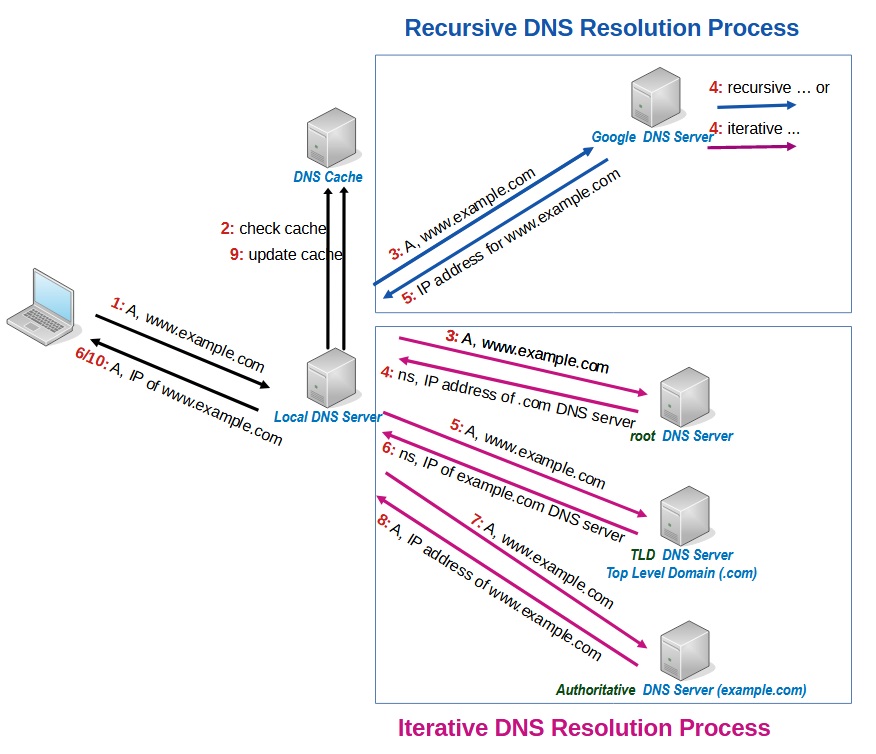
The key players in this process are:
- Stub Resolver: The DNS client on your own computer. It's "stubborn" and simple; its only job is to ask the next server in line, the Recursive Resolver.
- Recursive Resolver (or Recursor): This is the workhorse. It's usually your Internet Service Provider's (ISP) DNS server or a public one like Google's (
8.8.8.8) or Cloudflare's (1.1.1.1). When it receives a query, its job is to do whatever it takes to find the final answer. It does this by performing iterative queries. - Root Name Servers: The 13 groups of servers at the very top of the hierarchy. They don't know the IP for
google.com, but they know who to ask for anything ending in.com. - Top-Level Domain (TLD) Name Servers: These servers manage specific TLDs like
.com,.org, or.net. They don't know the IP forgoogle.comeither, but they know who is in charge of thegoogle.comdomain. - Authoritative Name Servers: This is the final destination. This server holds the actual DNS records for a specific domain (e.g.,
google.com) and provides the definitive, or authoritative, answer.
The following video provides an excellent and engaging overview of this entire process.
What is DNS? (and how it makes the Internet work)
The video "What is DNS?" from NetworkChuck explains the concepts of the DNS hierarchy in a very clear and practical way. It walks through the entire journey of a query from your computer to the authoritative server.
Please watch from the beginning up to the 9:02 mark. Pay close attention to: The initial explanation of the stub resolver and recursive resolver (02:19). The roles of the Root, TLD, and Authoritative servers in the lookup process (04:00 - 09:02).
2. Your DNS "Katana": The dig Command
To investigate this process, we need a professional tool. While commands like ping or nslookup can resolve a domain name, dig (Domain Information Groper) is the preferred tool for network and system administrators. It gives you far more detail and control, making it your "katana" for slicing through DNS problems.
First, let's make sure you have it installed. dig is part of a package of DNS utilities.
Dig Command in Linux (DNS Lookup)
The article "Dig Command in Linux (DNS Lookup)" from Linuxize provides installation instructions and a great reference for the command.
Please read the short "Installing dig" section to ensure the tool is installed on your Linux system. The commands are provided for all major distributions.
Now that dig is installed, let's learn how to use it. A basic dig command can seem overwhelming at first due to its verbose output.
The video "dig: A Practical Guide" by Navek provides a concise and clear walkthrough of the dig command and its output.
Watch the first four and a half minutes (00:00 - 04:28). The video does a fantastic job of: Breaking down the output into sections (Header, Question, Answer, etc.). Showing how to query for different record types (like NS for Name Server or MX for Mail Exchanger). Using options like +short or +noall +answer to get cleaner, more readable output.
As a quick reference, the Linuxize article also has an excellent, detailed breakdown of the output sections. It’s a great companion to the video.
3. Tracing the Full Path with dig +trace
Now for the main event. How can we see the entire chain of command from the Root servers all the way down to the Authoritative server? dig has a powerful option for this: +trace.
When you use +trace, dig stops using your system's default recursive resolver. Instead, it acts like a recursive resolver itself, performing the step-by-step iterative queries.

Let's run this command yourself in your terminal:dig google.com +trace
You will see output similar to the image above. It might look complex, but it's just a sequence of simple questions and referrals.
- Query to Root Servers:
digstarts by asking one of the root servers (e.g.,a.root-servers.net.) forgoogle.com. - Referral to TLD Servers: The root server responds, "I don't know, but here is a list of the
.comTLD servers. Go ask them." - Query to TLD Servers:
digpicks one of the.comTLD servers (e.g.,a.gtld-servers.net.) and asks it forgoogle.com. - Referral to Authoritative Servers: The TLD server responds, "I don't know either, but
google.comtold me thatns1.google.com.is their authoritative name server. Go ask it." - Query to Authoritative Server:
digthen asksns1.google.com.for the address ofgoogle.com. - The Authoritative Answer: Finally,
ns1.google.comprovides the answer: theArecord containing the IP address. Notice theaaflag in the header of this final response, which stands for "Authoritative Answer".
To really solidify your understanding of how +trace works under the hood, the following reading is invaluable. It manually recreates the +trace process using a series of individual dig commands.
How does dig +trace actually work?
This Q&A from Super User, "How does dig +trace actually work?", gives the single best explanation of this process. It demystifies the command by showing you the exact iterative queries it performs.
Read the accepted answer (the one with the green checkmark). The author walks you through a +trace for www.google.co.uk by manually running dig +norecurse against each server in the chain. This will crystallize how referrals work and what dig is doing for you automatically.
Your Turn: Practice Tracing
Theory and examples are great, but practical application is your "katana". Time to wield it.
- Open your terminal.
- Pick a few websites you use often (e.g.,
github.com,reddit.com, or a news site from your country). - For each one, run
dig <domain> +trace. - As you look at the output, identify the three main stages:
- The referral from the root server to the TLD server.
- The referral from the TLD server to the authoritative name server.
- The final authoritative answer (
aaflag) from the domain's own name server.
This exercise will prepare you to explain the DNS resolution process with confidence—a common task in technical interviews.
Conclusion
You've now peered behind the curtain of the internet's address book. You've gone from simply knowing that DNS exists to being able to trace its every step and diagnose its behavior with a powerful command-line tool.
Key Takeaways:
- DNS resolution is a hierarchical process involving Root, TLD, and Authoritative name servers.
- Your computer's stub resolver makes a request to a recursive resolver, which performs iterative queries to find the answer.
- The
digcommand is the professional standard for querying DNS servers and troubleshooting issues. dig +tracesimulates the entire iterative lookup process, showing you the full delegation path from the root servers down to the final answer. This is your primary tool for diagnosing DNS resolution failures.
In our next lesson, we'll shift our focus slightly. We now know how a name gets resolved to an IP address. But how does your computer get an IP address in the first place when it joins a network? We will investigate this by observing a DHCP lease assignment and identifying the DORA (Discover, Offer, Request, Acknowledge) process steps in a packet capture.