Hello! Welcome to the next lesson in your journey to becoming a data center professional.
In our last lesson, we mastered systemctl, learning how to manage the services that are the lifeblood of any server. We started, stopped, and enabled the Apache web server. This raises a crucial question: how do other computers reliably find that web server? If the server's address changes every time it reboots, any service it hosts becomes unreliable.
This brings us to today's topic, which directly addresses the learning outcome: Configure network interfaces on a Linux server with a static IP address.
Assigning a static (fixed) IP address is a fundamental task for any server administrator. Unlike workstations that can use DHCP to get a temporary IP address, servers require a predictable network identity. This is critical for:
- Reliability: Services like web servers, databases, and SSH need to be reachable at the same address, always.
- DNS Records: You can create a DNS record (e.g.,
server1.mycompany.com) that points to your server's static IP. - Firewall Rules: Security rules are often tied to specific IP addresses.
- Remote Management: You need to know the exact IP to connect to your server remotely.
In an interview, explaining why a server needs a static IP is just as important as knowing how to configure one. Today, we'll focus on the modern, command-line methods you'll encounter in a data center: Netplan (used by Ubuntu/Debian) and NetworkManager's nmcli (used by Red Hat/CentOS).
1. Gathering Your Network Information
Before making any changes, a good administrator always assesses the current situation. You need to know your network's layout to assign a valid static IP. Let's find out three key pieces of information: your current IP address and interface name, your network's default gateway, and a working DNS server.
The following video demonstrates how to find this information on an Ubuntu server.
How to Set a Static IP Address in Ubuntu Server
The video 'How to Set a Static IP Address in Ubuntu Server' from TechOpt clearly shows how to use the ip command to gather the necessary network details before you begin.
Watch from the beginning until 02:08. Pay close attention to the output of the ip addr and ip route commands. You will need to run these on your own system and note down the results.
Let's recap what you just saw and apply it to your virtual machine:
-
Find your interface name and current IP:
Runip aorip addr.
You will see a few interfaces. The loopback interface is namedlo. The main network interface will have a name likeeth0,ens33, or something similar. It will also have aninetaddress, which is your current IPv4 address assigned by DHCP.- Note down your interface name (e.g.,
ens33). - Note down your current IP address and its subnet mask (e.g.,
192.168.38.129/24). The/24is CIDR notation for the subnet mask255.255.255.0. Your ECE background should make this familiar.
- Note down your interface name (e.g.,
-
Find your Default Gateway:
Runip route.
Look for the line that starts withdefault via. The IP address on this line is your gateway. This is the router your server uses to communicate with the internet.- Note down your gateway address (e.g.,
192.168.38.2).
- Note down your gateway address (e.g.,
-
Choose a Static IP Address:
You need to pick an IP address that is on the same subnet as your current IP but is not already in use. For a lab environment, a simple way is to pick an address with a high last number (e.g.,192.168.38.200) that is unlikely to be assigned by DHCP.
Now that you have your interface name, a chosen static IP, the subnet mask, and the gateway address, you're ready to configure the server.
2. Method 1: Configuring with Netplan (Ubuntu/Debian)
Modern Ubuntu Server editions use Netplan as the standard tool for network configuration. It uses simple text files written in YAML format to describe what the network configuration should be.
The video you just started watching provides a perfect walkthrough.
How to Set a Static IP Address in Ubuntu Server
Let's continue with the TechOpt video. It will now guide you through editing the Netplan YAML file to set the static IP.
Watch from 02:08 to the end (06:25). Follow along with the steps on your own server: Navigate to /etc/netplan and identify your configuration file. Open it with sudo nano. Carefully modify the file to set your static IP, gateway, and DNS servers. YAML is very strict about indentation! Use spaces, not tabs. Apply the configuration with sudo netplan apply. Verify your new IP address.
Let's review the key components of the Netplan file you created. It should look something like this:
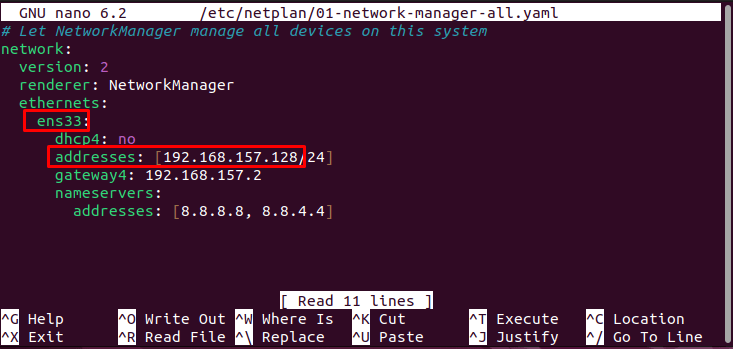
A breakdown of the configuration:
network:: The root of the file.ethernets:: Defines wired network interfaces.ens33:: Your interface name goes here.dhcp4: no: This is critical. It tells the system not to request an address from a DHCP server.addresses: [192.168.157.128/24]: Your chosen static IP and subnet mask go here. The brackets[]indicate a list, as you can assign multiple IPs to one interface.gateway4: 192.168.157.2: Your gateway address goes here. (Note: newer Netplan versions may use aroutessection as shown in the video, which is also correct).nameservers:: Defines DNS servers. Using public DNS servers like Google's (8.8.8.8,8.8.4.4) or Cloudflare's (1.1.1.1) is a safe bet.
After saving the file, sudo netplan apply reads this configuration and makes it active.
Verify your work with ip a to see the new address.

3. Method 2: Configuring with nmcli (Red Hat/CentOS)
While Netplan is the standard for Ubuntu Server, in the broader Linux world, especially in environments using Red Hat Enterprise Linux (RHEL) or its derivatives like CentOS, NetworkManager is the dominant force. Its command-line tool is nmcli. Knowing how to use it will make you more versatile.
This method is more procedural—you issue commands to modify a connection profile, rather than declaring the final state in a file.
Linux network - The most heroic network tutorial ever recorded
The video 'Linux network - The most heroic network tutorial ever recorded' by Linux Ninja provides an excellent, fast-paced guide to using nmcli.
Watch from 04:54 to 14:09. The instructor demonstrates how to: Modify a connection to add an IP address. Set the method to manual, and configure the gateway and DNS. Ensure the connection is set to autoconnect, which is vital for persistence after a reboot. Apply the changes.
Here is a summary of the nmcli process, which you can run on your VM (it will override your Netplan settings as long as NetworkManager is installed and running):
-
Find your connection name:
nmcli connection show
This will likely be named after your interface, e.g.,Wired connection 1. -
Modify the connection in a single command:
Replace<NAME>,<IP/CIDR>,<GATEWAY>, and<DNS>with your details.sudo nmcli con mod "<NAME>" ipv4.method manual ipv4.addresses <IP/CIDR> ipv4.gateway <GATEWAY> ipv4.dns "8.8.8.8,1.1.1.1" connection.autoconnect yesFor example:
sudo nmcli con mod "Wired connection 1" ipv4.method manual ipv4.addresses 192.168.38.200/24 ipv4.gateway 192.168.38.2 ipv4.dns "8.8.8.8,1.1.1.1" connection.autoconnect yes -
Apply the changes:
sudo nmcli con up "<NAME>"
This sequence modifies the profile and then reapplies it, making the changes active. The connection.autoconnect yes part is crucial; it ensures NetworkManager brings this connection up automatically at boot.
4. Temporary vs. Persistent Configuration: A Key Concept
You might see examples online of people using ip addr add .... Why didn't we do that? Because those changes are temporary. They will be lost when you reboot the server or restart the networking service. For a server, this is unacceptable.
Linux network - The most heroic network tutorial ever recorded
Let's finish the Linux Ninja video, as he makes this exact point very clearly.
Watch from 14:09 to 15:09. Understand why using the ip command directly to add an address is not a suitable method for server configuration.
Using tools like Netplan or NetworkManager (nmcli) writes your configuration to files, ensuring it is persistent across reboots. This is a fundamental principle of system administration and a great point to bring up in an interview to show you understand the difference between a quick fix and a robust configuration.
Conclusion
You have now successfully configured a static IP address on a Linux server using two of the most common modern methods. This is a day-one skill for any data center technician or Linux administrator.
Key Takeaways:
- Servers require static IPs for reliability and predictability.
- The configuration process is: Gather Info -> Configure -> Apply -> Verify.
- Netplan is the declarative, YAML-based standard for modern Ubuntu Server.
nmcliis the procedural, command-based tool for NetworkManager, common in the RHEL ecosystem.- Always use a management tool (like Netplan or
nmcli) to ensure your configuration is persistent. Avoid usingip addr addfor permanent server setup.
In our next lesson, we will continue with essential system administration tasks by learning how to schedule recurring administrative jobs using cron. This will allow you to automate tasks like backups, updates, and system checks.