Hello! Welcome to the first lesson in our new module, "Linux System Troubleshooting and Recovery."
In our last session, you mastered Logical Volume Manager (LVM), learning how to dynamically manage storage—a key skill for scalable systems. That prepared us to handle problems within a running system. But what happens when the system doesn't run at all?
This lesson addresses that fundamental challenge. We will trace the Linux boot process through its four main stages: BIOS/UEFI, GRUB, Kernel, and systemd. Our goal is not just to know the sequence, but to understand what happens at each stage and what a failure looks like. This systematic approach is exactly what a hiring manager wants to hear when they ask, "A server is unresponsive after a reboot. What do you do?"
Let's begin by looking at the entire journey from power button to login prompt.
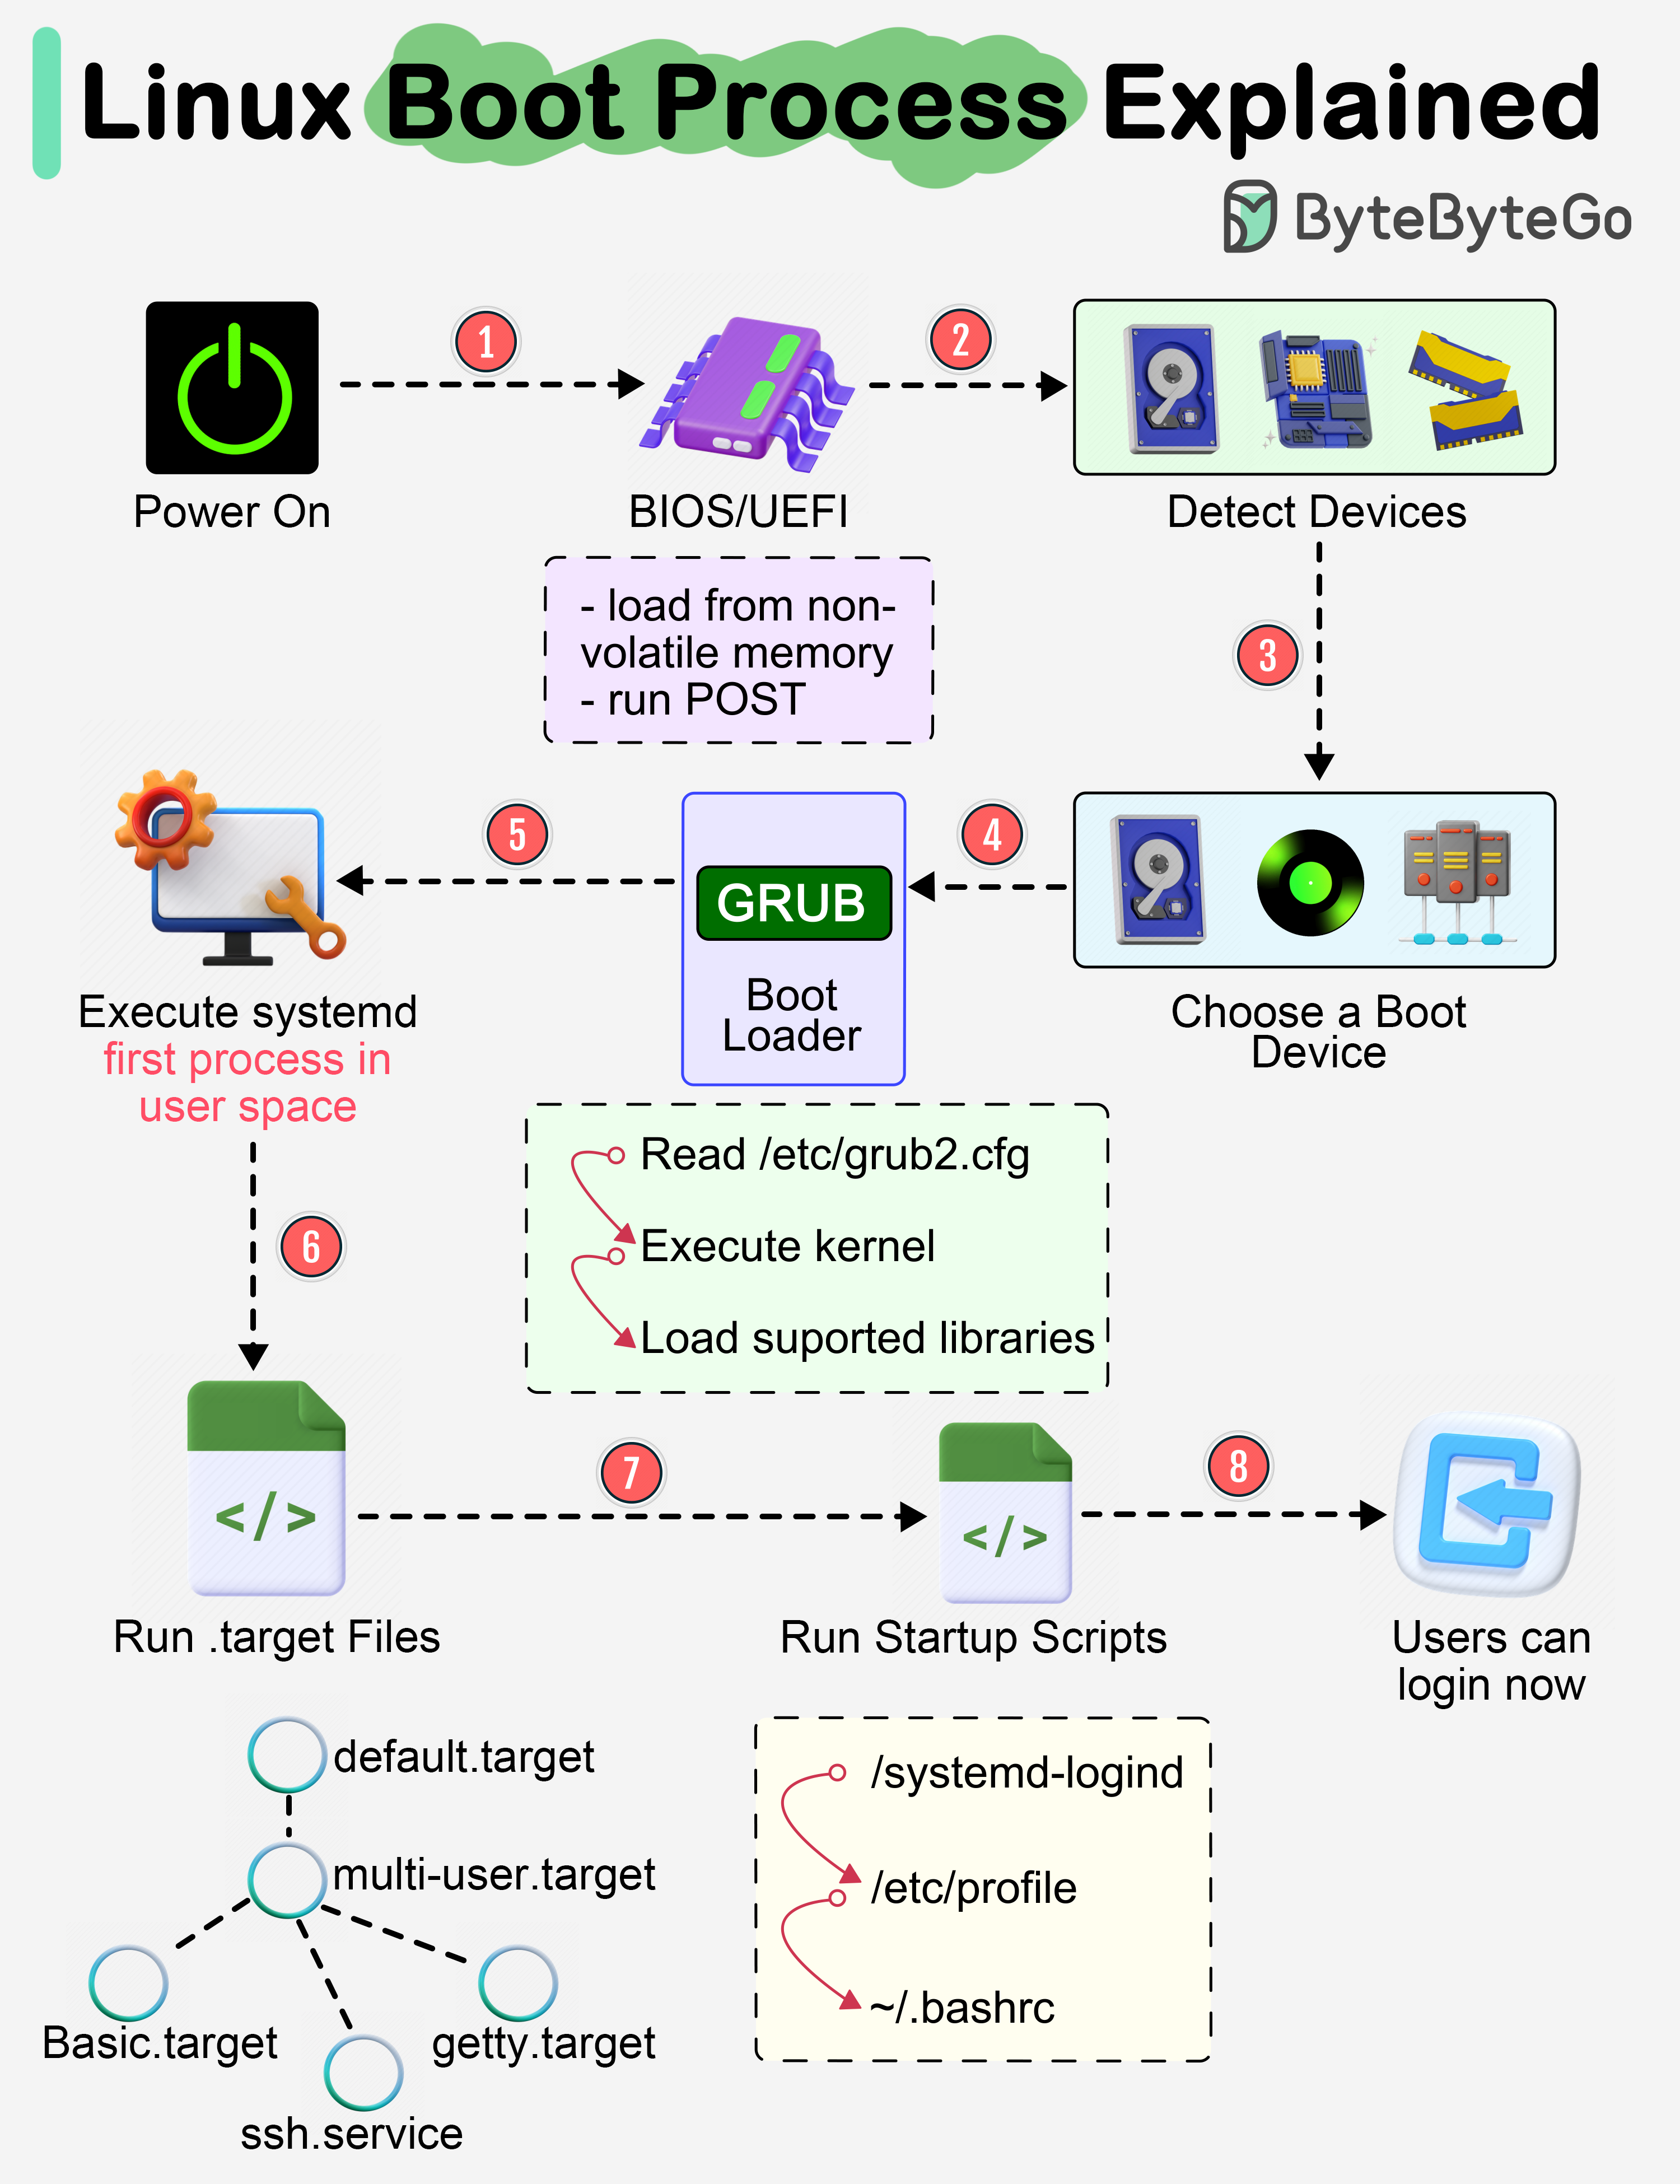
1. Stage 1: BIOS/UEFI - The Hardware Handshake
When you press the power button, the first code that runs isn't part of the operating system. It's firmware embedded on the motherboard. This firmware can be the older BIOS (Basic Input/Output System) or the modern UEFI (Unified Extensible Firmware Interface).
Your ECE background gives you a head start here. Think of this stage as the system's own hardware diagnostic routine.
Key Functions:
- Power-On Self-Test (POST): The firmware quickly checks that essential components like the CPU, RAM, and storage controllers are present and functional.
- Device Initialization: It prepares the hardware for the next stage.
- Locating the Bootloader: Its final job is to find a bootable device (like a hard drive or USB stick) based on a configured boot order, and hand control over to the program in that device's boot sector—the bootloader.
The video "How Linux Boots" provides a clear, concise explanation of this initial phase.
Watch the segment from 02:39 to 04:01. Pay attention to the distinction between BIOS and UEFI and their primary role in finding and starting the bootloader.
How to Spot a Failure at This Stage:
If a system fails here, it's almost always a hardware problem. The symptoms are unmistakable because the operating system hasn't even begun to load.
- The system powers on (fans spin, lights are on), but there is no video output.
- The motherboard emits a series of beep codes.
- The system freezes on the vendor's logo screen (e.g., Dell, HP).
Troubleshooting at this stage involves checking physical connections, reseating components like RAM, or using the server's remote management interface (which we'll cover later) to check hardware logs.
2. Stage 2: GRUB - The Operating System Chooser
Once the BIOS/UEFI finds a bootable disk, it executes the GRUB (Grand Unified Bootloader). GRUB is the bridge between your hardware firmware and the Linux kernel.
Key Functions:
- Presents a Boot Menu: If you have multiple operating systems or multiple kernel versions installed, GRUB displays a menu to let you choose which one to boot.
- Loads the Kernel: GRUB's primary job is to load two critical files into memory: the Linux kernel and the
initramfs. We'll discussinitramfsin the next section.
How to Spot a Failure at This Stage:
If the BIOS/UEFI ran successfully but GRUB fails, you'll see a very specific kind of error on the screen.
- The screen shows a minimal prompt, like
grub>. - You see an error message like
error: no such partitionfollowed by agrub rescue>prompt. This means GRUB was loaded but can't find its configuration files or the kernel.
Let's get practical. You can interact with GRUB during the boot process. This is the first step in troubleshooting many boot-related issues.
The same video demonstrates how to access the GRUB menu and explains what it's used for, including booting into recovery mode.
Watch the segment from 03:42 to 15:19. If you are using a virtual machine, you can try this yourself. Restart your VM and hold down the Shift key (for BIOS systems) or tap Esc (for UEFI systems) right after the initial firmware screen disappears. Focus on understanding the options presented in the GRUB menu, especially the 'Advanced options' which let you select different kernels.
Knowing how to get into the GRUB menu is essential, as we'll see in the next section for recovering from a bad kernel update.
3. Stage 3: Kernel and initramfs - Starting the Core OS
After you select an option in GRUB (or it proceeds automatically), GRUB loads the Linux Kernel (vmlinuz) and an Initial RAM Filesystem (initramfs) into memory and hands control to the kernel.
- Kernel: This is the heart of Linux. It takes control of the CPU and memory and begins initializing all the hardware using its built-in drivers.
initramfs: This is a clever part of the process. The kernel itself can't contain every possible driver for every piece of hardware. Theinitramfsis a small, temporary root filesystem loaded into RAM. It contains just enough drivers and tools (e.g., for your specific disk controller or LVM) needed for the kernel to mount your actual root filesystem. Once the real root filesystem is mounted, theinitramfsis discarded.
The Linux Boot Process (Linux+ Objective 1.1.2)
The video "The Linux Boot Process" by Shawn Powers gives an excellent conceptual breakdown of the relationship between the kernel, initrd (an older name for initramfs), and the final root filesystem.
Watch from 08:07 to 13:52. Focus on understanding why the initramfs is necessary—it solves the chicken-and-egg problem of needing drivers to mount the disk that contains the drivers.
How to Spot a Failure at This Stage:
This is where you might encounter the dreaded Kernel Panic.
- The screen fills with text and then freezes, with the last lines often including the words "Kernel panic - not syncing".
- Common messages include "VFS: unable to mount root fs" or errors about missing modules. This often means the
initramfsdoesn't have the right driver to access your main storage.
Practical Troubleshooting: Recovering from a Bad Kernel Update
A common cause for a kernel panic is a faulty update. The new kernel might have a bug or be incompatible with a driver. Linux automatically keeps older, working kernels for this exact situation.
The Linux Boot Process (Linux+ Objective 1.1.2)
Let's see how to use the GRUB menu to recover a system. This is a critical, real-world troubleshooting skill.
Watch the segment from 21:51 to 25:39. It shows exactly how to select a previous, working kernel from the GRUB 'Advanced options' menu to bypass a kernel panic and get the system booting again. This is a perfect example of identifying a failure at the kernel stage and applying a fix.
4. Stage 4: systemd - Launching User Space
Once the kernel has mounted the root filesystem, its final job is to start the very first user-space process, which on all modern Linux systems is systemd. This process has a Process ID (PID) of 1.
From this point on, systemd is in charge. It reads its configuration and starts all the background services (daemons) needed for a functioning system, such as networking, logging, and the login prompt itself.
Key Functions:
- PID 1: It's the "mother of all processes." Every other process on the system is a child of
systemd. - Manages Services: It starts, stops, and monitors services.
- Achieves "Targets": Instead of old-fashioned runlevels,
systemdworks towards targets. The most common are:multi-user.target: A command-line only environment.graphical.target: A full desktop environment.
How to Spot a Failure at This Stage:
If the kernel loads but the system fails to become fully usable, the problem is likely with systemd.
- The boot process hangs while trying to start a specific service. You'll often see a message like "A start job is running for..." with a timer.
- The system boots to a login prompt, but a key service is not working (e.g., you can't get a network address, or you can't SSH in).
- The system drops you into an "emergency mode" or "rescue mode" shell.
Practical Investigation:
Let's use some commands to inspect systemd on a running system.
Lab 3: Boot and startup processes
The Rocky Linux documentation provides a set of simple, practical exercises to explore the role of systemd.
Follow the hands-on exercises in the documentation. Open a terminal on your Linux machine and run these commands: Exercise 1 (/usr/lib/systemd/systemd | PID=1): Run the commands provided (like cat /proc/1/comm and ps -p 1) to confirm for yourself that systemd is indeed the process with PID 1. Exercise 2 (systemd Targets): Use systemctl get-default to see what your system's default boot target is. Use systemctl list-units --type target to see the available targets.
When a systemd-managed service fails, your main troubleshooting tools will be systemctl status <service-name> and journalctl -u <service-name> to check its status and logs.
Summary: A Troubleshooting Flowchart
You've now traced the entire boot process. Each stage hands off to the next, and each has its own unique failure signatures. This flowchart provides a fantastic summary and a mental model for troubleshooting.
Linux Boot Process Flowchart with Commands and Troubleshooting ...
This LinkedIn post contains a detailed flowchart that connects each boot stage with its purpose, key files, and common troubleshooting commands. It's an excellent reference to consolidate what we've learned.
Review the flowcharts in this post. Pay close attention to the troubleshooting tips (marked with 🔧) for each stage. For example: BIOS/UEFI Issue: Tip says to check BIOS boot order. GRUB Issue: Tip suggests using a live CD to reinstall GRUB. Kernel Issue: Tip suggests rebuilding initramfs. systemd Issue: Tip suggests using systemd-analyze blame to find slow services.
Conclusion
You now have a structured framework for diagnosing one of the most critical failures a system can experience. Instead of guessing, you can systematically analyze the symptoms to pinpoint the problem's location.
Key Takeaways:
- Stage 1: BIOS/UEFI - Initializes hardware. Failures are usually hardware-related (no video, beep codes).
- Stage 2: GRUB - Loads the kernel. Failures result in a
grub>orgrub rescue>prompt. - Stage 3: Kernel &
initramfs- Starts the OS core. Failures often lead to a Kernel Panic. You can often recover by booting a previous kernel via the GRUB menu. - Stage 4:
systemd- Starts user-space services. Failures manifest as hangs during boot or non-functional services (like networking) after boot.
In our next lesson, we will put this knowledge to practical use. We'll learn how to boot from a live USB and use chroot to gain access to a broken system for repairs, which is the direct follow-up to diagnosing a problem at the GRUB or kernel stage.