Hello! Welcome to your next lesson in our PySpark module.
In our previous session, we focused on the crucial first step of any data pipeline: ingestion. You learned how to use spark.read to load data from various sources like CSV, JSON, and Parquet files into a PySpark DataFrame.
Now that we have data loaded into a DataFrame, our next task is to start shaping it. This lesson will cover the fundamental column operations that you'll use constantly as a data engineer. Our goal is to learn how to select, rename, and drop columns in a DataFrame using the PySpark API. These three operations form the foundation of data preparation and cleaning in PySpark.
1. The Principle of Immutability
Before we dive into the specific commands, it's essential to understand a core concept of Spark: DataFrame immutability.
Unlike some data structures you may have used, such as pandas DataFrames which can be modified in-place, PySpark DataFrames are immutable. This means that every transformation you apply—like selecting or renaming columns—does not change the original DataFrame. Instead, it returns a new DataFrame with the transformation applied.
From your physics background, you can think of this like applying a mathematical function: if you have a variable x = 5 and you compute y = f(x) = x + 2, the original x remains 5. Similarly, if you have a DataFrame df and you run a transformation, you must assign the result to a new variable to capture the change:
new_df = df.select("some_column")
Or, more commonly, you reassign it back to the original variable name:
df = df.select("some_column")
This is a fundamental pattern in Spark programming that ensures predictable and reliable data processing, especially in a distributed environment.
2. Selecting a Subset of Columns
Often, a raw dataset contains many more columns than you need for a specific task. The .select() transformation allows you to create a new DataFrame containing only the columns you specify. This is one of the most common operations you will perform.
The official Databricks documentation provides a clear guide on the various ways to select columns.
PySpark basics | Databricks on AWS
Let's review the official Databricks documentation, "PySpark basics", to see the different syntaxes for selecting columns.
Please read the subsection titled "Select columns" under the "Column operations" heading. Pay attention to the different ways you can refer to a column: as a string literal ("c_custkey"), using the col function (col("c_custkey")), or using DataFrame indexing (df_customer["c_custkey"]).
As you read, the key takeaways are the different syntaxes available for select():
- Using strings (most common for simple selections):
new_df = df.select("column_a", "column_b") - Using the
colfunction (useful for more complex expressions we'll see later):from pyspark.sql.functions import col new_df = df.select(col("column_a"), col("column_b")) - Using DataFrame attribute or item access (convenient but can be limiting):
new_df = df.select(df.column_a, df["column_b"])
3. Renaming Columns
Clean, descriptive column names are crucial for readable and maintainable code. You might need to rename columns to remove special characters, correct typos, or conform to a naming convention like snake_case. The transformation for this is .withColumnRenamed().
This method takes two arguments: the existing column name and the new column name.
PySpark basics | Databricks on AWS
Now, let's look at how to rename columns. The same Databricks documentation page covers this topic concisely.
Read the subsection "Rename columns". Notice the syntax: withColumnRenamed("old_name", "new_name"). A key technique shown in the ONS Spark tutorial (which we'll use for an exercise later) is chaining these calls together to rename multiple columns.
Because DataFrames are immutable, if you need to rename multiple columns, you chain the calls together, with each call returning a new DataFrame that is immediately used by the next call:
# Chaining withColumnRenamed transformations
df_renamed = df.withColumnRenamed("oldName1", "new_name_1") \
               .withColumnRenamed("oldName2", "new_name_2")


# To see the result, you can check the schema
df_renamed.printSchema()
4. Dropping Columns
The opposite of selecting columns is dropping them. If you want to keep most columns and only remove a few, using .drop() is more convenient than selecting a long list of columns to keep.
PySpark basics | Databricks on AWS
Finally, let's learn how to remove columns from a DataFrame.
Read the subsection "Remove columns". Note that you can pass multiple column names as separate arguments to the .drop() method to remove them all at once.
The syntax is straightforward:
# Drop a single column
df_dropped_one = df.drop("column_to_remove")


# Drop multiple columns
df_dropped_many = df.drop("column_1", "column_2", "column_3")
Hands-On Exercise: Practice Makes Perfect
Now it's time to apply these concepts. We will use a great tutorial from the UK's Office for National Statistics (ONS) that includes a practical exercise.
First, let's make sure you have a DataFrame to work with. In a new Databricks notebook, you can re-run the code from our previous lesson to load the baby names dataset. (Remember to replace catalog, schema, and volume with your own values).
# Step 1: Set up paths
catalog = "your_catalog_name"
schema = "your_schema_name"
volume = "your_volume_name"
path_volume = f"/Volumes/{catalog}/{schema}/{volume}"
file_name = "baby_names.csv"


# Step 2: (If needed) Download the data to your volume
# import os
# if not os.path.exists(f"{path_volume}/{file_name}"):
#     import requests
#     url = "https://health.data.ny.gov/api/views/jxy9-yhdk/rows.csv?accessType=DOWNLOAD"
#     response = requests.get(url)
#     with open(f"/dbfs{path_volume}/{file_name}", "w") as f:
#         f.write(response.text)


# Step 3: Load the data into a DataFrame
df = spark.read.csv(f"dbfs:{path_volume}/{file_name}",
  header=True,
  inferSchema=True,
  sep=",")


# Let's inspect the starting schema
df.printSchema()
Notice the column names have spaces and are in Title Case. This is a perfect scenario for renaming. Now, follow the exercise from the ONS tutorial.
Introduction to PySpark — Spark at the ONS
This tutorial provides a fantastic, practical exercise for renaming and selecting columns. We will adapt it slightly for our DataFrame.
First, read the section "Rename columns: .withColumnRenamed()" for a good example of chaining renames. Then, proceed to "Exercise 1". Your task is to complete a similar exercise using your df DataFrame: Rename Columns: Rename "Year" to "year" and "First Name" to "first_name". Select Columns: Create a new DataFrame that contains only the newly renamed columns (year, first_name) plus the "County" and "Count" columns. Preview: Display the first 5 rows of your final DataFrame using .show(5).
Solution Walkthrough:
Here is how you would solve the exercise. Try to do it on your own before looking at the solution.
# 1. Rename the columns by chaining .withColumnRenamed()
df_renamed = df.withColumnRenamed("Year", "year") \
               .withColumnRenamed("First Name", "first_name")


# 2. Select the four specified columns
df_final = df_renamed.select("year", "first_name", "County", "Count")


# 3. Preview the result
df_final.show(5)


# You can also check the final schema
df_final.printSchema()
Quick Reference Cheat Sheet
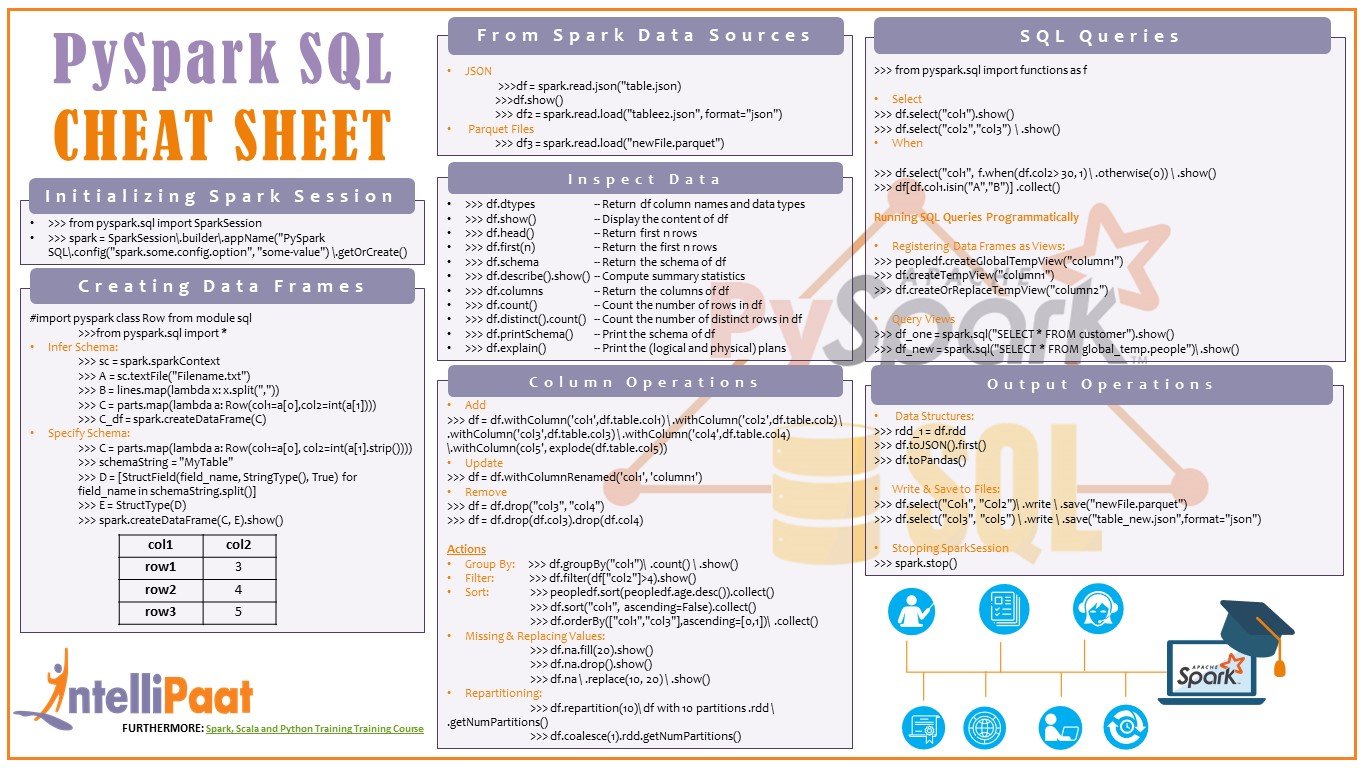
As you continue your journey, having a quick reference can be incredibly helpful. The image below is a PySpark cheat sheet that summarizes many common operations, including the column manipulations we've just covered. I recommend saving it for future use.
Conclusion
In this lesson, you've mastered the three fundamental operations for shaping the columns of a PySpark DataFrame. These skills are the bread and butter of data transformation.
Key Takeaways
- Immutability is Key: PySpark transformations create new DataFrames. You must assign the result to a variable (
df = df.operation(...)). .select()is used to choose a subset of columns from a DataFrame..withColumnRenamed()allows you to change the name of a column, which is essential for cleaning data and maintaining conventions..drop()is used to remove one or more unnecessary columns from a DataFrame.- These operations can be chained together to perform a sequence of transformations in a clean, readable way.
Next Steps
We've learned how to load data and how to manipulate its columns. The next logical step is to work with the rows. In the upcoming lesson, you will learn how to filter rows in a DataFrame based on single or multiple conditions, allowing you to select specific slices of your data for analysis.