Introduction
In our last lesson, we focused on the upper body, isolating the triceps with chair-assisted dips to build pressing power. Today, we shift our focus to the lower body to develop unilateral strength and stability. Building strength one leg at a time is crucial not only for athletic performance but also for correcting imbalances that can arise from daily life and bilateral exercises.
This lesson introduces the static split squat. Our objective is for you to learn how to perform this fundamental lower-body exercise with excellent form, specifically focusing on achieving stable balance, appropriate depth, and a strong, supported torso. This movement is a cornerstone of lower-body calisthenics, laying the groundwork for more dynamic exercises like lunges and pistol squats.
What is a Split Squat?
First, it's important to clarify what a split squat is and how it differs from a lunge, as the two are often confused. A split squat is a stationary exercise where your feet remain in a fixed, staggered position throughout the set. The movement is primarily vertical—you lower your body straight down and push straight back up. In contrast, a lunge is a dynamic movement that involves stepping into the position for each repetition.

This static nature of the split squat allows you to focus purely on strength and control without the added complexity of coordinating a step, making it an ideal exercise for mastering form.
Split Squat Biomechanics and Performance - E3 Rehab
The article from E3 Rehab clearly defines the movement.
Read the brief section under the heading "Split Squat Verbiage" to solidify your understanding of the exercise's definition and execution.
The Foundation: Balance and Stance
The most common challenge when first learning the split squat is maintaining balance. Most balance issues stem from an incorrect foot position. Many people instinctively place their feet one directly in front of the other as if walking on a tightrope, creating a very narrow and unstable base of support.
The key is to set your feet as if you are standing on parallel train tracks. Your feet should be about hip-width apart throughout the entire movement.
A Step-By-Step Guide to Split Squat - Ultimate Performance Blog
This guide from the Ultimate Performance blog provides excellent, clear cues for setting up a stable stance.
First, read the simple setup instructions. Then, pay close attention to the "train tracks" analogy, which is the most important concept for establishing balance.
The Movement: Depth and Torso Position
With a stable base established, we can focus on the movement itself. The goal is to lower your hips straight down, like an elevator, rather than shifting your weight forward and back, like an escalator. This ensures you are properly loading your leg muscles.
The learning outcome specifies an "upright torso," which is a crucial concept. However, "upright" in this context refers to maintaining a neutral, straight spine—not necessarily a perfectly vertical one. A slight forward lean from the hips is actually beneficial. This slight inclination helps to:
- Keep your center of gravity over your front (working) leg.
- Engage your glutes more effectively alongside your quads.
- Prevent you from putting excessive strain on your back leg and lower back.
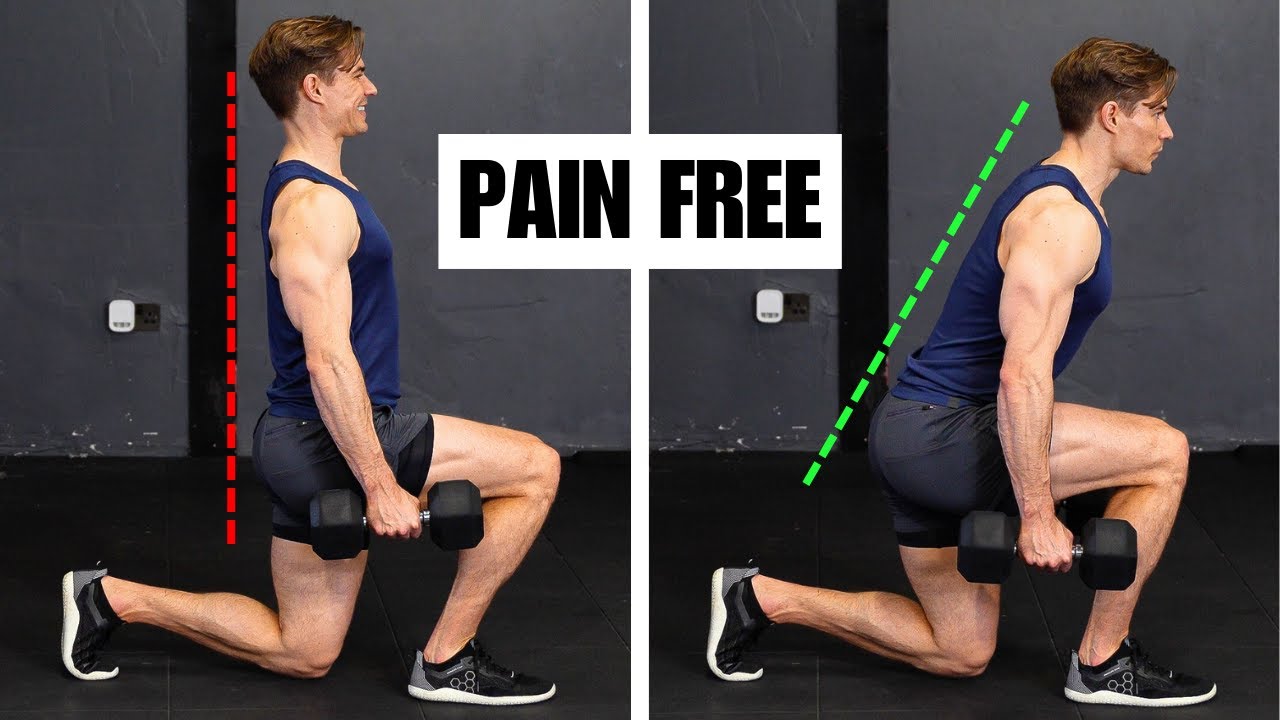
From a biomechanical perspective, your body is a system of levers. By leaning your torso slightly forward while keeping your shin relatively vertical, you increase the moment arm at the hip, requiring more work from your glutes to extend the hip. A perfectly vertical torso shortens this moment arm and can place more emphasis on the quads. Our goal is a balanced activation of both muscle groups.
The following video provides an excellent breakdown of common errors and the correct, nuanced form.
This video from Jack Hanrahan Fitness offers one of the best explanations of split squat technique.
First, watch the segment on common mistakes. Notice his explanation for why a too vertical torso can be problematic and his use of the "escalator vs. elevator" analogy. Then, watch his detailed walkthrough of perfect execution. He provides clear cues on weight distribution (about 75% on the front foot), maintaining the slight forward torso angle, and achieving proper depth.
Step-by-Step Execution Guide
Let's synthesize this information into a clear, actionable guide.
- Stance: Stand with your feet hip-width apart. Take a moderate step back with one foot, landing on the ball of that foot. Your feet should remain hip-width apart ("on train tracks").
- Posture: Before you descend, brace your core. Your spine should be neutral—a straight line from your head to your hips. Hinge slightly forward at the hips to achieve the slight torso lean.
- Descent: Inhale as you lower your hips straight down towards the floor. Control the movement. Your goal is to have your front thigh become parallel to the ground and your back knee hover just an inch or two above it.
- Bottom Position: At the bottom, your front shin should be roughly vertical, and your back knee should be directly under your hip.
- Ascent: Exhale and drive forcefully through your entire front foot to return to the starting position. Focus on using the muscles of the front leg to lift your body.
When starting, perform all reps on your weaker leg first, then match the number of reps on your stronger leg.
Common Mistakes to Avoid
As you practice, watch out for these common errors. Being aware of them is the first step to correction.
How to do the perfect SPLIT SQUAT: technique and common mistakes
This video from Get Exercise Confident provides clear visual demonstrations of what to avoid.
Watch the segment on common mistakes. The video clearly shows the knee caving inward and the body shifting forward, which are two of the most frequent errors.
- Knee Caving Inward: Your front knee should track in line with your front foot. If it collapses inward, you're putting your knee joint at risk. Actively think about keeping the knee aligned.
- Losing Torso Angle: Don't let your chest drop or your back round. Keep your core braced and your spine neutral throughout the entire rep.
- Pushing Off the Back Foot: The front leg should be doing the vast majority of the work. The back leg is primarily for balance. Avoid pushing off the toes of your back foot to initiate the ascent.
Conclusion
You now have a complete framework for performing the static split squat with proper technique. This exercise is a powerful tool for building single-leg strength, which will directly translate to better performance in more advanced calisthenics and improve your overall functional fitness.
Key Takeaways:
- A split squat is a stationary exercise with a vertical (elevator) path of motion.
- Maintain a hip-width stance ("train tracks") for balance.
- Keep your spine neutral but lean your torso slightly forward to correctly load the front leg.
- Lower yourself until your front thigh is parallel to the floor and your back knee nearly touches the ground.
- Drive through the front foot to power the movement, using the back leg mainly for balance.
In our next training lesson, we'll return to the upper body to focus on grip strength and shoulder health by learning to perform dead hangs from a door-frame ledge. Following that, our next lifestyle lesson will help you begin dissecting your distraction habits by teaching you how to identify your personal triggers.