Introduction
In our last training session, we focused on building foundational horizontal pressing strength with negative push-ups, primarily targeting your chest and triceps. Today, we're going to change the angle of attack to start building vertical pressing strength. This is where your engineering mindset will appreciate the shift in mechanics. By altering the geometry of your body, we can redirect the mechanical load from your chest to your shoulders, a crucial step for more advanced calisthenics skills.
This lesson introduces the pike push-up. It's the bridge between a standard push-up and a handstand push-up. By the end of this session, you will understand the mechanics behind the pike push-up and be able to perform it with correct form, using a progression that matches your current strength level. This will lay the groundwork for developing powerful, well-defined shoulders without any need for traditional weights.
The Physics of the Pike Push-up: A Bodyweight Military Press
Before we get into the "how," let's cover the "why." You're familiar with the idea that changing system parameters can drastically alter outcomes. In exercise, your body's angle relative to gravity is a key parameter. A standard push-up is a horizontal press. The pike push-up, by putting your body into an inverted 'V' shape, transforms the movement into a vertical press.
Pike Push-ups: Build Big, Strong Shoulders With No Equipment
This article from Runlovers provides an excellent conceptual overview of why the pike push-up is so effective.
Read the sections "Strong Shoulders Without a Gym? Change the Angle" and "The Bodyweight 'Military Press'". Focus on how the inverted 'V' position transfers the load to the deltoids, effectively mimicking an overhead press like the Military Press.
As the article highlights, this simple change in geometry is what makes the pike push-up a cornerstone for building shoulder strength. It not only targets the anterior deltoids and triceps but also engages your core for stability and improves mobility.
Setting Up for Consistent Progress
One of the biggest challenges with bodyweight exercises at home is consistency. Since you're not adding plates to a barbell, progress comes from perfecting your form and making incremental changes to your setup. Getting the setup right every time is non-negotiable.

Here are the key setup points:
- Start Position: Begin in a standard push-up or plank position, then walk your feet towards your hands until your body forms a sharp, inverted 'V'. Your hips should be the highest point.
- Hand Placement: Place your hands approximately shoulder-width apart. As you get stronger, you can experiment, but this is the ideal starting point.
- Legs and Feet: Keep your legs as straight as your hamstring flexibility allows. If they are very tight, a slight bend in the knees is acceptable. The important thing is to keep your hips high. Stay on the balls of your feet to allow for a forward weight shift.
- Core Engagement: Brace your core as you did for push-ups. This prevents your lower back from sagging and maintains a strong, stable structure.
For a detailed breakdown of how to execute the movement and what common mistakes to avoid, let's turn to a video.
How to Master the Pike Pushup (Tutorial + Progressions)
This tutorial from Chris Calisthenics provides a clear, step-by-step guide to the form and highlights the most common errors.
First, watch the detailed instructions on proper execution from the form breakdown. Pay close attention to the cues about shifting your weight forward and moving your head to form a triangle. Next, watch the section on common mistakes. This will help you self-correct and avoid building bad habits.
The Most Important Cue: Head Forward, Not Down
If you take only one thing away from the technique, let it be this: your head must travel forward, not straight down. This is the single most common mistake and the one that completely changes the exercise. Lowering your head between your hands turns it into an awkward push-up that stresses the shoulder joints. Moving it forward properly loads the deltoids.
How to do Pike Pushups with Perfect Form and Setup
The author of this article, Antranik, does an excellent job of emphasizing the critical details of proper form.
Read the three form checks under the heading "How to do Pike Pushups with Proper Form." The author's emphasis on getting the head "MUCH MORE FORWARD than you think" is a perfect mental cue.
To recap the movement with this crucial cue in mind:
- Lowering (Eccentric): From your inverted 'V', shift your weight onto your toes and begin to lower your head in front of your hands. Imagine your hands are the base of a triangle and your head is aiming for the top point. Keep your elbows tucked in at roughly a 45-degree angle, not flared out to the sides. Control this descent over 2-3 seconds.
- Pushing (Concentric): From the bottom position, push the floor away explosively, reversing the motion to return to the starting 'V' position. At the top, actively push your shoulders up towards your ears (elevation) to finish the rep strong.
Finding Your Starting Point: Progressions
The pike push-up is significantly harder than an incline push-up. It's vital to start with a variation you can perform with perfect form for several repetitions. Pride has no place here; solid mechanics are what build strength.
Here is a simple progression to find your starting point. You'll likely need your stack of books and a chair.
- Pike Holds: First, simply get into the inverted 'V' position and hold it. Can you maintain high hips and a straight back for 30 seconds without breaking form? This builds the foundational stability for the movement.
- Reduced Range of Motion (ROM): Place a stack of books or a yoga block on the floor where your head would land. Perform the pike push-up, but only go down until the top of your head lightly touches the books. This reduces the difficulty while allowing you to practice the correct movement path. As you get stronger, you can remove books to increase the range of motion.
- Standard Pike Push-up (Floor): This is the full range of motion exercise, with your head aiming to touch the floor.
- Feet-Elevated Pike Push-up: Place your feet on a stable chair. This increases the percentage of your bodyweight that your shoulders have to lift, making the exercise significantly harder. This is the next major step once floor pikes become too easy.
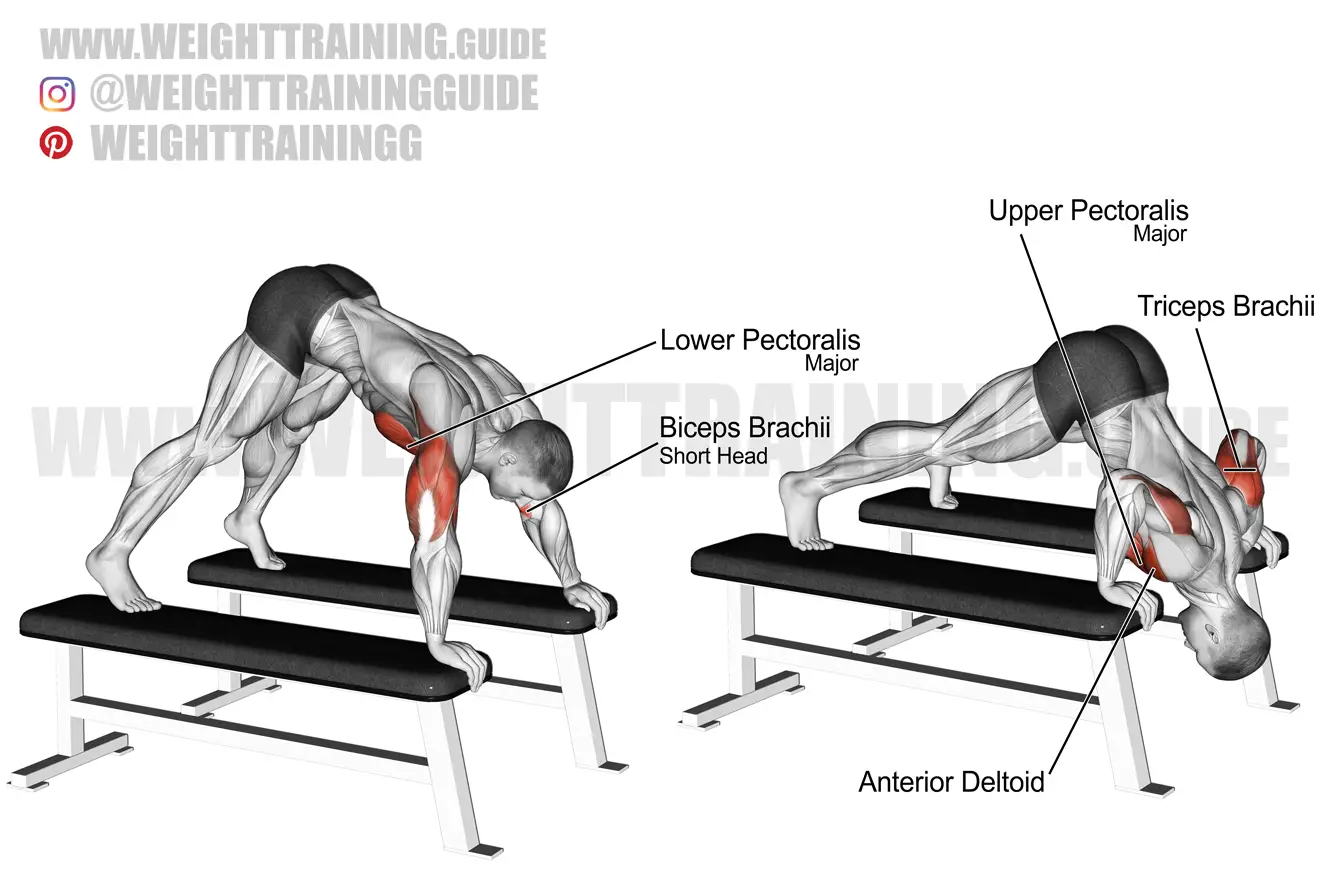
Your task now is to experiment and find which of these variations you can perform for 3-6 clean repetitions. That will be your starting point for your workouts. Given your strength with incline push-ups, you might start with either Reduced ROM or the Standard Pike Push-up.
How to Master the Pike Pushup (Tutorial + Progressions)
Let's revisit the Chris Calisthenics video to see these progressions in action.
Watch the section from the progressions guide. The video demonstrates pike holds, using books for reduced ROM, and elevating the feet, giving you a clear visual for each step.
Conclusion
You now have a complete toolkit for mastering the pike push-up. We've moved from the horizontal pressing of the standard push-up to the vertical pressing that will build serious shoulder strength and stability.
Key Takeaways:
- Pike push-ups build shoulder strength by changing your body's angle to gravity, creating a vertical press.
- The single most important form cue is to lower your head forward of your hands, not straight down between them. Imagine forming a triangle on the floor.
- Keep your elbows tucked at about a 45-degree angle; do not let them flare out to the sides.
- Master consistency by using landmarks for your hands and feet.
- Find your appropriate starting point using progressions like holds, reduced range of motion, or feet elevation. Perfect form is always the priority.
In our next training lesson, we'll shift focus slightly to another critical pressing muscle: the triceps. We will learn chair-assisted tricep dips, which you can do easily with the equipment you have. Our next lifestyle lesson will build on your work with prioritization by helping you identify the specific triggers and patterns that pull you into distraction.