Hello! Welcome to the first lesson in our module on FreeRTOS.
In our last lesson, you learned how to use timeouts to prevent a single unresponsive peripheral from freezing your entire program. While this is a crucial technique for building robust systems, the task is still blocked for the duration of the timeout, unable to perform other work. This can be a major limitation. Imagine a robot where the task reading a distance sensor gets blocked for 100ms; during that time, it can't update motor commands, potentially leading to a crash.
Today, we will overcome this limitation by diving into FreeRTOS, the real-time operating system that powers the ESP32. You will learn how to create and manage FreeRTOS tasks with different priorities. This will allow you to structure your application as a collection of independent programs that appear to run simultaneously, a concept known as multitasking.
By the end of this lesson, you will be able to:
- Understand the role of the FreeRTOS scheduler and task states.
- Define and create multiple tasks using the FreeRTOS API.
- Assign different priorities to tasks to control their execution order.
- Leverage the dual-core architecture of the ESP32 by pinning tasks to specific cores.
1. What is a Task?
In FreeRTOS, a task is essentially an independent function that runs in its own context, with its own stack. Think of it as a separate, self-contained program. Most tasks are designed to run forever inside an infinite loop.
The magic of FreeRTOS is the scheduler, a core component of the OS that decides which task gets to use the CPU at any given moment. It switches between tasks so quickly that they appear to run in parallel.
How to Multitask with FreeRTOS (ESP32 + Arduino series)
To start, let's watch a short segment from the 'How to Multitask with FreeRTOS' video by Simply Explained. It provides a very clear, simple definition of what a task looks like in code.
Watch from 00:14 to 01:35. Pay attention to how a task is just a C++ function containing an infinite loop.
2. The FreeRTOS Scheduler and Task States
The scheduler uses a hardware timer to generate periodic interrupts called ticks. On the ESP32, a tick is typically 1 millisecond. At every tick, the scheduler runs and examines all the tasks to decide which one should run next.
To manage this, the scheduler keeps track of each task's state. A task can be in one of several states, but the three most important for now are:
- Running: The task is currently executing on a CPU core. On the dual-core ESP32, up to two tasks can be in the Running state at once.
- Ready: The task is ready to run but is waiting for a CPU core to become available.
- Blocked: The task is waiting for some event, such as a timer to expire (e.g., from
vTaskDelay()) or for data to arrive in a queue. A blocked task does not consume any CPU time.
Introduction to RTOS Part 3 - Task Scheduling | Digi-Key Electronics
This next video from Digi-Key provides an excellent conceptual overview of the scheduler, task states, and the idea of preemption, which we'll discuss next.
Please watch these two segments: 00:00 - 01:42: This part explains how the scheduler uses time-slicing and ticks to switch between tasks. 04:22 - 05:46: This part details the different task states (Ready, Running, Blocked, Suspended) and how tasks transition between them. This is fundamental to understanding how an RTOS works.
3. Creating Tasks with xTaskCreate
To create a task, you use a FreeRTOS API function. The most common one is xTaskCreate(). It might look intimidating with its six parameters, but each has a clear purpose.
How to Multitask with FreeRTOS (ESP32 + Arduino series)
Let's return to the 'How to Multitask with FreeRTOS' video, which does a great job of breaking down each parameter of the xTaskCreate function.
Watch from 03:00 to 05:36. The video explains each of the six parameters in detail. Focus on understanding the role of the task function, stack size, and priority.
Here's a summary of the xTaskCreate parameters:
pvTaskCode: A pointer to the function that implements the task.pcName: A descriptive name for the task (a string), used for debugging.usStackDepth: The size of the task's stack in bytes (Note: in standard FreeRTOS this is in words). The stack is used for local variables and function call management. If this is too small, your task can crash. 1024 to 4096 bytes is a common starting point.pvParameters: A pointer that can be used to pass a parameter to the task when it starts. We'll useNULLfor now.uxPriority: The priority of the task. We'll explore this in the next section.pvCreatedTask: A pointer to aTaskHandle_tvariable. The task's "handle" (a unique identifier) will be stored here, allowing you to manage the task (e.g., delete or suspend it) from other tasks. Can beNULLif you don't need the handle.
For the ESP32, there is a more specific function, xTaskCreatePinnedToCore(), which adds a seventh parameter:
xCoreID: The core you want the task to run on (0 or 1). This allows you to manually balance the load across the ESP32's dual cores.
For reference, you can find the official documentation for these functions in the ESP-IDF guide under the "Task API" section (we've linked the specific page LINK in the resources).
4. Task Priorities and Preemption
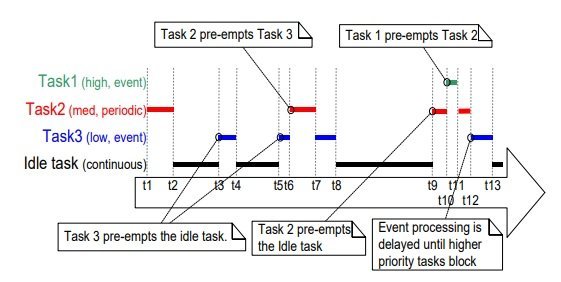
The most important factor the scheduler uses to decide which task to run is priority. When you create a task, you assign it a priority as an integer. On FreeRTOS for the ESP32, 0 is the lowest priority (this is tskIDLE_PRIORITY), and configMAX_PRIORITIES - 1 is the highest.
FreeRTOS uses preemptive priority-based scheduling. This means:
- If multiple tasks are in the Ready state, the scheduler will always choose the one with the highest priority to enter the Running state.
- If a low-priority task is running and a high-priority task becomes ready (e.g., its delay finishes), the scheduler will immediately pause the low-priority task and run the high-priority one. This is called preemption.
Introduction to RTOS Part 3 - Task Scheduling | Digi-Key Electronics
The Digi-Key video has a fantastic animation that demonstrates preemption in action.
Watch from 01:30 to 03:15. Observe how the scheduler handles tasks A, B, and C based on their priorities. Note that when tasks B and C have the same priority, the scheduler alternates between them (this is called round-robin scheduling).
5. Creating and Running Tasks on the ESP32
Let's put this all together with some practical code. We will use the xTaskCreatePinnedToCore() function, as it gives us explicit control over the ESP32's hardware.
ESP32 with FreeRTOS (Arduino IDE) - Create Tasks
The article 'ESP32 with FreeRTOS (Arduino IDE) - Create Tasks' from Random Nerd Tutorials provides excellent, step-by-step code examples. We'll look at two of them.
First, read section 3) Creating and Running Multiple Tasks. Pay attention to how two separate task functions are defined and then created in setup(), both with the same priority. Then, read section 4) Creating and Running Multiple Tasks On Different Cores. Notice the only change is the last parameter in the second xTaskCreatePinnedToCore call, which assigns the second task to Core 0.
Now, let's write a program that makes preemption visible. We will create two tasks:
lowPriorityTask(Priority 1): This task will slowly print a long sentence, one character at a time.highPriorityTask(Priority 2): This task will print a short message ("-HIGH-") every 200ms.
Because the high-priority task becomes ready every 200ms, it will preempt the low-priority task, and you will see its message appear right in the middle of the sentence.
#include <Arduino.h>

// Task function for the low-priority task
void lowPriorityTask(void *pvParameters) {
  const char *message = "This is a long message from the low priority task, it should be interrupted frequently... ";
  int i = 0;

  Serial.print("Low priority task started on core ");
  Serial.println(xPortGetCoreID());

  for (;;) { // Infinite loop
    Serial.print(message[i]);
    i++;
    if (message[i] == '\0') {
      i = 0;
      Serial.println();
    }
    // A small delay to make the character-by-character printing visible
    vTaskDelay(pdMS_TO_TICKS(10));
  }
}

// Task function for the high-priority task
void highPriorityTask(void *pvParameters) {
  Serial.print("High priority task started on core ");
  Serial.println(xPortGetCoreID());

  for (;;) { // Infinite loop
    Serial.println(" -HIGH- ");
    // Block this task for 200 milliseconds
    vTaskDelay(pdMS_TO_TICKS(200));
  }
}

void setup() {
  Serial.begin(115200);
  delay(1000); // Wait for serial monitor to connect

  // Create the high-priority task on Core 1
  xTaskCreatePinnedToCore(
      highPriorityTask,   // Task function
      "HighPriTask",      // Task name
      2048,               // Stack size
      NULL,               // Parameters
      2,                  // Priority
      NULL,               // Task handle
      1);                 // Core

  // Create the low-priority task on the same core
  xTaskCreatePinnedToCore(
      lowPriorityTask,    // Task function
      "LowPriTask",       // Task name
      2048,               // Stack size
      NULL,               // Parameters
      1,                  // Priority
      NULL,               // Task handle
      1);                 // Core
}

void loop() {
  // The loop() is also a task! It runs on Core 1 with priority 1 by default.
  // We leave it empty because our other tasks are handling the work.
}
When you run this code, your Serial Monitor output will look something like this, clearly showing the high-priority task interrupting the low-priority one:
High priority task started on core 1
Low priority task started on core 1
This is a long message fro -HIGH-
m the low priority task, it sho -HIGH-
uld be interrupted frequently...
 -HIGH-
This is a long message from t -HIGH-
he low priority task, it should be interrupted frequently...
Test your understanding!
You create two tasks, TaskA with priority 2 and TaskB with priority 3. Both are pinned to the same core. TaskA runs an infinite loop printing "A" and TaskB runs an infinite loop printing "B". Neither task uses vTaskDelay or any other blocking function. What will you see in the serial monitor?
- A, B, A, B, A, B...
- B, B, B, B, B, B...
- A, A, A, A, A, A...
- The program will crash.
Show answer
The correct answer is 2. B, B, B, B, B, B.... Since TaskB has a higher priority (3 > 2) and it never blocks, it will always be in the Ready or Running state. The scheduler will never give TaskA a chance to run because a higher-priority task is always ready. This is a condition known as starvation.
Conclusion
Congratulations! You've taken your first and most important step into the world of real-time operating systems. By understanding and using tasks, you can now write applications that perform multiple operations concurrently, making your projects far more powerful and responsive.
Key Takeaways:
- A task is an independent function, typically running in an infinite loop.
- The FreeRTOS scheduler manages which task runs on a CPU core at any given time.
- The scheduler is preemptive: a high-priority task will interrupt a lower-priority one as soon as it's ready to run.
- You create tasks using
xTaskCreate()or the ESP32-specificxTaskCreatePinnedToCore()to assign tasks to Core 0 or Core 1. - Task priority is the key parameter that determines execution order.
In this lesson, our tasks ran in tight loops or used vTaskDelay. While this works, vTaskDelay is a very simple way of yielding processor time. In our next lesson, we will explore vTaskDelay in more detail and learn why it's a critical tool for writing efficient, non-blocking code that allows lower-priority tasks to get their fair share of CPU time.