Hello! In our last lesson, we explored how to use CUDA streams and events to create pipelines of asynchronous work, opening the door to overlapping data transfers with kernel execution. We concluded with a crucial cliffhanger: for cudaMemcpyAsync to be truly non-blocking and enable this overlap, the host-side memory involved must be pinned (or page-locked).
This lesson picks up right where we left off. We'll start by implementing this requirement, learning the APIs to allocate and use pinned memory and understanding its performance benefits and trade-offs. Then, we will explore Unified Memory, a powerful abstraction in modern CUDA that aims to simplify memory management by creating a single, coherent memory space for both the CPU and GPU. You'll learn how it works via on-demand page migration and, critically, how to tune its performance to get the best of both worlds: programmer productivity and high performance.
Pinned Memory: The Key to Asynchronous Transfers
Let's start by revisiting the problem. Standard host memory allocated with C++'s new or C's malloc is pageable. This means the operating system (OS) is free to move the physical memory pages that back this allocation to a swap file on disk whenever it sees fit. A GPU, however, initiates data transfers using a Direct Memory Access (DMA) engine, which requires a stable, physical RAM address to read from or write to. It cannot access data that the OS has paged out to disk.
To reconcile this, when you issue an asynchronous copy from pageable memory, the CUDA driver must perform a hidden, synchronous operation:
- Allocate a temporary, pinned host buffer.
- Copy your pageable data into this temporary pinned buffer.
- Initiate the asynchronous DMA transfer from the pinned buffer to the GPU.
This implicit staging copy blocks the host and serializes the transfer, completely negating the benefit of asynchrony. The solution is to allocate our host-side buffers as pinned from the outset. This tells the OS not to page this memory out, guaranteeing it has a stable physical address that the GPU's DMA engine can access directly and asynchronously.
Allocating and Using Pinned Memory
The primary API for this is cudaMallocHost. It functions like malloc but allocates page-locked memory.
cudaError_t cudaMallocHost(void** ptr, size_t size);cudaError_t cudaFreeHost(void* ptr);
Once allocated, you use the pointer in your host code just like any other, but now it's eligible for true asynchronous transfers with cudaMemcpyAsync.
The performance gain can be significant, as it eliminates the driver's intermediate copy. Let's watch a short video that clearly demonstrates this concept and benchmarks the difference.
CUDA Crash Course (v2): Pinned Memory
This video from the "CUDA Crash Course" series provides a concise and practical look at pinned memory.
Please watch the entire video. It will cover: The problem with pageable memory and the hidden copy. The solution, showing how to replace standard allocations with cudaMallocHost. The result, a profiler-backed comparison showing a nearly 2x speedup in memory transfer time.
The Performance Implications
The benefits are clear: by removing the staging copy, pinned memory makes cudaMemcpyAsync significantly faster and enables the true overlap of computation and data transfer that we discussed in the previous lesson.
However, pinned memory is a scarce system resource. By page-locking a region of memory, you are reducing the pool of memory that the OS can manage. Over-allocating pinned memory can degrade overall system performance by forcing the OS to swap out other applications' memory more aggressively. Therefore, a key principle of CUDA optimization is to use pinned memory judiciously, allocating it only for buffers that will be part of a high-throughput, asynchronous data pipeline.
Unified Memory: A Single Address Space
While pinned memory and explicit cudaMemcpyAsync calls give you maximum control and performance, they also add complexity. You have to manage two separate memory spaces, two sets of pointers, and all the transfers between them. What if we could simplify this?
This is the promise of Unified Memory (UM). Introduced in CUDA 6, UM creates a single, managed memory pool that is accessible to both the CPU and GPU using a single pointer. The CUDA runtime system, in cooperation with the GPU hardware and driver, automatically handles migrating data between the CPU's system memory and the GPU's device memory as needed.
The main allocation function is cudaMallocManaged:
cudaError_t cudaMallocManaged(void** devPtr, size_t size);- The memory is freed with the standard
cudaFree.
With a pointer allocated this way, you can read and write to it from host code, and you can also pass it directly to a CUDA kernel to be used in device code. This can drastically simplify your program.
[PDF] cuda unified memory | ornl
These slides from an OLCF training provide an excellent overview of Unified Memory. We'll start with the motivation and a code example.
Please review slides 4 through 8. Start at slide 4, which introduces the core concept. Then, focus on slides 7 and 8. They show a side-by-side comparison of a function implemented with standard CPU code, explicit CUDA memcpys, and finally with Unified Memory. Notice how the UM version eliminates all explicit memory copy calls, looking almost as simple as the original CPU code.
The Performance of Unified Memory: Page Faults and Prefetching
This simplification seems magical, but how does it work? The mechanism is based on the virtual memory systems of the CPU and GPU, specifically on-demand page migration.
When you allocate memory with cudaMallocManaged, the data isn't immediately present on both the CPU and GPU. It might start on the host, for instance. When a GPU kernel then tries to access an address in that managed memory region, the GPU's Memory Management Unit (MMU) finds that the corresponding data page is not in its local memory. This triggers a page fault. The CUDA driver intercepts this fault, pauses the kernel, transfers the required page from CPU memory to GPU memory, updates the page tables, and then resumes the kernel. The same process happens in reverse if the CPU accesses data that is currently resident on the GPU.
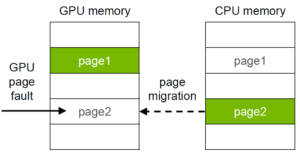
While this on-demand migration provides correctness and simplifies programming, relying on page faults to move large amounts of data is very inefficient. Each fault has non-trivial overhead, so moving gigabytes of data one 4KB page at a time is significantly slower than a single, bulk cudaMemcpy.
Let's watch a demonstration of this.
CUDA Crash Course (v2): Unified Memory
This video from the same "CUDA Crash Course" series walks through a Unified Memory example and its performance characteristics.
Watch from the beginning up to the introduction of prefetching hints: The first part explains what Unified Memory is and shows the simplified code using cudaMallocManaged. Pay close attention to the profiler analysis starting at this timestamp. The nvprof timeline clearly shows the storm of GPU page faults that occur when the kernel launches, as the data is slowly streamed over to the device. This is the performance penalty of naive UM.
Reclaiming Performance with Prefetching
Fortunately, we don't have to choose between simplicity and performance. We can guide the Unified Memory system using prefetching hints. The key function is cudaMemPrefetchAsync.
cudaError_t cudaMemPrefetchAsync(const void* devPtr, size_t count, int dstDevice, cudaStream_t stream);
This function tells the runtime to start moving a region of managed memory to a destination processor (dstDevice can be a GPU ID or cudaCpuDeviceId). Since it's asynchronous, it can be streamed and overlapped just like a cudaMemcpyAsync. By prefetching data just before it's needed, you effectively turn the slow, many-fault migration into a fast, single-transfer bulk migration, restoring the performance of explicit copies while retaining the code simplicity of a single pointer.
[PDF] cuda unified memory | ornl
Let's return to the OLCF slides to see the formal explanation of this performance tuning.
Read slides 20 and 21. Slide 20 explicitly states the performance problem: "Relying on page faults to move large amounts of data, page-by-page... is inefficient." Slide 21 introduces cudaMemPrefetchAsync as the solution, calling it the "UM alternative to cudaMemcpy(Async)" which "Restores' performance".
For even finer-grained control, CUDA provides cudaMemAdvise, which lets you give hints about expected access patterns (e.g., read-only). This allows the runtime to make smarter decisions, such as duplicating read-only data on both the CPU and GPU to avoid migration altogether. For our purposes, cudaMemPrefetchAsync is the most critical tool to master.
Choosing Your Memory Strategy
You now have three primary strategies for managing host-device memory:
-
Explicit Management with Pinned Memory: Use
cudaMalloc/cudaFreefor device memory andcudaMallocHost/cudaFreeHostfor host staging buffers. Manually orchestrate transfers withcudaMemcpyAsyncin streams.- Pros: Offers the highest potential performance and most explicit control.
- Cons: Most complex and verbose. Requires managing separate pointers and explicit transfers.
-
Naive Unified Memory: Use
cudaMallocManagedand let the runtime handle all migrations via on-demand page faulting.- Pros: Simplest code, great for rapid prototyping or complex, pointer-heavy data structures (like graphs or trees) where explicit copying is difficult.
- Cons: Often has poor performance for bulk data access patterns due to page fault overhead.
-
Unified Memory with Prefetching: Use
cudaMallocManagedfor single-pointer simplicity, but addcudaMemPrefetchAsynccalls to explicitly manage the movement of bulk data.- Pros: The modern sweet spot. Achieves performance comparable to explicit management while keeping the code much cleaner and easier to maintain.
- Cons: Still requires you to think about data locality and orchestrate the prefetches.
In high-level frameworks like PyTorch, these choices are often abstracted away. For example, when you create a DataLoader, setting pin_memory=True instructs PyTorch to use a pool of pinned host memory for its staging buffers, enabling faster, asynchronous transfers of data batches to the GPU, exactly the pattern we've discussed.
Conclusion
In this lesson, you've mastered the final prerequisites for building high-performance data pipelines in CUDA. You've seen how pinned memory is essential for enabling true asynchronous data transfers and how Unified Memory, when combined with prefetching hints, offers a powerful combination of programmer productivity and performance.
Key Takeaways:
- Pinned (page-locked) memory (
cudaMallocHost) prevents the OS from paging out host memory, enabling true, non-blocking asynchronous transfers withcudaMemcpyAsync. - Pinned memory is a limited resource and should be used judiciously.
- Unified Memory (
cudaMallocManaged) simplifies programming by creating a single address space, with the runtime migrating data on-demand via page faults. - Relying solely on page faults for bulk transfers is inefficient. Performance is reclaimed by using
cudaMemPrefetchAsyncto guide the runtime, achieving the performance of explicit copies with the simplicity of a single pointer.
So far in this module, we've built up your CUDA C++ toolkit from first principles. In our next and final lesson for this module, we will bring everything together and return to our case studies. You will use Nsight Systems, a professional-grade profiler, to analyze a vanilla PyTorch forward pass of GPT-2 and ResNet-50. This will establish the performance baseline that we will spend the rest of the course systematically optimizing.