Welcome to our next session. In the previous lesson, you mastered the theoretical foundation of launching CUDA kernels. We dissected the <<<grid, block>>> syntax and, most importantly, learned how to derive a unique global index for each thread. This allows us to map a grid of parallel threads to a large data array, which is the cornerstone of data-parallel programming on the GPU.
Today, we will translate that theory into a complete, working program. Our objective is to write a CUDA application for vector addition from start to finish and, crucially, to verify its correctness. While writing parallel code is one challenge, ensuring it produces the correct output is another, more subtle one. This lesson will guide you through building a host-side harness for our kernel, managing data, and implementing a verification step against a trusted CPU implementation. This practice of rigorous verification is fundamental to developing reliable high-performance code.
The Structure of a Complete CUDA Program
Before diving into the code, let's establish the full lifecycle of a typical CUDA program that performs a computation. The process involves a coordinated "dance" between the host (CPU) and the device (GPU):
- Initialization (Host): Create and populate the input data structures (our vectors) in CPU memory.
- Allocation (Device): Allocate memory on the GPU to hold the input vectors and the output vector.
- Data Transfer (Host -> Device): Copy the input data from host memory to the newly allocated device memory.
- Execution (Device): Launch the CUDA kernel on the GPU. The host passes the device pointers to the kernel, which then executes in parallel across thousands of threads.
- Data Transfer (Device -> Host): Copy the result from device memory back to host memory.
- Verification (Host): Compare the GPU-computed result with a result computed by a reliable CPU-based function to ensure correctness.
- Cleanup: Free the memory allocated on both the device and the host.
This sequence is the fundamental pattern for most CUDA applications.
The Ground Truth: A CPU Reference
To verify our GPU kernel, we first need a "golden" reference. For vector addition, this is a simple sequential implementation on the CPU. Given your background, this is straightforward, but it's a critical part of the process.
The following resource provides a clear example of both the mathematical definition and a sequential C++ implementation.
This document provides a concise overview of vector addition, starting with the math and then showing the code.
First, briefly review the mathematical form of vector addition. Then, focus on the sequential implementation section. This simple for loop is the reference against which we will check our parallel CUDA kernel.
Implementing the Full CUDA Workflow
Now, let's build the complete CUDA program following the 7-step lifecycle. We'll handle memory management, the kernel launch, and the data transfers. The kernel itself will use the global indexing logic you learned in the previous lesson.
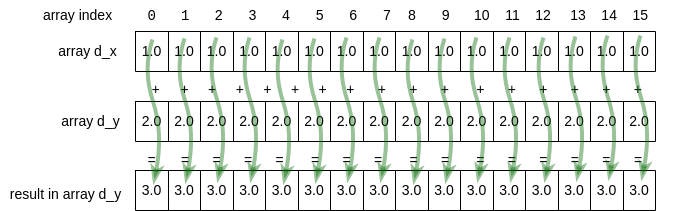
The image below illustrates the core operation happening on the GPU during the execution step. Each thread independently performs one addition, operating on its assigned element.
The following video provides an excellent walkthrough of a complete vector addition program, covering all the necessary host-side setup and the kernel code.
CUDA Crash Course: Vector Addition
This "CUDA Crash Course" video walks through building a vector addition program from scratch.
Watch the following segments to see how the pieces fit together: Setup and Data Transfer : Pay close attention to how the host code allocates device memory with cudaMalloc, copies data with cudaMemcpy, and calculates the gridSize and blockSize for the kernel launch. Kernel Implementation : This section details the kernel itself. Notice the familiar global index calculation (blockIdx.x * blockDim.x + threadIdx.x) and the crucial boundary check to prevent out-of-bounds memory access.
To complement the video, the textual resource we looked at earlier provides the complete code structure, including the main function that orchestrates everything.
This section consolidates all the CUDA-specific code needed for our vector addition.
Read through the CUDA implementation section. This text explicitly lays out: The __global__ kernel function. The host-side calculation of gridDim and blockDim. The full sequence of cudaMalloc, cudaMemcpy (HostToDevice), the kernel launch, cudaMemcpy (DeviceToHost), and cudaFree. The convention of using h_ for host pointers and d_ for device pointers.
The Crucial Step: Verification
After the kernel runs and we've copied the result vector back to the host, how do we know it worked? We must compare it, element by element, against the output of our trusted CPU reference function.
A simple loop can iterate through both the CPU and GPU result arrays and check for discrepancies.
void verify_results(const float* cpu_result, const float* gpu_result, int N) {
    // Define a small tolerance for floating-point comparison
    const float epsilon = 1e-5;

    for (int i = 0; i < N; ++i) {
        if (fabs(cpu_result[i] - gpu_result[i]) > epsilon) {
            printf("Error: Mismatch at index %d. CPU: %f, GPU: %f\n",
                   i, cpu_result[i], gpu_result[i]);
            return; // Exit on first error
        }
    }
    printf("Success! The results are identical.\n");
}
A key detail here is the use of an epsilon for comparing floating-point numbers. Due to the nature of floating-point arithmetic, direct comparison with == is often unreliable. Minor differences in the order of operations between a sequential CPU loop and a massively parallel GPU execution can lead to tiny variations in the least significant bits. Checking if the absolute difference is within a small tolerance is a much more robust verification strategy.
The video you watched earlier concludes with this verification step.
CUDA Crash Course: Vector Addition
This final clip shows the verification process in action.
Watch the end of the video where the result is copied back and checked: Copying back the result using cudaMemcpyDeviceToHost. The final check, which in this case uses an assert to confirm correctness. Our verify_results function is a more descriptive version of this same idea.
By combining the CPU implementation, the full CUDA host harness, the GPU kernel, and a robust verification function, you have now created your first complete, verifiable CUDA program.
Conclusion
In this lesson, you have moved from theory to practice, building and verifying your first CUDA kernel. You have seen how host code is used to orchestrate the entire process, from data preparation to final verification. This methodical approach is essential for developing complex GPU-accelerated applications.
Key Takeaways:
- A complete CUDA program follows a standard lifecycle: initialize host data, allocate and copy to device, launch kernel, copy result back to host, verify, and clean up.
- Verification against a trusted CPU reference implementation is a non-negotiable step to ensure the correctness of your parallel code.
- When comparing floating-point results, checking if the absolute difference is within a small
epsilonis more robust than direct equality checks. - The C++/CUDA code for vector addition combines host-side logic (
mainfunction) and device-side logic (__global__kernel) into a single application, compiled withnvcc.
In our next lesson, we will examine the timing and synchronization of these operations. You've seen cudaMemcpy and kernel launches, but are they blocking or non-blocking? We'll explore the difference between synchronous and asynchronous CUDA APIs, introduce cudaDeviceSynchronize, and lay the groundwork for overlapping computation and data transfers to maximize performance.