Hello! Welcome to the final lesson in our module, "The Editor's Craft: Pacing and Continuity."
In our last few lessons, we've focused on creating "invisible" edits—techniques that keep your audience immersed in the story. We learned to correct jump cuts and maintain continuity to avoid jarring the viewer. Today, we tackle one of the most common and distracting technical problems: shaky footage. Nothing says "amateur" quite like a wobbly camera when the shot is supposed to be steady.
Your learning outcome for this lesson is to use digital stabilization in post-production to correct shaky footage. We'll explore how stabilization tools work, the inevitable trade-offs they create, and how to apply them effectively in the software you're familiar with, CapCut and Shotcut.
1. What is Digital Stabilization?
Before we jump into the software, let's understand the basic principle. Digital stabilization is a post-production process where software analyzes your footage frame by frame to identify unwanted camera motion. It then counteracts this motion by digitally shifting, rotating, and scaling the image in the opposite direction.
The goal is to make the footage appear as if it were shot with a steadier camera.
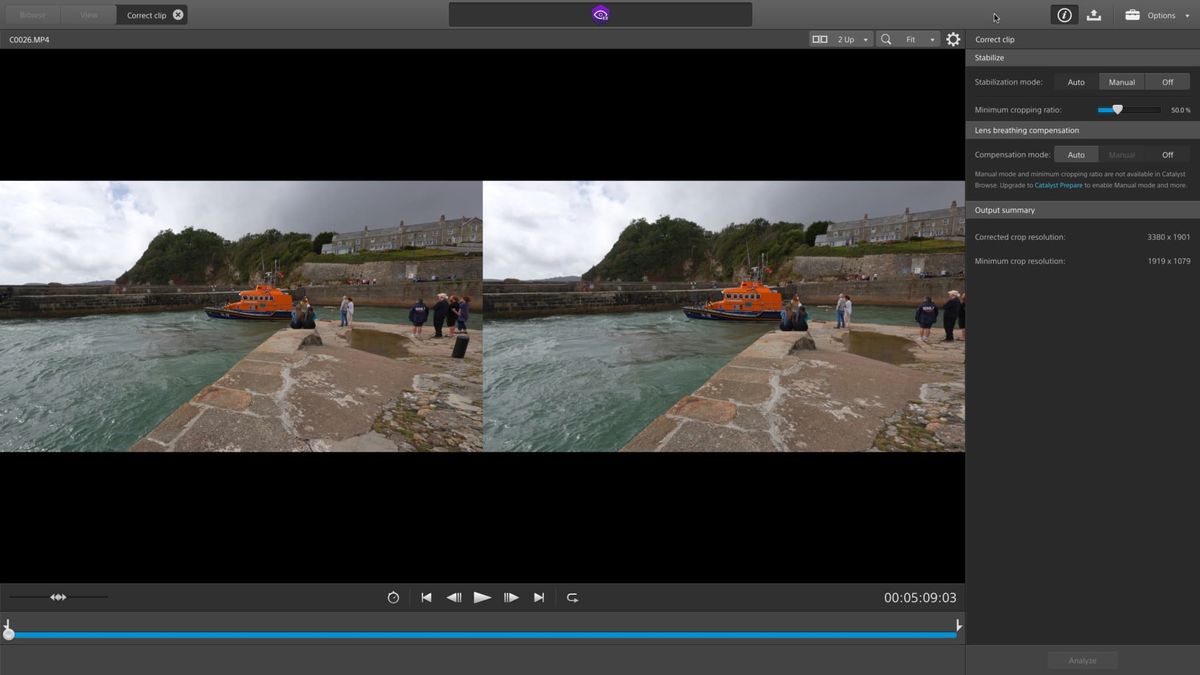
The key thing to understand is that stabilization is not magic. To hide the moving edges of the frame as it shifts around, the software must crop into your image. This means you will always lose some resolution and part of your original composition. The more aggressive the stabilization, the more the software has to zoom in, and the softer your image may become.
The best solution is always to capture stable footage in the first place (which we'll cover in a future module). But when that's not possible, digital stabilization is an incredibly powerful rescue tool.
2. Quick and Easy Stabilization in CapCut
Since you have experience with CapCut, let's start there. CapCut's stabilizer is very user-friendly and great for quick fixes, which is perfect for YouTube content. It simplifies the complex process into a few straightforward levels of intensity.
How to Use CapCut Stabilizer: PC, Online, and Mobile Ways
The article 'How to Use CapCut Stabilizer' offers a clear, step-by-step guide for using this feature in the desktop application.
Please read the section titled 'How to use the CapCut stabilizer on PC'. It walks you through the process with screenshots. Focus on understanding the purpose of the three stabilization levels: 'Recommended,' 'Minimum cut,' and 'Most stable'.
As the article shows, CapCut gives you three options:
- Minimum cut: Applies the least amount of stabilization, preserving as much of the original frame as possible. Use this for footage that only has minor jitters.
- Recommended: A balanced setting that provides good stabilization without an excessive crop. This is your go-to starting point.
- Most stable: Applies the most aggressive stabilization. This will result in the smoothest footage but also the tightest crop and the biggest potential loss in quality. Use this for very shaky footage, but be prepared for a noticeably softer image.
3. Finer Control with Shotcut's Stabilizer
While CapCut is simple and effective, Shotcut provides more granular control, letting you fine-tune the stabilization to better suit your specific clip. This requires understanding a few key parameters.
This video provides an excellent walkthrough of Shotcut's stabilization filter.
Stabilize Video Using Shotcut [Tutorial, Explanation & Comparison]
The video 'Stabilize Video Using Shotcut' by Point of Parallax offers a fantastic tutorial, first showing the basic steps and then explaining what each setting does.
First, watch from the beginning to 01:33 to see the basic workflow: apply the filter, then analyze. Then, continue watching from 01:33 to 04:29 for a detailed explanation of the parameters. Pay close attention to the descriptions of Shakiness, Accuracy, Zoom, and Smoothing.
Based on the video, here’s a breakdown of the key steps and parameters in Shotcut:
- Apply the Filter: Unlike other filters, the Stabilize filter won't do anything until you perform the next step.
- Analyze: You must click the "Analyze" button. Shotcut will process the clip and create a data file that tracks the motion. This can take some time on longer clips.
- Adjust the Parameters:
- Shakiness: This tells the algorithm how much motion to expect. The video suggests maxing this out to allow the filter to perform a thorough analysis.
- Accuracy: This affects how precisely the filter tracks motion within the frame. Again, setting this high yields better results at the cost of longer analysis time.
- Smoothing: This is your main creative control. It determines how much of the detected shake is removed. A low value will only remove fine jitters, while a high value will create a very smooth, almost "floaty" look. Be careful, as too much smoothing can look unnatural and will result in a significant crop.
- Zoom: This parameter controls the amount of digital zoom used to hide the black borders created by the stabilization. The
Smoothingsetting often adds its own zoom, so you may only need to adjust this manually if you see distracting edges.
4. Advanced Concepts for Better Results
Some stabilization concepts are universal across all editing software. Understanding them will help you troubleshoot tricky shots and achieve more professional results, regardless of the tool you're using.
How to Stabilize Footage in Premiere Pro and After Effects | Adobe Video x @filmriot
To explore these advanced concepts, we'll watch a video about Premiere Pro's 'Warp Stabilizer.' Don't worry about the specific software; focus on the ideas, as they are highly transferable.
Watch from 00:34 to 01:45. Focus on the difference between 'No Motion' and 'Smooth Motion'. This is a crucial conceptual distinction. Then, watch the advanced technique from 01:54 to 02:44. This shows how to handle a difficult shot with a large moving subject.
From that video, here are two powerful ideas to keep in mind:
-
Smooth Motion vs. No Motion: This is a critical distinction.
- Use a "Smooth Motion" setting when you want to keep the intentional camera movement (like a walking shot or a slow pan) but remove the unintentional jitters and bumps.
- Use a "No Motion" setting when the shot was intended to be completely static (as if on a tripod) but has a slight wobble or drift. The software will attempt to lock the frame in place.
-
Handling Warping and Moving Subjects:
- Sometimes, digital stabilizers can introduce strange, "Jell-O"-like distortions into the image, known as warping artifacts. If you see this, your first step should be to reduce the
Smoothingamount. - A stabilizer can get confused by large objects moving across the frame (like a person walking past the camera). The software might try to stabilize the person instead of the background, causing the background to move unnaturally. As the video shows, an advanced solution is to use masking to temporarily remove the moving subject, stabilize the background, and then add the subject back in.
- Sometimes, digital stabilizers can introduce strange, "Jell-O"-like distortions into the image, known as warping artifacts. If you see this, your first step should be to reduce the
Test your understanding!
You've filmed a handheld shot walking behind a friend for a short film. The footage is shaky. You apply a stabilization filter with a high Smoothing value. The result is smooth, but your friend's body seems to distort and wobble unnaturally.
What is likely causing this, and what are two different things you could try to fix it?
Show answer
-
The Cause: The stabilizer is likely being confused by the large moving subject (your friend) and is trying to stabilize their motion relative to the frame, causing warping artifacts. The high
Smoothingvalue is exaggerating this effect. -
Potential Fixes:
- Reduce the Smoothing: Lower the
Smoothingvalue to a point where it removes the worst of the shake without introducing noticeable distortion. It's a balance between smoothness and artifacts. - Change the Method/Type: In a more advanced stabilizer, you could switch from a "warp" based method (which bends the image) to a simpler method that only uses Position, Scale, and Rotation. This is less likely to cause distortion but may not be as smooth. (This corresponds to the options shown in the Premiere Pro video).
- Reduce the Smoothing: Lower the
Conclusion
You now have the tools and knowledge to rescue shaky footage, a crucial skill for polishing your videos and maintaining a professional look.
Key Takeaways:
- Digital stabilization works by analyzing motion and then shifting, rotating, and cropping the frame to counteract it.
- There is always a trade-off between smoothness and image quality due to the necessary cropping.
- Simple tools like CapCut offer preset levels (
Minimum,Recommended,Most stable) for quick fixes. - Advanced tools like Shotcut give you granular control over parameters like Shakiness, Accuracy, and especially Smoothing.
- It's important to distinguish between smoothing intentional movement (
Smooth Motion) and creating a locked-off shot (No Motion). - Be mindful of warping artifacts and know that sometimes less stabilization is better than a perfectly smooth but distorted image.
Next Lesson Preview:
With this lesson, we conclude our module on "The Editor's Craft." You've learned to manage pacing, ensure continuity, and fix common errors like jump cuts and shaky shots.
In our next module, we'll shift our focus from the picture to the sound. We'll begin "Audio Post-Production" by tackling a fundamental task: cleaning up dialogue. Your next lesson will teach you how to remove background noise and hum using audio editing software.