Hello! Welcome to the next lesson in our module, "The Editor's Craft: Pacing and Continuity."
In our last lesson, we explored how to control the pacing and rhythm of your edits to guide your audience's emotions. We talked about creating rhythmic contrast with rapid cuts and lingering shots. This was all about making deliberate choices to serve your story.
Today, we're flipping the coin. We'll look at cuts that are often accidental and disruptive. Your learning outcome for this lesson is to identify and correct jump cuts and other continuity errors. Mastering this skill is about achieving "invisible" editing—making your cuts so smooth that the audience remains completely immersed in the story you're telling, whether it's a short film or a dynamic YouTube video.
1. The Jump Cut: An Abrupt Leap in Time
In the previous lesson, we discussed fast cutting. A jump cut is a specific type of cut that can feel jarring and amateurish if used unintentionally. It occurs when you edit together two shots of the same subject that are too similar in framing and angle, making the subject appear to "jump" in the frame.
Let's start with a clear definition.
What is a Jump Cut & When to Use It — 5 Essential Jump Cut Editing Techniques Explained
The video 'What is a Jump Cut' from StudioBinder provides a concise and clear definition of what a jump cut is and how it's created.
Watch the section from 00:51 to 01:50. This will show you the two main ways a jump cut can happen: by cutting a piece out of a single continuous shot, or by cutting between two separate but very similar shots.
As the video explains, a jump cut breaks the continuous flow of time. In traditional narrative filmmaking, this is often seen as an error because it breaks the audience's suspension of disbelief. It reminds them they are watching an edited video.
However, in other contexts, like the fast-paced vlogs common on YouTube, jump cuts are used intentionally to create energy and condense information. This is a stylistic choice you can make, but it's crucial to know the difference between a deliberate effect and an accidental mistake.
2. The Editor's Rescue Kit: How to Fix Unwanted Jump Cuts
So, you've edited an interview or a scene, and you have an ugly jump cut. What do you do? Luckily, you have a versatile toolkit to fix it. Many of these techniques are especially useful for the kind of content you're interested in creating.
This next video is packed with practical solutions. We'll break it down piece by piece.
How To Hide Jump Cuts With Seamless Edits
The video 'How To Hide Jump Cuts With Seamless Edits' by Jeven Dovey is a fantastic resource focused on the practical techniques editors use, especially in the context of YouTube content.
We'll go through this video in sections. Start by watching from the beginning to 02:13. This first part explains why jump cuts are so common in YouTube videos and why you might want to hide them.
Now let's dive into the specific techniques from the video and other resources.
Technique 1: Change the Shot Size or Angle
The best way to avoid a jump cut is to follow a guideline known as the 30-degree rule. It states that for a cut between two shots of the same subject to look natural, the camera angle or position should change by at least 30 degrees. If you can't change the angle, you should significantly change the shot size (e.g., cutting from a wide shot to a close-up).
What is a Jump Cut & When to Use It — 5 Essential Jump Cut Editing Techniques Explained
Let's return to the StudioBinder video for a clear explanation of this rule.
Watch the section from 11:52 to 12:38. It directly explains the 30-degree rule and the alternative of changing your shot size.
Technique 2: "Punch In" by Reframing
If you didn't get different shot sizes during filming, you can sometimes create them in post-production. By "punching in"—scaling up your footage—you can create a close-up from a medium shot. This simulates a second camera and hides the jump cut effectively.
Important Note: This works best when your original footage has a higher resolution than your project timeline (e.g., shooting in 4K for a 1080p edit). Punching in too much on footage that is the same resolution as your project will result in a soft, pixelated image.
How To Hide Jump Cuts With Seamless Edits
Let's see this technique in action. Jeven Dovey demonstrates how he punches in and out throughout his video.
Watch the short clip from 05:05 to 05:35. Notice how cutting from a wider shot to a tighter 'punched-in' shot feels like a deliberate choice, not a mistake.
Technique 3: Cover the Cut with B-Roll or Graphics
This is perhaps the most common and versatile technique. A jump cut only exists if the audience sees it. By covering the visual edit with another piece of footage (B-roll), a graphic, or a still image, you hide the jump completely. The audio continues seamlessly, and the viewer just sees relevant, illustrative content.
The article '5 Ways to Hide Jump Cuts' from PremiumBeat provides a great text-based summary of these techniques.
Read sections 2 ('Cut to B-Roll') and 5 ('Use Images or Stock Photos'). This will reinforce what you're about to see in the video.
Now, let's see how this looks in practice.
How To Hide Jump Cuts With Seamless Edits
Returning to Jeven Dovey's video, watch how he uses both B-roll and on-screen graphics to hide his cuts.
Watch two segments: 04:37 to 05:05 (Using B-roll) 06:58 to 07:37 (Using Graphics) Pay attention to how the audio track remains consistent while the visuals change to cover the edit point.
A Note on Audio
As the video mentions, maintaining audio continuity is critical. A visual cut can be perfectly hidden with B-roll, but if there's an audible pop, a change in room noise, or an unnatural breath, the audience will still sense the edit. Always listen carefully at your edit points and use short audio crossfades to smooth the transition if needed.
Test your understanding!
You are editing a "talking head" style YouTube video for your channel. You've removed an "um" from the middle of a sentence, creating an obvious jump cut. You shot the video in 4K on a single camera and have some photos of the product you are reviewing.
List at least three different methods you could use to correct this jump cut.
Show answer
- Punch In: Since you shot in 4K for what is likely a 1080p final video, you have extra resolution. You can cut at the point of the jump cut and scale up the second clip to create a "close-up," hiding the jump.
- Cover with B-roll/Images: You can place one of the product photos over the edit point. The audio of your sentence continues, but the viewer sees the product image instead of the visual jump.
- Use a Morph Cut/Smooth Cut: In your editing software (like CapCut, which has a 'Smooth slow-mo' feature, or more advanced tools in Premiere/Resolve), you could apply a morphing transition. The software would analyze the frames before and after the cut and attempt to blend them seamlessly. This works best for very minor jumps.
3. Beyond Jump Cuts: Other Continuity Errors
Continuity is about maintaining consistency in details from shot to shot. A jump cut is a temporal continuity error (a break in time), but there are other types as well. When continuity is broken, it can pull the viewer out of the story just as much as a bad cut.
Here are a few common types:
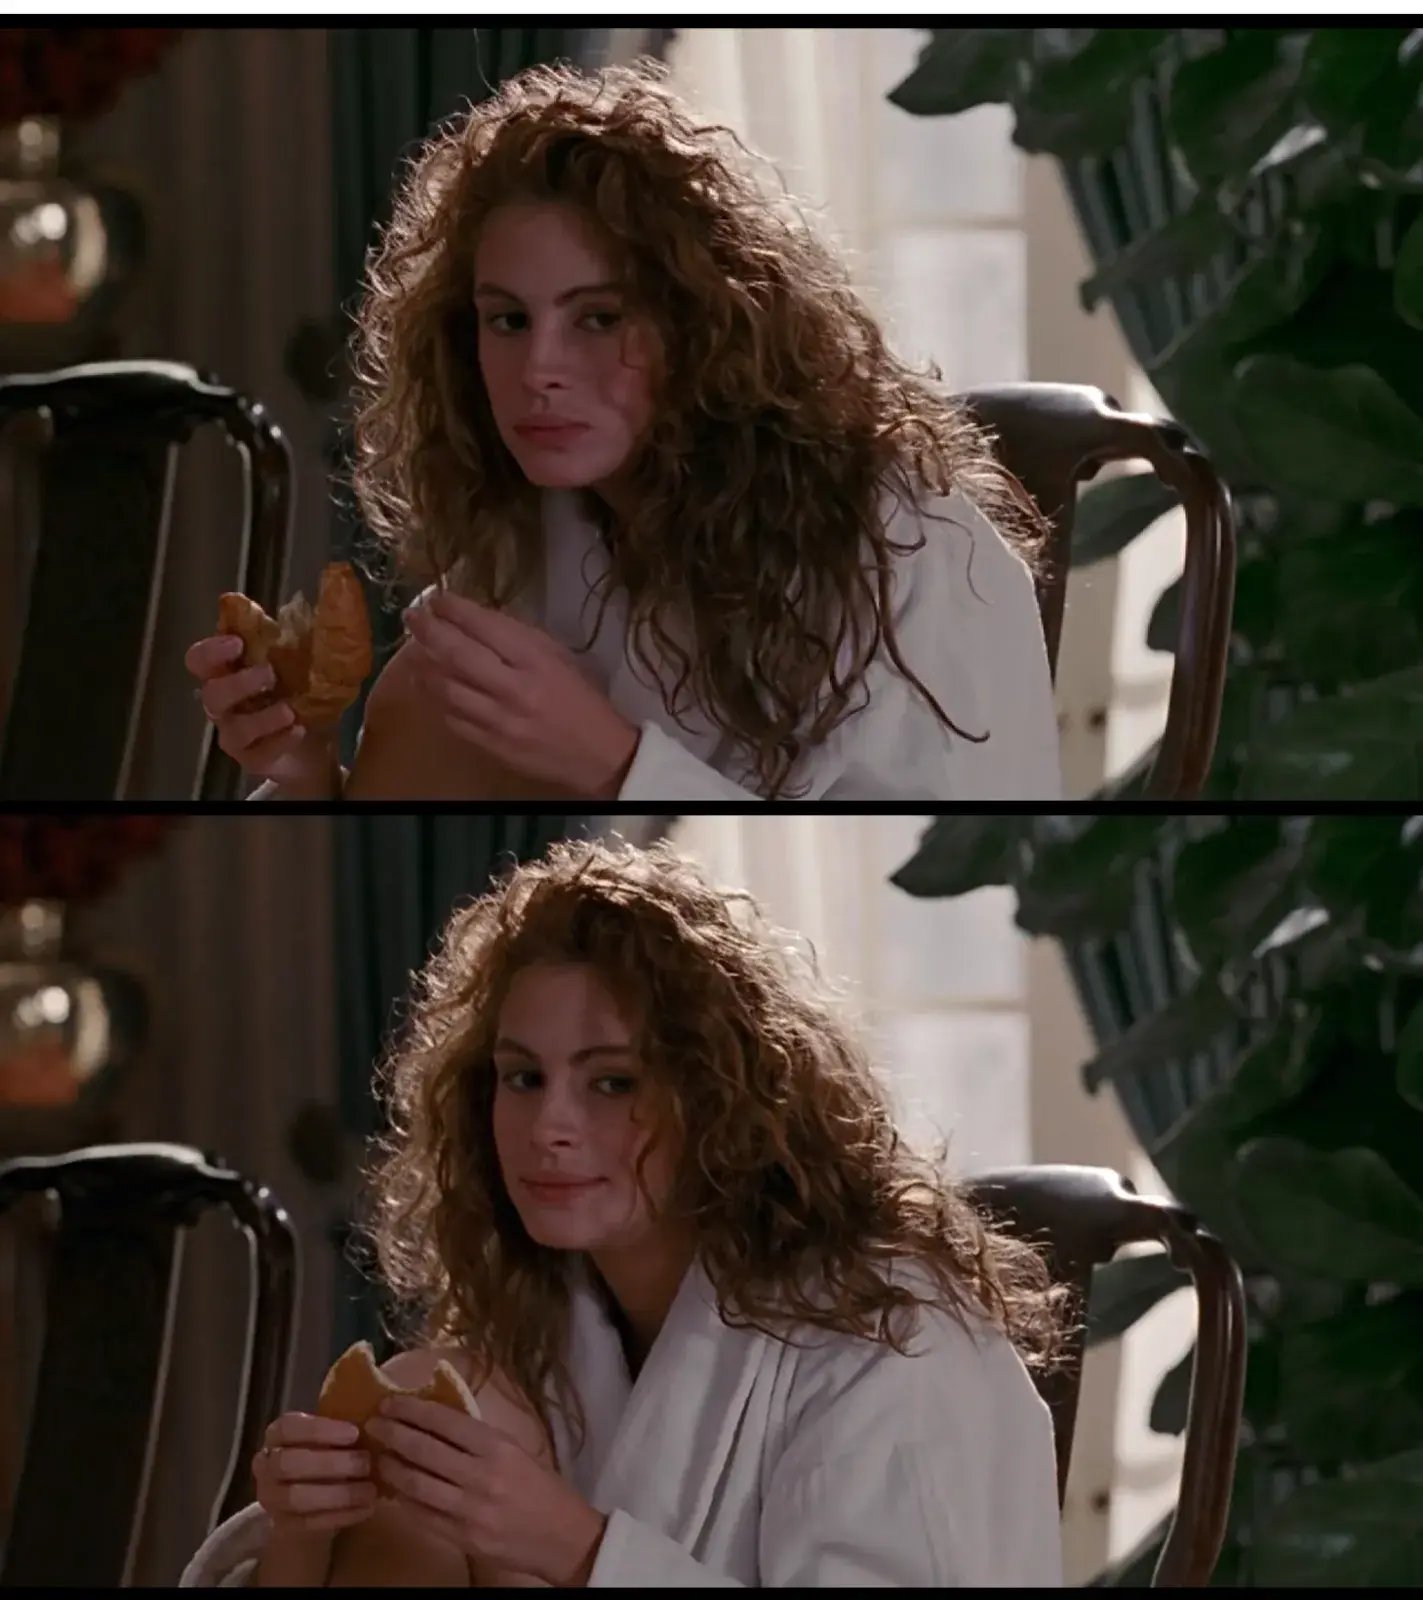
Prop/Wardrobe/Set Continuity
This is the classic "movie mistake." A character's drink is full in one shot and half-empty in the next. Their tie is straight, then crooked, then straight again. These small details can be surprisingly distracting.
Lighting and Color Continuity
When you cut between shots in a scene, the lighting and color should match. If one shot is warm and golden, and the next is cool and blue, it breaks the illusion that the shots are happening in the same time and place.
Fixing the jump cut — A guide to common editing problems
The article 'Fixing the jump cut' from Videomaker briefly touches on this issue.
Read the sections titled 'Matching shots' and its 'How to fix it' subsection. This explains how inconsistent color occurs and how it's typically fixed in post-production with color correction tools.
We will dive much deeper into color correction in a later module, but for now, it's important to be able to spot these inconsistencies.
Spatial Continuity (The 180-Degree Rule)
This is one of the most fundamental rules of cinematic grammar. It governs where you can place the camera to ensure that the characters and objects in your scene maintain a consistent spatial relationship with each other. A character on the left side of the screen should stay on the left. Breaking this rule can completely disorient the viewer.
Conclusion
You've now learned to identify some of the most common technical flaws in an edit and, more importantly, how to fix them. This is the difference between a rough assembly and a polished, professional piece.
Key Takeaways:
- A jump cut is a disruptive edit between two overly similar shots that creates an unnatural jump in time.
- Jump cuts can be a deliberate stylistic choice (common in vlogs) or an unintentional error (in traditional narrative).
- You can fix jump cuts by applying the 30-degree rule, punching in on high-resolution footage, covering the edit with B-roll or graphics, or using morphing transitions.
- Continuity errors go beyond jump cuts and include inconsistencies in props, wardrobe, lighting, color, and on-screen positions.
- Maintaining continuity, especially with audio, is key to creating a seamless viewing experience.
Next Lesson Preview:
In our next lesson, we will focus entirely on that last point: spatial continuity. You will learn to apply the 180-degree rule to maintain clear and consistent geography in your scenes, which is an essential skill for editing any conversation or action sequence.