Hello! Welcome back to our series on the principles of cinematography.
In our last lesson, we established the foundation of professional lighting with the three-point setup. You learned how to use a key, fill, and back light to control the direction and intensity of light, sculpting your subject and separating them from the background.
Today, we're adding another crucial layer of control: light quality. The same three-point setup can look completely different depending on whether the light is harsh and sharp or soft and gentle. By the end of this lesson, you will be able to modify light quality using diffusion and bounce to create soft or hard shadows. Mastering this will unlock a new level of nuance in your visual storytelling, allowing you to precisely shape the mood and texture of every shot.
What are Hard and Soft Light?
At its simplest, the quality of light is defined by the shadows it creates.
- Hard Light creates sharp, well-defined shadows with a crisp edge. Think of the distinct shadow you cast on a bright, sunny day.
- Soft Light creates diffused, gentle shadows with a gradual, blurry edge—or sometimes no visible shadow at all. Think of the light on an overcast day, where everything is evenly lit.
This side-by-side comparison makes the difference immediately clear.

To get a more formal definition, let's turn to a short video.
How Cinematographers Use Hard Vs Soft Light
The video 'How Cinematographers Use Hard Vs Soft Light' from the In Depth Cine channel provides a clear, concise definition of these two qualities of light.
Watch from 00:50 to 02:00. Focus on how the video describes the 'gradient'—or transition—between the light and shadow for each type.
The "Why": Creative Use of Light Quality
Choosing between hard and soft light is a powerful creative decision that directly influences the audience's emotional response. It's a key part of your visual language as a filmmaker.
The same video continues to explain the distinct moods and effects associated with each.
How Cinematographers Use Hard Vs Soft Light
Now let's explore the storytelling functions of hard and soft light. This is where you connect the technical choice to the narrative you want to tell.
Watch from 02:10 to 06:30. As you watch, make a mental list of the different feelings or genres associated with each light quality (e.g., soft light for romance, hard light for film noir).
As the video highlights:
- Soft light is often used to create a sense of calmness, beauty, and naturalism. Its flattering quality makes it a go-to for interviews and commercial work, as it smooths skin texture.
- Hard light creates drama, tension, and suspense. It can make a character seem more rugged, imposing, or dangerous. Its high contrast is a stylistic hallmark of genres like film noir and thrillers.
The Core Principle: Relative Size of the Light Source
So, what physically makes light hard or soft? It all comes down to one simple principle: the size of the light source relative to the subject.
- A small or "point" light source creates hard light.
- A large light source creates soft light.
The classic example is the sun. On a clear day, the sun is a tiny point in the vast sky. Its light travels in parallel rays, creating hard, sharp shadows. On an overcast day, the clouds act as a massive diffusion panel, turning the entire sky into a huge, soft light source. The light now comes from many directions, wrapping around objects and softening the shadows.
Distance also plays a role. A light source that is physically far away appears smaller to the subject, making its light harder. The same light source moved very close to the subject becomes relatively larger, and its light becomes softer.
To learn how you can manipulate this principle on set, let's explore the two primary techniques.
The "How": Diffusion and Bounce
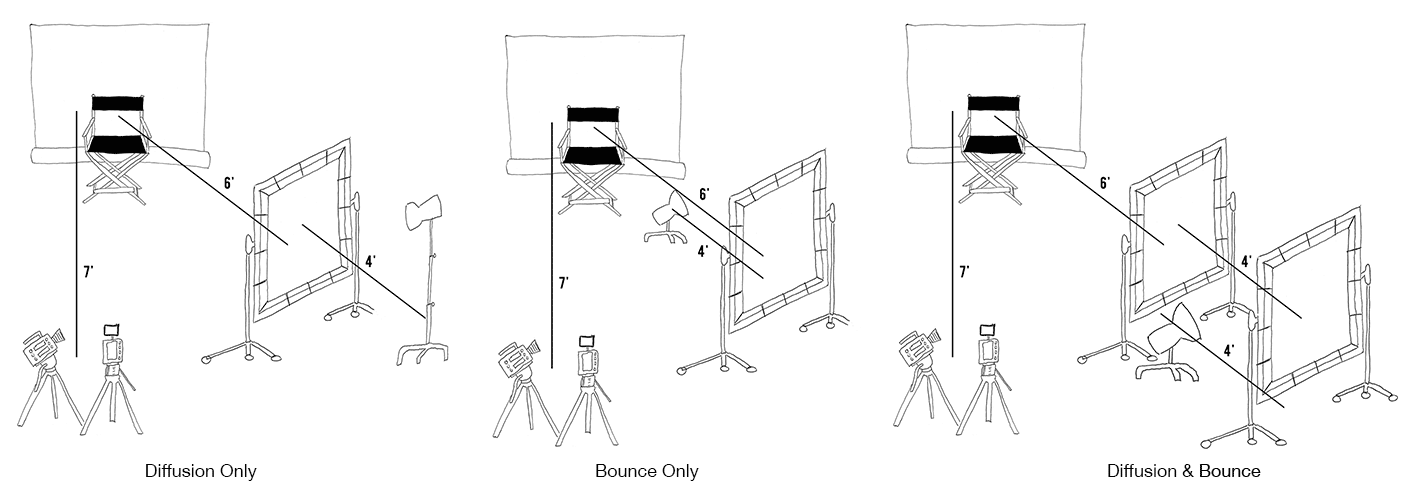
To soften light, we need to make our light source effectively larger. The two main ways to do this are diffusion and bounce.
Technique 1: Diffusion
Diffusion involves placing a sheet of translucent material between your light and your subject. This material scatters the light rays, effectively transforming your small lamp into a larger panel of light.
There are many materials and tools used for diffusion, from professional gear to household items. For a detailed breakdown of professional options, the "In Depth Cine" video is an excellent resource.
How Cinematographers Use Hard Vs Soft Light
Let's look at the professional tools used for diffusion. Understanding these will help you recognize them on sets and know what to look for when buying or renting gear.
Watch from 06:30 to 09:44. Pay attention to the different types of materials mentioned (gels, textiles like silk and grid cloth) and the important trade-off: diffusion reduces the intensity of the light.
For your own short films and YouTube videos, you don't need expensive equipment. The following article provides a fantastic overview of practical and affordable diffusion methods.
Cinematography Tip: How to Create Soft Diffused Light
The article 'Cinematography Tip: How to Create Soft Diffused Light' from PremiumBeat is a goldmine of practical techniques. We'll focus on the specific tools you can use.
Read the sections under 'Diffusion Techniques,' specifically the parts on Diffusion Paper, Softboxes, Umbrellas, Silks/Scrims, and the 5-in-1 Reflector Diffusion Screen. Note the DIY alternatives, like using a white sheet or shower curtain in place of a professional silk.
Technique 2: Bounce Lighting
The second method is to bounce the light. Instead of pointing your light directly at the subject, you aim it at a large, neutral-colored surface, like a white wall or a piece of foam board. That surface becomes your new, large, soft light source.
The Curtis Judd video below gives a great practical demonstration.
Better Lighting for Your Videos: Flags, Bounce, Diffusion
In his video 'Better Lighting for Your Videos,' Curtis Judd demonstrates how to use a simple bounce board to create soft fill light.
Watch from 04:32 to 05:44 to see the bounce technique in action. Then, continue watching from 08:08 to 09:24, where he discusses affordable alternatives like poster board and the ever-useful 5-in-1 reflector.
Key considerations for bouncing light:
- Color Contamination: The color of your bounce surface will affect the color of your light. Bouncing off a beige wall will give you a warm, beige-tinted light. For clean light, always use a neutral white or silver surface.
- Intensity Loss: Just like diffusion, bouncing light significantly reduces its intensity. You'll need a powerful enough light source, especially if your bounce surface is far from your subject.
A more advanced technique that combines both methods is called a "book light." This involves bouncing a light off a white card and then sending that reflected light through a diffusion panel. It creates an incredibly soft, beautiful quality of light, but requires a very powerful source to compensate for the double loss of intensity.
Test your understanding!
You are shooting a dialogue scene for a short film. The characters are having a serious, heartfelt conversation in a living room. You are using a single, powerful LED light as your key light, but it's creating shadows that are too harsh and dramatic for the scene's mood.
Describe two different ways you could soften this light using affordable, everyday materials.
Show answer
Here are two excellent, budget-friendly solutions:
-
Diffusion Method: You could take a large, white, translucent shower curtain or a thin white bedsheet and clamp it to a stand (or have a friend hold it) between the light and the actors. This will diffuse the light, making it softer and more flattering for the heartfelt conversation.
-
Bounce Method: You could turn the light away from the actors and aim it at a large white wall or the ceiling (assuming they are white/neutral). The entire wall or ceiling then becomes your new, massive light source, bathing the scene in soft, indirect light that feels very natural. You could also use a large piece of white poster board or foam core as a more portable bounce surface.
Creating Hard Light
Creating hard light is much simpler: you do the opposite of everything we've just discussed! Use a small, direct light source without any diffusion or bounce. Direct sunlight, a bare bulb, or a focused spotlight will all produce hard light. To make it even harder and more dramatic, you can use a mirror to create a sharp, focused beam of light.
Conclusion
You now have a complete framework for thinking about the fundamental qualities of light. You can control its direction (key, fill, back), its intensity (lighting ratio), and now, its quality (hard or soft). By combining these three elements, you gain immense creative control over the look and feel of your films.
Key Takeaways:
- Light quality is described by its shadows: hard light creates sharp shadows, while soft light creates diffused shadows.
- Light quality is a key storytelling tool that shapes mood, with soft light often feeling calm and hard light feeling dramatic.
- The softness of light is determined by the relative size of the light source; larger sources produce softer light.
- The two primary techniques for softening light are diffusion (passing light through a material) and bounce (reflecting it off a surface).
- Budget-friendly tools like shower curtains, foam board, and 5-in-1 reflectors are highly effective for modifying light quality.
Next Lesson Preview:
In our next lesson, we will use these concepts to build specific aesthetic styles. We'll start by learning how to create a high-key lighting setup to convey an optimistic or clean mood. You'll see how the lighting ratios from the previous lesson and the light quality you learned today come together to create this classic cinematic look.