Hello! Welcome to your next lesson on the principles of cinematography.
In our last session, we explored how the direction of a single light source can dramatically alter a subject's appearance and create mood. You learned that light isn't just for illumination; it's a tool for sculpting with shadows. We saw how a front light can feel open and honest, a side light can create drama, and a backlight can make a subject "pop."
Today, we're going to build on that foundation by moving from one light to a complete, professional setup. By the end of this lesson, you will be able to set up three-point lighting (key, fill, and back) for a basic scene. This is one of the most fundamental and widely used lighting techniques in all of visual media, from Hollywood films to YouTube videos. It's the standard method for making a subject look three-dimensional and polished on a two-dimensional screen.
The Three Pillars of Lighting
Three-point lighting, as the name suggests, uses three distinct light sources to control how a subject is lit. Each light has a specific job. Think of them as a team working together:
- The Key Light: The team captain. It's the main light source.
- The Fill Light: The supporting player. It manages the shadows created by the key.
- The Back Light: The specialist. It creates separation and depth.
Let's look at a diagram that shows the classic arrangement.
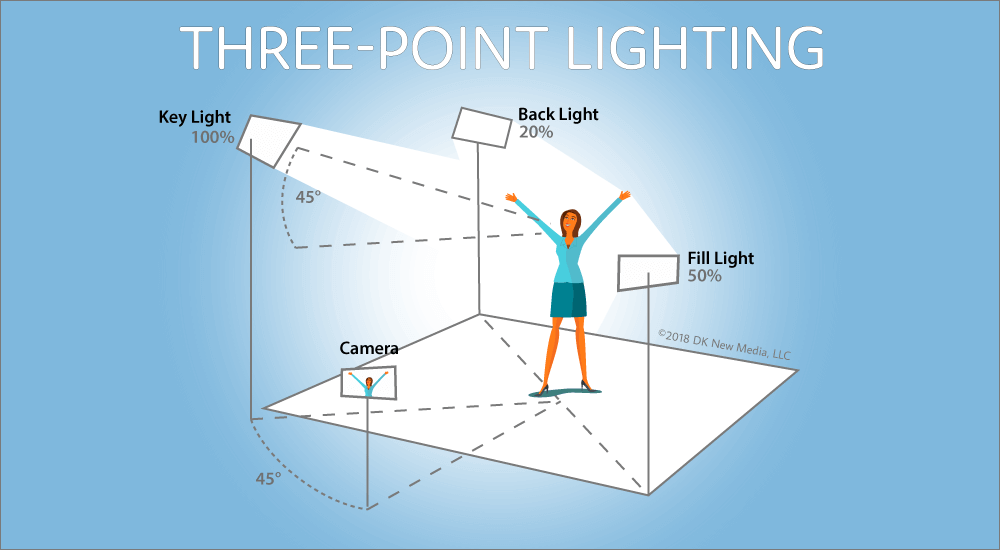
Now, let's break down the role of each of these lights in detail.
1. The Key Light: Your Main Source
The key light is the first and most important light you'll set up. It is typically the brightest light in the scene and is responsible for the primary illumination of your subject.
- Purpose: To establish the main shape, form, and dimension of the subject by creating the most prominent highlights and shadows. It sets the overall mood of the shot.
- Placement: The key light is usually placed about 45 degrees to one side of the camera (either left or right) and positioned slightly above the subject's eye level, pointing down at them. This placement creates a flattering, dimensional look, similar to the 45-degree lighting we discussed in the last lesson.
2. The Fill Light: Controlling Contrast
Once the key light is set, you'll notice strong, defined shadows on the side of the subject opposite the light. This can be very dramatic, but sometimes you want to see more detail in those shadows. This is the job of the fill light.
- Purpose: To "fill in" the shadows created by the key light. It does not create new shadows of its own. The power of the fill light determines the scene's contrast and, therefore, much of its mood.
- Placement: The fill light is placed on the opposite side of the camera from the key light. It's often positioned closer to the camera's axis to ensure it's just softening shadows rather than creating a competing set of them.
- Intensity (The Lighting Ratio): The relationship between the key and fill light is crucial. This is called the lighting ratio.
- A high-contrast (or low-key) look is achieved when the fill light is much dimmer than the key (e.g., a 4:1 or 8:1 ratio). This results in deep shadows and is often used for drama, mystery, or film noir.
- A low-contrast (or high-key) look is achieved when the fill light is almost as bright as the key (e.g., a 2:1 ratio). This creates a bright, even look with soft shadows, often used for comedies, commercials, or friendly interview setups.
3. The Back Light: Creating Separation
With the key and fill lights in place, your subject is well-lit, but they might still feel like they're "stuck" to the background. The back light is the solution.
- Purpose: To separate the subject from the background. It creates a subtle rim of light (sometimes called a "rim light" or "hair light") on the subject's shoulders and hair. This outline defines their shape and gives the image a crucial sense of depth.
- Placement: The back light is placed behind the subject, often high up and pointing down, so it hits the back of their head and shoulders. It's usually positioned on the same side as the key light to create a balanced look.
To see how these three roles work together in a practical setup, let's watch a clear demonstration.
How To Set Up 3-Point Lighting for Film, Video and Photography
The video 'How To Set Up 3-Point Lighting' from Full Sail University walks through the process of building this setup light by light. It's a perfect visual demonstration of the principles we've just discussed.
Watch from 00:37 to 02:35. Pay attention to how they first establish the 'camera-to-subject axis' and then add the key, fill, and back light one by one, explaining the function and effect of each.
The Step-by-Step Setup Process
Now that you understand the "what" and "why," let's focus on the "how." Setting up three-point lighting is a methodical process. Working in a specific order helps you maintain control.
For a great, practical walkthrough, the article "Guide to 3-Point Lighting" from the Vimeo Blog provides an easy-to-follow guide.
Guide to 3-Point Lighting: Examples, Setup & Best Practices
This article lays out a simple, 5-step process for setting up your lights. We will use this as our framework for your own practical work.
Read the section titled 'How to set up three-point lighting in 5 easy steps.' Focus on the order of operations: start dark, then add key, fill, back, and finally, adjust.
To summarize and reinforce that excellent guide, here is the process:
- Start in the Dark: Turn off all ambient lights. You want complete control over the light in your scene. This allows you to build your lighting from scratch.
- Set Your Key Light: Place your main light first. This establishes the dominant light direction and the primary shadows. Make all your main creative decisions about mood and shape with this light.
- Add Your Fill Light: Bring in your second light (or a reflector) to soften the shadows to your desired level. Adjust its intensity to set the lighting ratio and control the contrast.
- Add Your Back Light: Finally, place your back light to lift your subject from the background and add that professional-looking depth. Be careful that it doesn't spill into the lens and cause a flare (unless that's a desired creative effect).
- Adjust and Balance: Look at the complete picture. Tweak the position, angle, and intensity of each light until you achieve the exact look you want. Remember, changing one light will affect how the others appear.
Test your understanding!
You are tasked with lighting an interview for a documentary about a whistleblower. You want them to appear credible and sympathetic, but also convey a sense of the serious, somewhat somber nature of their story.
Describe how you would set up your three-point lighting. What would your lighting ratio be like (high or low contrast), and why?
Show answer
A good approach would be a classic three-point setup with a moderate lighting ratio.
- Key Light: Place it at a 45-degree angle to provide a clear, dimensional light that feels natural and allows the audience to connect with the subject.
- Fill Light: Use a fill light that is significantly dimmer than the key, creating a lighting ratio of around 3:1 or 4:1. This creates a medium-contrast look. It's not as dark and dramatic as film noir, but it's not the bright, flat look of a comedy either. This moderate contrast will add a sense of seriousness and gravity to the scene while still keeping the subject trustworthy and visible.
- Back Light: Use a subtle back light to separate them from the background, adding a professional polish and ensuring they remain the clear focus of the shot.
Variations and Creative Freedom
Three-point lighting is a powerful foundation, but it's not a rigid rule you must follow every time. It's a starting point from which you can experiment.
- Using a Reflector for Fill: You don't always need three separate lights. For your fill, you can often use a simple piece of white foam board or a collapsible reflector to bounce light from your key source back into the shadows. This is a cost-effective and very common technique.
- The "Kicker": As mentioned in the Full Sail video, if you move the backlight more to the side, so it catches the side of the subject's face, it's often called a "kicker." This adds a nice splash of light that helps define the jawline.
- Breaking the Rules: Sometimes the most powerful statement is made by removing a light. For an extremely dramatic, high-contrast look, you might use only a key light and a back light, with no fill at all.
This final video offers a great recap and introduces some of these common variations.
Lighting 101: Intro to Light Placement
To reinforce these concepts, let's watch this quick overview from Aputure. It summarizes the roles of each light and introduces some useful variations in terminology.
Watch from 00:57 to 02:21. Note the mention of 'Rembrandt' lighting for the key, using a reflector for fill, and the different types of backlights like 'hairline' and 'rim light.'
Conclusion
You have now learned the most essential lighting setup in a filmmaker's toolkit. By understanding and controlling the interplay between the key, fill, and back lights, you can move beyond simple illumination and begin to truly shape the look and feel of your scenes with intention and professionalism.
Key Takeaways:
- Three-point lighting is a standard system using a Key Light, Fill Light, and Back Light.
- The Key Light is the main light source that establishes shape and mood.
- The Fill Light controls contrast by managing the shadows from the key. The key-to-fill ratio determines if the look is high-key (low contrast) or low-key (high contrast).
- The Back Light provides separation from the background, creating depth and a polished look.
- The setup process is methodical: start dark, then add lights in the order of Key, Fill, and then Back.
Next Lesson Preview:
So far, we have focused on the direction and intensity of our lights. But there's another crucial quality: is the light harsh and sharp, or soft and wrapping? In our next lesson, we will learn how to modify light quality using diffusion and bounce to create soft or hard shadows. This will give you another powerful layer of control for refining the mood and texture of your images.