Hello! Welcome to the next lesson in your graphic design journey.
In our last session, we learned how to combine typography and color to create cohesive and professional compositions. You now have a solid understanding of how to use Text Styles and Color Styles in Figma to build flexible and scalable designs. Today, we're going to add the third major element of visual design into your toolkit: images.
This lesson is all about learning how to source and import license-free images into Figma. For a professional designer, knowing where to find high-quality, legally-usable images is just as important as knowing how to use your design software. We will cover where to find these images and the various ways you can bring them into your Figma projects.
Part 1: Sourcing High-Quality, License-Free Images
When you're working on professional projects, you can't just use any image you find on a Google search. Most images are protected by copyright, which means using them without permission can lead to legal issues. This is why the world of "stock photography" exists. While many stock photo sites are expensive, there are fantastic resources that offer high-quality images completely free for both personal and commercial use.
Understanding Image Licenses
Before we look at where to find images, it's helpful to understand what "license-free" typically means. You'll often see these terms:
- Creative Commons (CC0) / Public Domain: This is the most permissive license. It means you can use the image for any purpose, including commercial projects, without needing to ask for permission or give credit to the creator.
- "Free for Commercial Use": Many sites have their own custom license that is very similar to CC0. It allows you to use the images for commercial work, but it's always a good idea to read the site's specific license page to check for any minor restrictions (e.g., you can't resell the photo as-is).
- Attribution Required: Some free licenses require you to give credit to the photographer. This is less common on the sites we'll recommend, but it's something to watch out for.
For your goal of becoming a working designer, you should always aim for images that are cleared for commercial use.
Top Websites for Free Stock Photos
There are many websites that provide excellent, free-to-use images. The following video gives a great overview of the best options available. As you watch, pay attention to the names that come up repeatedly as being the most popular and having the simplest licenses.
Top 10 Best FREE STOCK PHOTO Websites (2026)
Let's watch a countdown from the 'Brett In Tech' channel titled 'Top 10 Best FREE STOCK PHOTO Websites'. This video will introduce you to several reliable sources for your design projects.
Please watch the segment covering the top three picks, from 07:51 to 10:30. This will introduce you to Unsplash, Pexels, and Pixabay. Notice that all three have very generous licenses that are perfect for getting started.
Based on the video and industry popularity, here are three sites I recommend you bookmark and explore first:
- Unsplash: Known for its artistic, high-resolution photos.
- Pexels: Offers a huge library of both photos and videos with great search functionality.
- Pixabay: Another massive repository of photos, illustrations, and vectors.
These three platforms are excellent starting points because their licenses are straightforward and allow for commercial use without attribution.
Sourcing Images Directly in Figma with Plugins
An even more efficient workflow is to find and import images without ever leaving Figma. This can be done using plugins. The Unsplash plugin is one of the most popular and useful plugins for any designer.
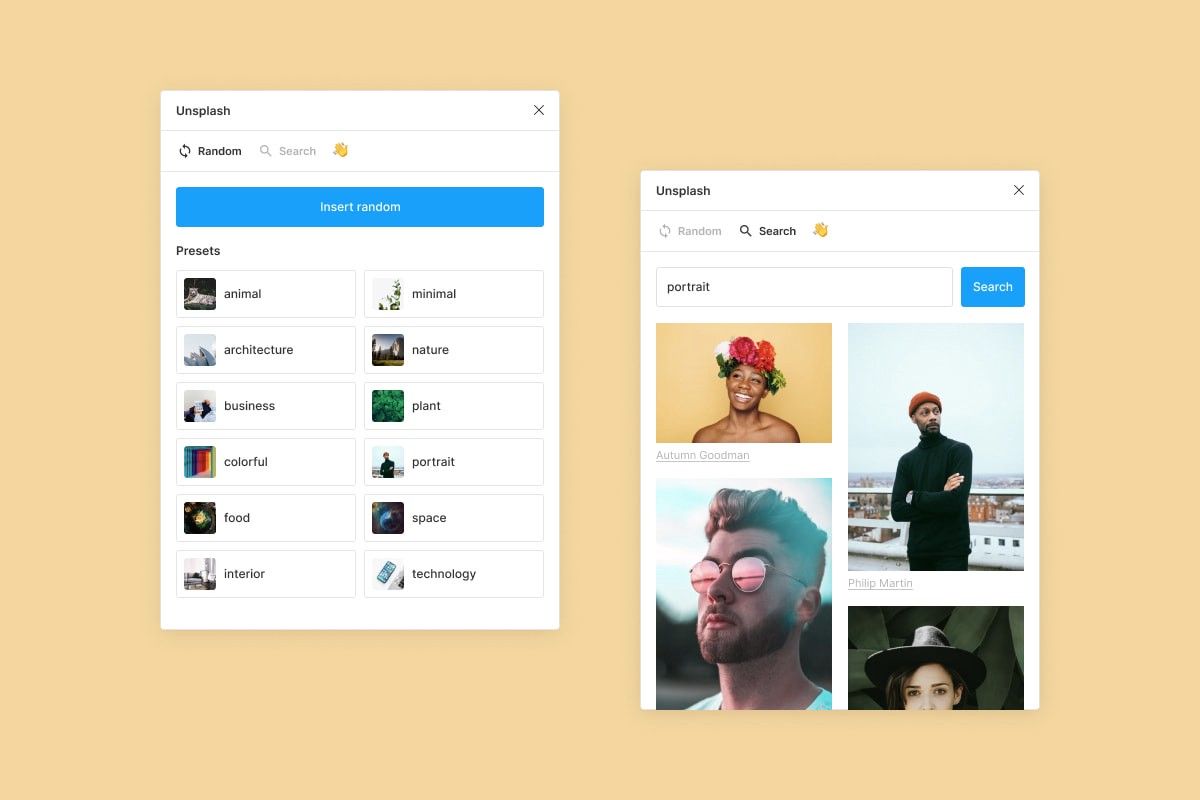
The Unsplash plugin allows you to search for and insert license-free images directly into your Figma canvas, streamlining your workflow significantly.
To use it:
- Right-click on your canvas.
- Go to
Plugins>Find more plugins. - Search for "Unsplash" and click Run.
- You can now search for an image and click it to add it directly to your design.
Part 2: Importing Images into Your Figma Designs
Once you have an image—either downloaded from a website or found through a plugin—you need to get it into your Figma file. There are several ways to do this, each suited for different situations.
The official Figma guide provides a great written overview of these methods. It also introduces a core concept: in Figma, images are treated as fills. This means an image isn't an object itself, but rather a background applied to a shape (usually a rectangle). This is what allows for easy cropping and manipulation, which we'll cover in the next lesson.
Let's read the official guide from Figma, 'Working with images in Figma', to understand the primary import methods.
Please read the section titled 'Importing images in Figma'. Focus on understanding the three methods described: 'Via the menu', 'Via drag and drop', and 'Via copy + paste'. Pay special attention to the explanation of how Figma treats images as fills.
To see these methods in action, the following short video provides a clear, practical demonstration.
Working with images in Figma | Cropping images in Figma | Figma Images 2025
This video, 'Working with images in Figma', demonstrates the import techniques we just read about.
Watch the first part of the video, from 00:00 to 01:22. The presenter shows how to drag-and-drop, use the 'Fill' property, and use the 'Place Image' shortcut (Ctrl+Shift+K on Windows, Cmd+Shift+K on Mac).
Let's summarize the main ways to import images:
- Place Image (
Ctrl+Shift+KorCmd+Shift+K): This is the most versatile method. It lets you select one or more images from your computer and then click to place them on the canvas or directly into existing shapes.

*The 'Place image...' command is a powerful way to import images with precision.*
2. Drag and Drop: Simply drag an image file from a folder on your computer directly onto the Figma canvas. This is quick and easy for single images you've already downloaded.
- Copy and Paste: Find an image in your web browser, right-click it, and select "Copy Image." Then, go to Figma and press
Ctrl+V(orCmd+V) to paste it. This is perfect for quickly trying out ideas without needing to save the image to your computer first.
Test your understanding!
Let's practice sourcing and importing images. Open a blank Figma file and complete the following tasks.
-
Task 1 (Place Image Method):
- Go to Pexels.com and search for "workspace".
- Download one of the images to your computer.
- In Figma, use the Place Image shortcut (
Ctrl+Shift+KorCmd+Shift+K), select the downloaded file, and click on the canvas to place it.
-
Task 2 (Drag and Drop Method):
- Go to Pixabay.com and search for "nature".
- Download an image you like.
- Drag the image file directly from your computer's downloads folder onto your Figma canvas.
-
Task 3 (Copy and Paste Method):
- Go to Unsplash.com and search for "architecture".
- Find an image, right-click on it, and select Copy Image.
- Return to Figma and paste the image onto your canvas using
Ctrl+VorCmd+V.
You should now have three different images on your canvas, each imported using a different method!
Show answer
A successful result is simply having all three images from the different sources placed on your Figma canvas. By completing this exercise, you've demonstrated that you can:
- Navigate major stock photo websites.
- Source images that are free for commercial use.
- Execute the three primary methods for importing images into Figma.
Notice that if you select any of the images and look at the Fill section in the right-hand panel, you'll see the image thumbnail there, confirming that Figma is treating it as a fill property of a rectangle.
Conclusion
Great job! You've now mastered a critical and practical skill for any graphic designer: sourcing and importing images legally and efficiently. This opens up a whole new world of creative possibilities for your designs.
Here are the key takeaways from this lesson:
- Always use images that are licensed for commercial use for professional work. Websites like Unsplash, Pexels, and Pixabay are excellent resources.
- You can import images into Figma in several ways: Place Image (
Ctrl+Shift+K), Drag and Drop, and Copy and Paste. - Figma plugins, like the Unsplash plugin, can dramatically speed up your workflow by allowing you to find and add images without leaving the application.
- Fundamentally, Figma treats images as a fill for a shape, which is key to manipulating them.
In our next lesson, we'll build directly on this foundation. Now that you know how to get images into Figma, you'll learn how to crop, resize, and mask images using frames and shapes. This will give you the control you need to make images fit perfectly into your layouts.