Hello! Welcome to the next lesson in our Advanced LAN Switching module.
In the previous lesson, we explored how voice VLANs create a special type of access port to handle both tagged voice traffic and untagged data traffic, enabling Quality of Service. Today, we'll delve into another powerful VLAN feature that provides granular security at Layer 2.
This lesson focuses on the learning outcome: Configure and verify private VLANs to provide Layer 2 isolation between hosts. We will examine scenarios where standard VLAN segmentation isn't enough and explore how Private VLANs (PVLANs) can prevent devices within the same IP subnet from communicating with each other. For a solutions engineer like yourself, understanding PVLANs is key to designing secure multi-tenant networks or environments where host isolation is a primary security requirement.
1. The Case for Isolation Within a VLAN
Ordinarily, all devices within the same VLAN exist in a single broadcast domain and can communicate freely at Layer 2. While this is the intended behavior, it can be a security risk in certain situations.
Consider a multi-tenant office building where a single switch serves multiple small, independent companies on the same floor. To conserve IP addresses, you might place all companies into a single VLAN and subnet. However, you certainly don't want Company A to be able to see the broadcast traffic from Company B, or worse, directly access their file servers. This is where Private VLANs become essential.
To start, let's watch this excellent introduction from Kevin Wallace Training. He uses the multi-tenant building scenario to explain the problem that Private VLANs are designed to solve.
Watch the first two minutes of the video (00:00 - 01:52) to understand the fundamental use case for Private VLANs.
2. The Components of a Private VLAN Architecture
Private VLANs achieve this intra-VLAN isolation by partitioning a primary VLAN into one or more secondary subdomains. This architecture introduces new VLAN roles and port types.
Let's continue with the same video to break down the key components. Pay close attention to the distinct roles of isolated, community, and promiscuous ports, as this is the foundation of PVLANs.
Watch from 01:52 to 05:48. Focus on understanding the communication rules for each port type.
Let's summarize those key terms:
VLAN Types:
- Primary VLAN: The main VLAN that carries traffic downstream from the router (via a promiscuous port) to all host ports. All ports in a private VLAN are members of the primary VLAN.
- Secondary VLANs: These are "VLANs within a VLAN" and are associated with the primary VLAN. They define the isolation boundaries. There are two types:
- Isolated VLAN: Any host port assigned to this VLAN is completely isolated at Layer 2 from all other host ports in the PVLAN, including other isolated ports. They can only communicate with promiscuous ports.
- Community VLAN: Host ports assigned to the same community VLAN can communicate with each other and with promiscuous ports. They cannot communicate with ports in other communities or with isolated ports.
Port Types:
- Promiscuous Port: This port can communicate with all other ports in the private VLAN (isolated, community, and other promiscuous ports). It is typically used to connect to a router or firewall that provides the default gateway for the entire PVLAN domain.
- Host Port: This is a standard access port that connects to an end device. It can be one of two types:
- Isolated Port: A host port associated with an isolated VLAN.
- Community Port: A host port associated with a community VLAN.
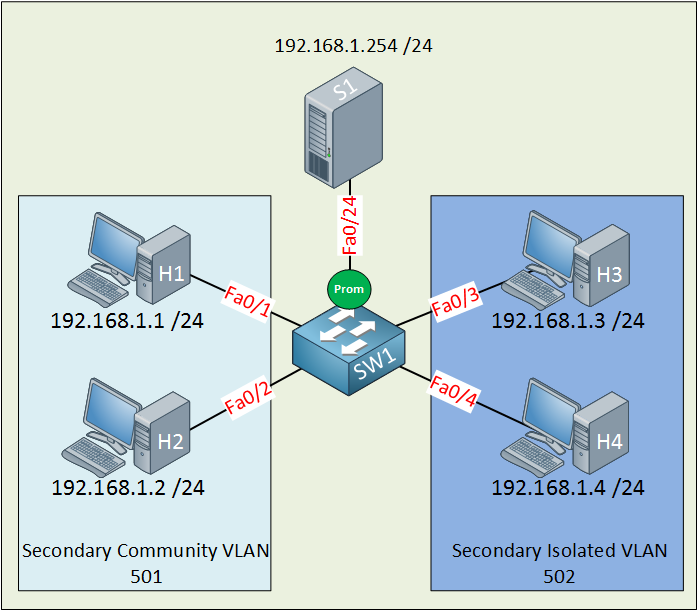
3. Configuration and Verification
Now, let's walk through the configuration process using the topology from the diagram above. The configuration follows a logical sequence: set the switch prerequisite, create and define the VLANs, associate them, and then configure the interfaces.
This is the most critical part of the lesson. Kevin Wallace provides a clear, step-by-step command-line demonstration that maps directly to the concepts we've just discussed. Follow along closely.
Watch from 05:48 to 12:06. The first part (until 10:24) covers the full configuration, and the second part shows the essential verification commands. Note the commands for each step: setting VTP mode, creating VLANs, associating VLANs, and configuring each port type.
To complement the video demonstration, let's refer to the official Cisco documentation. It provides a structured, command-by-command guide that serves as an excellent reference for building and verifying your configurations.
[PDF] Configuring Private VLANs - Cisco
The following Cisco documentation provides the definitive guide to configuring Private VLANs. We will use it to reinforce the steps shown in the video and as a detailed reference.
Use this document as a reference. You don't need to read it from start to finish. Instead, focus on these key sections: 'How to Configure Private VLANs': Review the high-level 6-step procedure. 'Configuring and Associating VLANs in a Private VLAN': This section shows the commands for creating the primary and secondary VLANs and linking them. 'Configuring a Layer 2 Interface as a Private VLAN Host Port' / '...as a Private VLAN Promiscuous Port': These sections detail the interface-level commands for host and promiscuous ports. 'Monitoring Private VLANs': Note the table of show commands for verification.
Configuration Summary
Let's consolidate the process into key steps:
-
Set VTP Prerequisite: PVLAN configurations are not propagated by VTP v1/v2. You must set the switch to transparent mode. VTPv3 supports PVLANs, but for the exam and general practice, transparent mode is the standard approach.
Switch(config)# vtp mode transparent -
Create and Define VLANs: Create your primary and secondary VLANs and assign their roles.
Switch(config)# vlan 100 Switch(config-vlan)# private-vlan primary Switch(config-vlan)# exit Switch(config)# vlan 501 Switch(config-vlan)# private-vlan community Switch(config-vlan)# exit Switch(config)# vlan 502 Switch(config-vlan)# private-vlan isolated Switch(config-vlan)# exit -
Associate VLANs: Go back into the primary VLAN and associate the secondary VLANs with it.
Switch(config)# vlan 100 Switch(config-vlan)# private-vlan association 501,502 Switch(config-vlan)# end -
Configure Ports:
- Promiscuous Port (Router/Server):
Switch(config)# interface Fa0/24 Switch(config-if)# switchport mode private-vlan promiscuous Switch(config-if)# switchport private-vlan mapping 100 501,502 - Community Host Port:
Switch(config)# interface Fa0/1 Switch(config-if)# switchport mode private-vlan host Switch(config-if)# switchport private-vlan host-association 100 501 - Isolated Host Port:
Switch(config)# interface Fa0/3
Switch(config-if)# switchport mode private-vlan host
Switch(config-if)# switchport private-vlan host-association 100 502
- Promiscuous Port (Router/Server):
Verification Commands
show vlan private-vlan: This is your primary command. It gives a summary of the primary/secondary relationships and which ports are assigned to them.show interfaces <interface-id> switchport: This shows the detailed private VLAN status for a specific port, including its mode (e.g.,private-vlan host) and associations.
Test your understanding!
A data center is implementing PVLANs to isolate customer servers. All servers must be able to reach the internet via a firewall connected to port GigabitEthernet1/0/1. However, servers must be completely isolated from each other at Layer 2.
- The primary VLAN is 200.
- The isolated VLAN is 201.
- A customer server is connected to port
GigabitEthernet1/0/5.
Write the necessary commands to configure the firewall port (Gi1/0/1) and the server port (Gi1/0/5).
Show answer
First, you would have already configured VTP mode and created/associated the VLANs. The specific port configurations would be:
Firewall Port (Promiscuous):
Switch(config)# interface GigabitEthernet1/0/1
Switch(config-if)# switchport mode private-vlan promiscuous
Switch(config-if)# switchport private-vlan mapping 200 201
This configures the port to be promiscuous and maps it to the primary VLAN (200) and allows it to communicate with the secondary isolated VLAN (201).
Server Port (Isolated):
Switch(config)# interface GigabitEthernet1/0/5
Switch(config-if)# switchport mode private-vlan host
Switch(config-if)# switchport private-vlan host-association 200 201
This configures the server port as a host port and associates it with the primary VLAN (200) and the isolated VLAN (201), ensuring it cannot communicate with other hosts but can reach the promiscuous firewall port.
4. Private VLANs and Layer 3 Routing
A common point of confusion is how IP routing works with PVLANs. Since all hosts are in the same primary VLAN, they typically share the same IP subnet. This means they all need the same default gateway.
The Switched Virtual Interface (SVI) for the PVLAN domain is only configured on the primary VLAN. You cannot create an active SVI on a secondary VLAN. The switch automatically handles the mapping so that all hosts, regardless of their secondary VLAN, can use the primary VLAN's SVI as their gateway.
We will cover SVIs in much greater detail in our next lesson, but for now, the key takeaway is: one IP subnet, one SVI (on the primary VLAN), one default gateway for the entire private VLAN domain.
Conclusion
In this lesson, we moved beyond standard VLANs to implement a powerful security feature for Layer 2 isolation. By partitioning a broadcast domain into primary and secondary VLANs, you can enforce strict communication policies even for hosts on the same IP subnet.
Key Takeaways:
- Private VLANs (PVLANs) provide Layer 2 isolation between hosts within the same primary VLAN and IP subnet.
- The main components are a Primary VLAN and one or more Secondary VLANs (which can be Isolated or Community).
- Ports are configured as Promiscuous (for routers/gateways), Isolated Host, or Community Host.
- Communication rules are strict:
- Isolated ports only talk to promiscuous ports.
- Community ports talk to each other and to promiscuous ports.
- Promiscuous ports talk to everyone.
- Configuration requires setting VTP mode, creating and associating VLANs, and then configuring the port modes and mappings.
- Verification relies on
show vlan private-vlanandshow interfaces switchport.
Preview of the Next Lesson:
Now that we've seen how PVLANs operate at Layer 2 and briefly touched on their interaction with Layer 3, our next lesson will be a deep dive into Layer 3 switching on Catalyst switches. We will focus on how to troubleshoot inter-VLAN routing using Switched Virtual Interfaces (SVIs), a foundational skill for managing any multi-VLAN enterprise network.