Hello! Welcome to our next lesson in the CCNP ENCOR course.
In our previous session, we focused on Layer 2 security features like DHCP Snooping, DAI, and IP Source Guard. These tools are essential for protecting the integrity of your internal network within a single site. Today, we shift our focus from internal threats to external ones, learning how to protect data as it travels across untrusted networks like the public internet.
This lesson addresses the learning outcome: Analyze IPsec framework components (IKE, ESP, AH) and configure a site-to-site IPsec VPN with IKEv2. We will deconstruct the IPsec framework to understand how it builds secure tunnels and then apply that knowledge to configure a classic site-to-site VPN between two Cisco routers.
1. What is IPsec? A Framework for Security
Imagine you need to connect your company's headquarters in one city to a branch office in another. You could lease an expensive, private WAN link, or you could use the ubiquitous and inexpensive public internet. The problem, of course, is that the internet is an insecure, shared network. Anyone could potentially intercept, read, or modify your company's sensitive data in transit.
IPsec (Internet Protocol Security) solves this problem. It's not a single protocol, but a framework of open standards that work together to provide secure communications over IP networks. IPsec provides four critical security services:
- Confidentiality: Encrypting data to ensure it cannot be read by unauthorized parties.
- Integrity: Using hashing algorithms to verify that data has not been altered in transit.
- Authentication: Verifying the identities of the two devices (peers) that are communicating, ensuring you're talking to the right entity.
- Anti-replay Protection: Using sequence numbers to protect against attackers who capture and re-transmit valid packets.
To get a foundational understanding of IPsec, let's start with a resource that covers the basic principles.
IPsec (Internet Protocol Security) - NetworkLessons.com
The article 'IPsec (Internet Protocol Security)' from NetworkLessons.com provides an excellent introduction to the IPsec framework and its core components.
Please read the introductory section, up to (but not including) the 'IKE (Internet Key Exchange)' heading. Focus on the four security features IPsec provides and the high-level overview of the five steps of the IPsec process.
2. Building the Tunnel: Internet Key Exchange (IKE)
Before two peers can start securely exchanging data, they must first perform a complex negotiation. They need to authenticate each other and agree on a set of common security parameters (like which encryption and hashing algorithms to use). This negotiation process is handled by the Internet Key Exchange (IKE) protocol.
IKE establishes a secure VPN connection in two distinct phases:
- IKE Phase 1: The goal of this phase is to authenticate the peers and establish a secure, bidirectional management channel. This channel is called the ISAKMP Security Association (SA) or simply the Phase 1 tunnel. It's used to protect the negotiations for Phase 2.
- IKE Phase 2: Using the secure channel created in Phase 1, the peers negotiate the parameters for the tunnel that will protect the actual user data. This results in the creation of one or more IPsec SAs, also known as the Phase 2 tunnel.
This two-phase approach is efficient. The heavy lifting of authentication and complex key exchange happens in Phase 1. If the Phase 2 tunnel is torn down due to inactivity, it can be re-established very quickly because the Phase 1 tunnel remains active.
To see this process in action, let's watch a video that provides an excellent conceptual overview.
The video 'IP Sec VPN Fundamentals' from the LearnCantrill channel offers a clear and visual explanation of the entire IKE process, from the initial key exchange to the creation of the final data tunnel.
Please watch from the beginning to 11:28. Pay close attention to: The explanation of symmetric vs. asymmetric encryption and why IPsec uses both. The role of the Diffie-Hellman (DH) key exchange in Phase 1. The distinction between the Phase 1 (management) tunnel and the Phase 2 (data) tunnel.
IKEv1 vs. IKEv2
There are two versions of IKE. While you may still encounter IKEv1, IKEv2 is the modern standard and the focus of the ENCOR exam. IKEv2 offers several significant advantages over its predecessor:
- Efficiency: It requires fewer message exchanges (typically 4 messages vs. 6 or 9 in IKEv1) to establish a tunnel.
- Built-in NAT Traversal (NAT-T): It natively handles situations where a VPN peer is behind a NAT device.
- Enhanced Reliability: It includes built-in keepalives and liveness checks (Dead Peer Detection).
- Flexibility: It adds support for EAP authentication, which is common in remote access VPNs.
The image below visually contrasts the negotiation processes of IKEv1 and IKEv2. Notice how much simpler the message flow is for IKEv2.

3. Protecting the Data: AH vs. ESP
Once IKE has built the IPsec SAs, the actual protection of user data is handled by one of two IPsec protocols:
-
Authentication Header (AH): Specified in IP protocol 51.
- Provides: Data integrity, authentication, and anti-replay protection.
- Does NOT provide: Confidentiality (encryption).
- Scope: AH authenticates the entire IP packet, including the immutable parts of the IP header. This creates a problem with Network Address Translation (NAT), which must change the source IP address, causing the AH integrity check to fail. For this reason, AH is rarely used in modern networks.
-
Encapsulating Security Payload (ESP): Specified in IP protocol 50.
- Provides: Confidentiality (encryption), data integrity, authentication, and anti-replay protection.
- Scope: ESP encrypts the IP payload (e.g., the TCP/UDP segment) and adds a new ESP header. It does not protect the outer IP header, which allows it to pass through NAT devices without issue. Because it provides encryption and is NAT-friendly, ESP is the dominant protocol used in IPsec VPNs today.
Tunnel vs. Transport Mode
Both AH and ESP can operate in two modes, which define how much of the original packet is protected.
- Transport Mode: Inserts the IPsec header between the original IP header and the payload. The original source and destination IP addresses are used for routing. This mode is typically used for end-to-end security between two hosts.
- Tunnel Mode: Encapsulates the entire original IP packet and adds a new, outer IP header. The new header's source and destination are the VPN peers (e.g., your site's routers). This mode is used for site-to-site VPNs, as it hides the internal network addressing from the public internet.
The following images illustrate these concepts clearly.
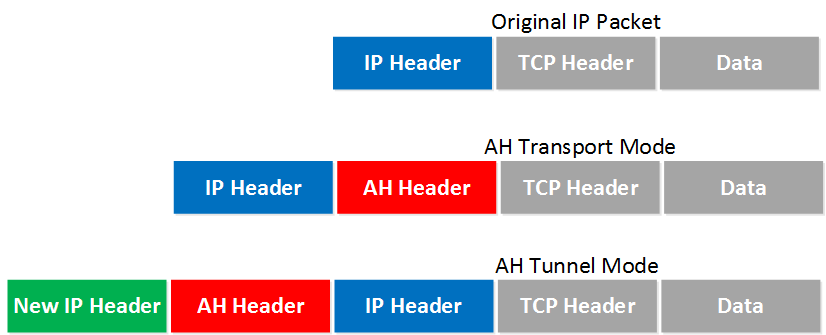
For our site-to-site VPN, we will be using ESP in Tunnel Mode.
Test your understanding!
A company wants to connect two of its sites across the public internet. The internal networks at both sites use private RFC 1918 addressing. Security policy mandates that all inter-site traffic must be encrypted and that the internal IP addresses must not be visible on the internet.
Which IPsec protocol (AH or ESP) and which mode (Transport or Tunnel) would be appropriate for this scenario, and why?
Show answer
The appropriate choice is ESP in Tunnel Mode.
- ESP is required because the policy mandates encryption, which AH does not provide.
- Tunnel Mode is required because it encapsulates the entire original IP packet (with its private RFC 1918 addresses) inside a new IP packet with public IP addresses for routing over the internet. This hides the internal addressing scheme and is the standard for site-to-site VPNs.
4. Configuration: Site-to-Site IKEv2 VPN with Crypto Maps
Now let's put theory into practice. We will configure a site-to-site VPN between two Cisco IOS XE routers using IKEv2 and pre-shared keys for authentication. We'll use the traditional crypto map method.
The configuration consists of several logical blocks that define the IKEv2 negotiation and the IPsec data protection parameters.
Site-to-Site IKEv2 IPSec VPN using Pre-Shared Key Authentication
This guide provides a complete, step-by-step example for configuring a site-to-site IKEv2 VPN using the crypto map method. We will walk through each section of this configuration.
Read through the section 'Configuration of IPsec VPN with IKEv2 and PSK authentication'. Focus on understanding the purpose of each configuration block rather than memorizing every command: IKEv2 Keyring: Stores the pre-shared keys. IKEv2 Proposal: Defines Phase 1 parameters (encryption, integrity, DH group). IKEv2 Policy: A container for proposals. IKEv2 Profile: Binds the identity, authentication, and keyring together. IPsec Transform Set: Defines Phase 2 parameters (the data protection policy). Crypto ACL: Identifies the 'interesting traffic' to be encrypted. Crypto Map: Ties all the components together and is applied to the outside interface.
Let's summarize the configuration flow described in the article. This process is performed on both peer routers, with peer-specific values (like IP addresses) adjusted accordingly.
IKEv2 Configuration (Phase 1)
- Configure the IKEv2 Keyring: This stores the pre-shared key used for authentication.
crypto ikev2 keyring MY-KEYRING peer HQ-ROUTER address 209.165.200.226 pre-shared-key MySecretKey123 - Configure the IKEv2 Proposal: This defines the set of algorithms for Phase 1. Both peers must have at least one matching proposal.
crypto ikev2 proposal MY-PROPOSAL encryption aes-cbc-256 integrity sha256 group 19 - Configure the IKEv2 Policy: This attaches the proposal. It can also be used to match specific proposals to peers if needed.
crypto ikev2 policy MY-POLICY proposal MY-PROPOSAL - Configure the IKEv2 Profile: This is the main IKEv2 object. It links the peer's identity, the local identity, the authentication method, and the keyring.
crypto ikev2 profile MY-PROFILE
  match identity remote address 209.165.200.226
  identity local address 209.165.200.242
  authentication remote pre-share
  authentication local pre-share
  keyring local MY-KEYRING
IPsec Configuration (Phase 2)
- Configure the IPsec Transform Set: This defines the algorithms for Phase 2 (ESP encryption and integrity).
crypto ipsec transform-set MY-TRANSFORM-SET esp-aes 256 esp-sha-hmac mode tunnel - Configure the Crypto ACL: This access list defines the "interesting traffic" that will trigger the VPN and be tunneled.
ip access-list extended VPN-TRAFFIC permit ip 192.168.1.0 0.0.0.255 10.10.10.0 0.0.0.255 - Configure the Crypto Map: This ties everything together.
crypto map MY-CRYPTO-MAP 10 ipsec-isakmp
  set peer 209.165.200.226
  set transform-set MY-TRANSFORM-SET
  set ikev2-profile MY-PROFILE
  match address VPN-TRAFFIC
Apply to the Interface
- Finally, the crypto map is applied to the public-facing (outside) interface.
interface GigabitEthernet2
  crypto map MY-CRYPTO-MAP
5. Verification
After configuring both routers, you need to generate interesting traffic (e.g., ping from a host in one site's LAN to a host in the other's) to bring the tunnel up. You can then use show commands to verify its status.
show crypto ikev2 sa: Verifies the IKEv2 Security Association (Phase 1). You should see the state asREADY.show crypto ipsec sa: Verifies the IPsec Security Association (Phase 2). Look for thepkts encapsandpkts decapscounters to increase as traffic flows.show crypto session detail: Gives a comprehensive overview of the active IPsec session.
BRANCH# show crypto ikev2 sa

IPv4 Crypto IKEv2  SA
Tunnel-id Local                 Remote                fvrf/ivrf            Status
1         209.165.200.242/500   209.165.200.226/500   none/none            READY
   Encr: AES-CBC, keysize: 256, PRF: SHA256, Hash: SHA256, DH Grp:19, Auth sign: PSK, Auth verify: PSK

HQ# show crypto ipsec sa

interface: GigabitEthernet3
    Crypto map tag: MY-CRYPTO-MAP, local addr 209.165.200.226

   protected vrf: (none)
   local  ident (addr/mask/prot/port): (10.10.10.0/255.255.255.0/0/0)
   remote ident (addr/mask/prot/port): (192.168.1.0/255.255.255.0/0/0)
   current_peer: 209.165.200.242:500
     PERMIT, flags={origin_is_acl,}
    #pkts encaps: 5, #pkts encrypt: 5, #pkts digest: 5
    #pkts decaps: 5, #pkts decrypt: 5, #pkts verify: 5
Conclusion
In this lesson, we delved into the IPsec framework, a cornerstone of network security. We analyzed its core components and protocols, then walked through a practical configuration of a site-to-site VPN.
Key Takeaways:
- IPsec is a Framework: It uses multiple protocols to provide confidentiality, integrity, authentication, and anti-replay services.
- IKEv2 is the Key: Internet Key Exchange v2 is the modern protocol used to negotiate security parameters and authenticate peers in a two-phase process.
- ESP in Tunnel Mode: This combination is the standard for site-to-site VPNs, providing encryption for user data and hiding the internal network topology.
- Configuration is Modular: Building an IPsec VPN involves configuring separate blocks for IKEv2 and IPsec parameters and then linking them together with a crypto map.
Preview of the Next Lesson:
While crypto maps are a valid and widely deployed method, modern Cisco IOS offers a more flexible, route-based approach to VPNs using tunnel interfaces. In our next lesson, we will explore this alternative by learning to Configure a GRE tunnel and secure it using an IPsec profile. This method allows routing protocols to run over the VPN, offering greater scalability and flexibility in enterprise networks.