Hello! Welcome back to your CCNP ENCOR preparation.
In our last lesson, we focused on the data plane, learning how to implement and verify IPv6 ACLs to filter traffic transiting our network devices. We saw how to create policies that control which packets can pass through a router.
Today, we shift our attention from the data plane to the management plane. Our focus is no longer on the traffic passing through the device, but on securing access to the device itself. We will tackle the learning outcome: Configure and verify device access control using TACACS+ for AAA. This is a fundamental skill for any network professional, ensuring that only authorized personnel can manage your critical network infrastructure.
This lesson will cover:
- The core principles of the AAA framework (Authentication, Authorization, and Accounting).
- Why TACACS+ is the preferred protocol for device administration compared to RADIUS.
- The step-by-step process for configuring TACACS+ on a Cisco IOS XE device.
- How to verify the configuration and troubleshoot common issues.
The AAA Framework: Securing Network Access
Before configuring any commands, it's essential to understand the framework we're implementing. AAA stands for Authentication, Authorization, and Accounting. Think of it as the comprehensive security guard for your network devices.
To get a solid grasp of these concepts, let's start with a foundational reading.
AAA Deep Dive: Authentication and Authorization in Cisco ...
The article 'AAA Deep Dive' provides an excellent introduction to AAA fundamentals and why a centralized approach is critical in enterprise networks. It also sets the stage for our discussion on TACACS+ versus RADIUS.
Please read the first two sections, 'AAA Fundamentals and Architecture' and 'AAA Protocols: RADIUS and TACACS+'. Pay close attention to the definitions of each AAA component and the detailed comparison table between the two protocols.
From the reading, let's summarize the three pillars of AAA:
- Authentication: Answers the question, "Who are you?" It's the process of verifying a user's identity, typically with a username and password.
- Authorization: Answers the question, "What are you allowed to do?" Once authenticated, this step determines the user's level of access and the specific commands they are permitted to execute.
- Accounting: Answers the question, "What did you do?" This is the logging and tracking of user actions. It provides an audit trail for security, compliance, and troubleshooting purposes.
Why TACACS+ is the Choice for Device Administration
As the article highlighted, there are two primary protocols for AAA: RADIUS and TACACS+. While both can be used, their designs make them suitable for different purposes. For securing administrative access to routers, switches, and firewalls, TACACS+ is the industry best practice.
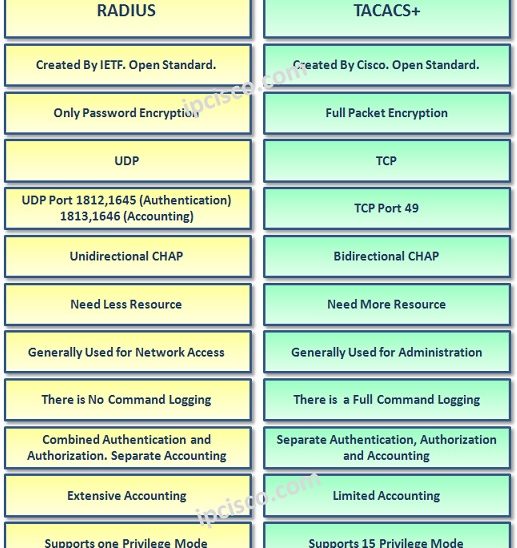
Let's emphasize the three key advantages of TACACS+ for device administration:
- Transport Protocol: TACACS+ uses TCP port 49. TCP is a connection-oriented protocol, which makes communication with the AAA server more reliable than RADIUS, which uses connectionless UDP.
- Encryption: TACACS+ encrypts the entire body of the packet, including the username and the commands being authorized or logged. RADIUS, by contrast, only encrypts the password.
- Separation of AAA: This is the most significant advantage. TACACS+ handles authentication, authorization, and accounting as separate processes. This separation allows for highly granular control, such as authorizing commands on a per-user or per-group basis after they have already been authenticated.
This separation of duties is visualized well in the protocol's message flow.

Configuring TACACS+ on a Cisco IOS XE Device
Now, let's get practical. Configuring TACACS+ involves a clear sequence of steps on the network device (often called the Network Access Server, or NAS).
Step 1: Enable AAA and Define the Server
First, you must enable the AAA framework globally. Then, you tell the router where to find the TACACS+ server and what shared secret to use for encrypting communication.
A critical best practice: Before enabling AAA, always ensure you have a local user account configured. This provides a fallback login method in case the TACACS+ server becomes unreachable, preventing you from being locked out of your own device.
! Create a local user for fallback access
R1(config)# username admin privilege 15 secret YourStrongSecret_Fallback

! Enable the AAA framework
R1(config)# aaa new-model
! WARNING: Once enabled, all access is governed by AAA method lists.
! Always configure from a console connection to avoid being locked out.

! Define the TACACS+ server
R1(config)# tacacs server MY_ISE_SERVER
R1(config-server-tacacs)# address ipv4 10.1.1.100
R1(config-server-tacacs)# key MySharedSecretKey123
R1(config-server-tacacs)# exit

! It's good practice to group servers for easier management
R1(config)# aaa group server tacacs+ MY_TACACS_GROUP
R1(config-sg-tacacs+)# server name MY_ISE_SERVER
R1(config-sg-tacacs+)# exit
Step 2: Create Authentication Method Lists
A method list defines the sequence of authentication methods to try. For device login, the best practice is to try the TACACS+ server first and use the local database as a backup.
! This list will first try the server group 'MY_TACACS_GROUP'.
! If the servers are unreachable, it will fall back to the 'local' database.
R1(config)# aaa authentication login VTY_AUTH_LIST group MY_TACACS_GROUP local
Step 3: Apply the Method List to the VTY Lines
Finally, you apply this policy to the virtual terminal (VTY) lines used for remote access like SSH.
R1(config)# line vty 0 4
R1(config-line)# login authentication VTY_AUTH_LIST
R1(config-line)# transport input ssh
Let's watch a short video that puts these steps together in a concise demonstration.
MicroNugget: AAA, TACACS+, and SSH
This video from CBT Nuggets provides a quick, practical walkthrough of the core TACACS+ authentication configuration on a Cisco router.
Please watch from 00:58 to 02:20. The presenter covers creating a local user, enabling SSH, enabling AAA, and configuring the authentication method list. Notice the emphasis on having a local fallback method.
Extending AAA: Authorization and Accounting
With authentication configured, users can log in. But what can they do? That's where authorization and accounting come in.
-
Authorization: To control which commands a user can run, you create authorization method lists. The
commands 15list, for example, can be used to check with the TACACS+ server before allowing any command at privilege level 15. This is how you implement role-based access control (RBAC).! Authorize EXEC shell access R1(config)# aaa authorization exec VTY_AUTH_LIST group MY_TACACS_GROUP local ! Authorize all commands at privilege level 15 R1(config)# aaa authorization commands 15 VTY_COMMAND_LIST group MY_TACACS_GROUP local -
Accounting: To log what users are doing, you create accounting method lists. This can log the start and stop of user sessions and, most powerfully, every command they type.
! Log the start and stop of every command at privilege level 15
R1(config)# aaa accounting commands 15 VTY_COMMAND_LIST start-stop group MY_TACACS_GROUP
The Server-Side Configuration (Cisco ISE)
The router configuration is only half the story. The real power of RBAC is defined on the TACACS+ server itself, such as a Cisco Identity Services Engine (ISE) node. On ISE, you define policies that map users or groups to specific permissions.
Configure and Troubleshoot TACACS with Cisco ISE 3.3 | Admin Access Control Guide
To understand the full picture, let's look at the server side. This official Cisco video demonstrates how to configure command sets and authorization policies in ISE, which work in tandem with the 'aaa authorization' commands on the router.
Please watch these key segments: 00:00 - 01:28: See how to enable the Device Admin service in ISE and add the network device with its shared key. 04:22 - 05:45: This part is crucial. It shows how to create command sets (e.g., to permit only 'show' commands) and build an authorization policy that assigns these permissions to specific user groups. This demonstrates the power of TACACS+ authorization.
As you saw, the server is where you can create a policy that says, "Users in the 'NetOps_Tier1' group are only allowed to run commands beginning with show and ping." The router then enforces this policy.
Verification and Troubleshooting
Once configured, you must verify that everything is working as expected.
For a comprehensive guide to verification and troubleshooting commands, this article is a great reference.
CCNP Enterprise - AAA Authentication with TACACS+ and RADIUS
The article from Network Journey provides clear, step-by-step lab instructions along with an excellent troubleshooting table and FAQ that reinforce the concepts.
Please review the 'Summary' table for a list of key CLI commands. Then, read the 'Lab: TACACS+ Configuration' section to see the configuration in a lab context, and finally, look over the 'Troubleshooting Tips' table. This will provide you with a solid toolkit for verification.
Key verification steps include:
- Testing from the CLI: The
test aaacommand lets you simulate a login attempt without actually logging out. - Using Debugs: The
debug tacacsanddebug aaa authenticationcommands show the real-time exchange between the router and the server. - Testing from a Client: The ultimate test is to SSH to the device from a separate machine and attempt to log in.
Let's see this verification process in action.
MicroNugget: AAA, TACACS+, and SSH
Now, let's watch the verification part of the process. The same CBT Nuggets video demonstrates how to use the 'test' command, enable debugs, and confirm a successful login.
Watch from 02:20 to the end. Pay close attention to the test aaa command syntax and the debug output that appears when the user logs in via SSH. This output is your proof that the request is being handled by the TACACS+ server.
Test your understanding!
You've configured TACACS+ authentication on a router with the method list aaa authentication login VTY_ACCESS group tacacs+ local. An administrator tries to SSH to the router, but the TACACS+ server is offline. What happens, and why? What would happen if the method list was aaa authentication login VTY_ACCESS group tacacs+ (without local)?
Show answer
In the first case (... group tacacs+ local), the router first attempts to contact the TACACS+ server. When it fails to get a response (times out), it proceeds to the next method in the list, which is local. It will then prompt the user for credentials and check them against the local user database on the router. If a matching local user exists, the login will succeed. This is a "fail-open" (to local) approach and a critical best practice.
In the second case (... group tacacs+), the router will only try the TACACS+ server. When the server is unreachable, there is no backup method defined. The authentication attempt will fail, and the administrator will be denied access. This is known as a "fail-close" configuration and can lead to administrative lockout if the server fails.
Conclusion
In this lesson, we secured the management plane of our network devices using the powerful combination of AAA and TACACS+. This centralized approach provides robust security, granular control, and detailed auditing capabilities essential for any enterprise network.
Key Takeaways:
- AAA provides Authentication (who you are), Authorization (what you can do), and Accounting (what you did).
- TACACS+ is the standard for device administration due to its use of reliable TCP, full packet encryption, and separation of AAA functions.
- Configuration requires enabling
aaa new-model, defining the server details, creating method lists with alocalfallback, and applying them to the appropriate lines (e.g., VTY). - The true power of TACACS+ is unlocked through command authorization, allowing you to implement fine-grained Role-Based Access Control (RBAC) defined on a central server like Cisco ISE.
- Verification is performed using
show,test, anddebugcommands on the router, as well as by checking the logs on the TACACS+ server.
Preview of the Next Lesson:
Having secured administrative access to our devices, our next step is to secure user and device access through our network. In the next lesson, we will configure and verify network access control using RADIUS and 802.1X. This is the framework that underpins secure access for wired and wireless clients connecting to the enterprise network.