Hello! Welcome to your next lesson in the EIGRP Routing module.
In our previous session, we delved into the theoretical heart of EIGRP—the DUAL algorithm. We analyzed how EIGRP uses metrics, feasible distance, and reported distance to intelligently select primary (Successor) and loop-free backup (Feasible Successor) paths. This gave you the "why" behind EIGRP's remarkable efficiency.
Today, we shift from theory to modern practice. Your goal is to learn how to configure EIGRP named mode with address families for both IPv4 and IPv6. This is the current, preferred method for deploying EIGRP, especially in dual-stack networks that run both IP versions simultaneously. As a solutions engineer, mastering this streamlined and scalable configuration method is essential for designing and managing robust enterprise networks.
1. From Classic Chaos to Named Cohesion
Before "named mode," configuring EIGRP for IPv4 and IPv6 were two separate, parallel tasks. This "classic" method required distinct configuration blocks, as shown below:
Classic Configuration (Fragmented):
! EIGRP for IPv4
router eigrp 100
 network 10.1.1.0 0.0.0.255
! ---
! EIGRP for IPv6
ipv6 router eigrp 100
 eigrp router-id 1.1.1.1
! (Configuration applied under interfaces)
This approach scatters the configuration, making it harder to manage and troubleshoot. Settings for a single routing process are in different places, which isn't efficient.
EIGRP named mode was introduced to solve this. It provides a unified, hierarchical structure where all settings for a single EIGRP instance—for both IPv4 and IPv6—are consolidated in one place.
EIGRP Configuration Modes > Enhanced Interior Gateway Routing ...
To understand the benefits of this modern approach, let's read a short piece from the Cisco Press article "EIGRP Configuration Modes."
Read the sections "Classic Configuration Mode" and "EIGRP Named Mode." Focus on the listed benefits of named mode and its three hierarchical subsections: Address Family, Interface, and Topology.
As the article highlights, named mode brings order to EIGRP configuration. All settings reside within a single router eigrp <name> block. For someone with your experience in structured data formats like JSON, you can think of this as similar to a well-formed object where all related key-value pairs are logically grouped under a single parent, rather than being scattered.
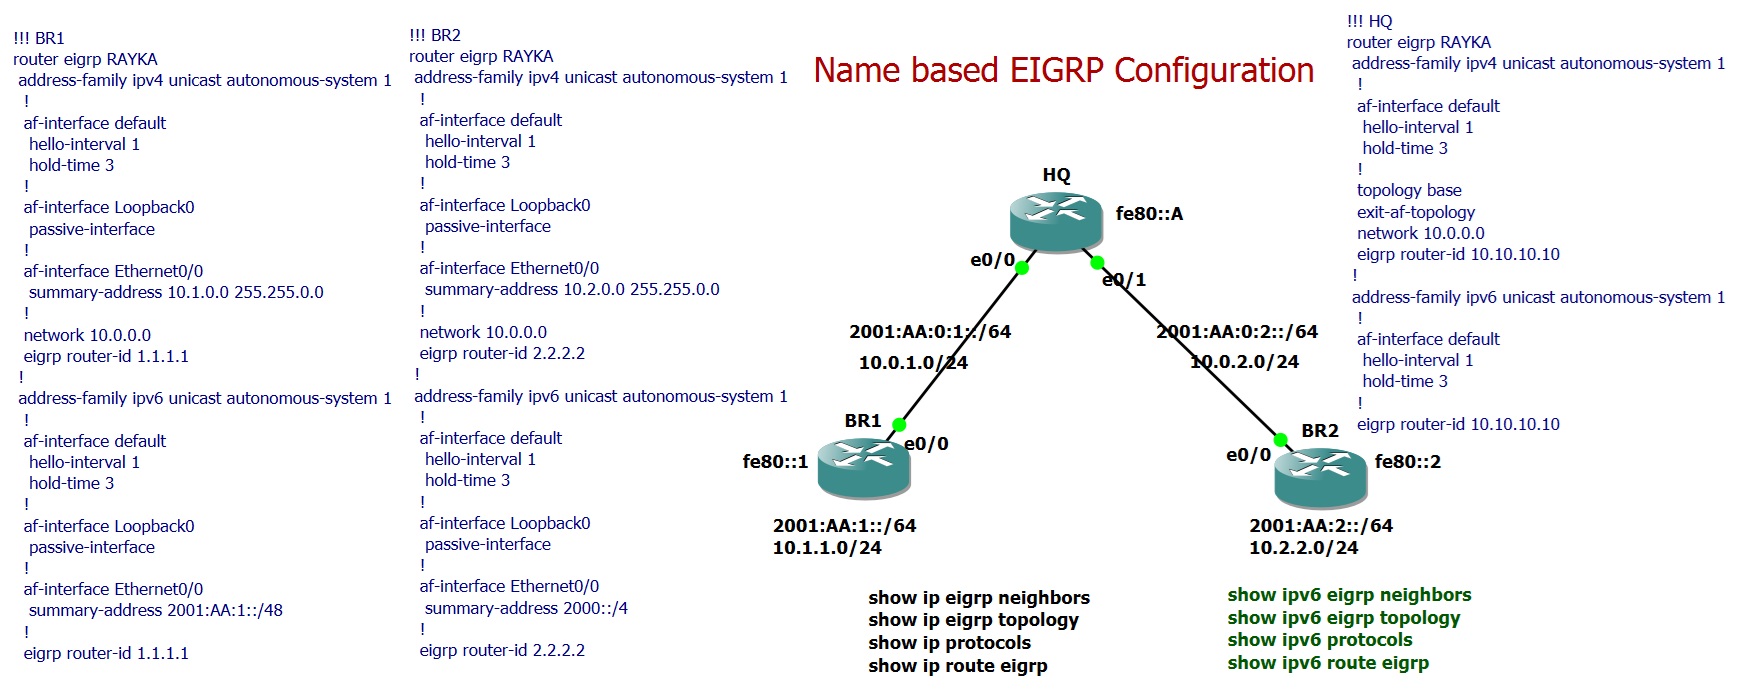
We will refer back to the configurations in this diagram as we proceed.
2. The Structure of EIGRP Named Mode
EIGRP named mode configuration is built on a clear hierarchy:
-
EIGRP Virtual Instance: This is the top-level container, created with the command
router eigrp <virtual-instance-name>. The name is locally significant and is used to identify the configuration block, not the autonomous system. -
Address Family: Within the virtual instance, you define an address family for each protocol you want EIGRP to route. This is where you also define the Autonomous System Number (ASN), which must match between neighbors.
address-family ipv4 unicast autonomous-system <ASN>address-family ipv6 unicast autonomous-system <ASN>
-
Address-Family Sub-modes: Inside each address family, you can further refine the configuration:
topology base: Contains settings related to the EIGRP topology table, such as redistribution or variance.af-interface <interface-name>: Contains interface-specific settings like timers, split-horizon, or summary addresses. Usingaf-interface defaultapplies settings to all interfaces in that address family.
3. Configuring Named EIGRP: A Step-by-Step Guide
Let's walk through the configuration process. We'll use the "HQ" router from the diagram above as our example.
Step 1: Enable IPv6 Routing and Create the Virtual Instance
Before you can configure EIGRP for IPv6, you must enable IPv6 routing globally. Then, you create the named EIGRP instance.
HQ(config)# ipv6 unicast-routing
HQ(config)# router eigrp CCNP
HQ(config-router)#
The router is now in EIGRP router configuration mode, ready for you to define address families.
Step 2: Configure the IPv4 Address Family
Next, you'll configure everything related to IPv4.
HQ(config-router)# address-family ipv4 unicast autonomous-system 100
HQ(config-router-af)#
You are now in address-family configuration mode. Here, you define which interfaces will participate in EIGRP for IPv4.
EIGRP Configuration Modes > Enhanced Interior Gateway Routing ...
The network command is central to enabling EIGRP on interfaces. Please read the section "EIGRP Network Statement" from the Cisco Press article to understand how it works.
Focus on the function of the network command and its use of a wildcard mask. Note the important distinction that it enables EIGRP on an interface, which then causes the connected network to be advertised.
Now, let's complete the IPv4 configuration for the HQ router. We set a router ID and specify the networks to include.
HQ(config-router-af)# eigrp router-id 1.1.1.1
HQ(config-router-af)# network 10.1.1.0 0.0.0.255
HQ(config-router-af)# network 10.1.2.0 0.0.0.255
HQ(config-router-af)# exit-address-family
The IPv4 portion is now complete. Notice we returned to the top-level router configuration mode, ready to configure the next address family.
Step 3: Configure the IPv6 Address Family
Configuring the IPv6 address family is similar, but with one key difference.
HQ(config-router)# address-family ipv6 unicast autonomous-system 100
HQ(config-router-af)# eigrp router-id 1.1.1.1
HQ(config-router-af)#
Unlike the IPv4 address family, you don't typically need a network command here. By default, when you activate the IPv6 address family, EIGRP is automatically enabled on all IPv6-configured interfaces on the router.
If you need to prevent EIGRP from running on a specific interface (like a LAN interface), you can make it passive using the af-interface sub-mode:
HQ(config-router-af)# af-interface GigabitEthernet0/0
HQ(config-router-af-interface)# passive-interface
HQ(config-router-af-interface)# exit-af-interface
Or, to completely disable it on an interface within the EIGRP process:
HQ(config-router-af)# af-interface Serial0/1/0
HQ(config-router-af-interface)# shutdown
HQ(config-router-af-interface)# exit-af-interface
This automatic enablement and explicit disabling are key differences from the IPv4 configuration workflow.
To see this entire process in action, let's watch a segment from Kevin Wallace's "EIGRP Deep Dive." He demonstrates the configuration of named EIGRP, highlighting its backward compatibility with classic mode and the consolidated structure.
Please watch from 01:13:22 to 01:22:10. Pay close attention to: The router eigrp <name> command to start. The creation of both address-family ipv4 and address-family ipv6. How the IPv6 adjacency forms automatically after the address family is created, without a network command.
4. Verification
Once configured, you need to verify that EIGRP is operating as expected. The verification commands are largely the same as for classic mode, but they display output specific to the named instance.
[PDF] Chapter 2 Lab 2-4, Named EIGRP Configuration
The lab guide "Named EIGRP Configuration" provides an excellent set of verification commands and sample outputs. Reviewing this will help you interpret the results on a live router.
Please read through the verification steps in "Step 8: Verify named EIGRP." Notice the use of familiar commands like show ip eigrp neighbors, show ipv6 eigrp neighbors, and show ip route eigrp. Also, note the show running-config | section router eigrp command, which is perfect for seeing the complete, unified configuration.
Here are the most critical verification commands:
| Command | Purpose |
|---|---|
show running-config | section router eigrp |
Displays the entire named EIGRP configuration block. |
show ip eigrp neighbors |
Verifies IPv4 neighbor adjacencies. |
show ipv6 eigrp neighbors |
Verifies IPv6 neighbor adjacencies (uses link-local addresses). |
show ip eigrp topology |
Examines the DUAL-computed IPv4 topology table. |
show ipv6 eigrp topology |
Examines the DUAL-computed IPv6 topology table. |
show ip route eigrp |
Shows only the EIGRP-learned routes in the IPv4 routing table. |
show ipv6 route eigrp |
Shows only the EIGRP-learned routes in the IPv6 routing table. |
Test your understanding!
You are configuring a new branch router, BR3, with the following requirements:
- The EIGRP virtual instance should be named
ENTERPRISE. - The Autonomous System Number is
50. - The interface
GigabitEthernet0/1has IP address192.168.10.1/24and IPv6 address2001:DB8:10::1/64. - The interface
GigabitEthernet0/2has IP address172.16.20.1/24and IPv6 address2001:DB8:20::1/64. - EIGRP for IPv4 should only run on
GigabitEthernet0/1. - EIGRP for IPv6 should run on both interfaces.
Write the complete named EIGRP configuration for router BR3.
Show answer
ipv6 unicast-routing
!
router eigrp ENTERPRISE
 !
 address-family ipv4 unicast autonomous-system 50
  network 192.168.10.0 0.0.0.255
 exit-address-family
 !
 address-family ipv6 unicast autonomous-system 50
  ! No specific configuration needed here, as EIGRP for IPv6 will
  ! automatically run on both IPv6-enabled interfaces.
 exit-address-family
Explanation: The IPv4 address family uses a network statement that specifically matches the subnet on GigabitEthernet0/1, so it won't be enabled on GigabitEthernet0/2. The IPv6 address family is simply created; by default, it will run on both interfaces because they are both configured with IPv6 addresses.
Conclusion
Congratulations on completing this lesson! You have bridged the gap from EIGRP theory to modern, practical configuration. You can now confidently set up a dual-stack EIGRP network using the clean, scalable, and manageable named mode configuration.
Key Takeaways:
- EIGRP named mode provides a unified configuration block (
router eigrp <name>) for an entire EIGRP process, simplifying management. - Configuration is organized into address families for IPv4 and IPv6, where you define the Autonomous System Number.
- The
networkcommand is used within the IPv4 address family to enable EIGRP on interfaces. - The IPv6 address family, by default, enables EIGRP on all IPv6-configured interfaces, requiring you to use
passive-interfaceorshutdownto exclude interfaces. - Verification commands remain familiar but now operate within the context of the named EIGRP instance.
Preview of the Next Lesson:
Now that we know how to establish EIGRP neighbor relationships, our next step is to secure them. In the following lesson, you will learn to implement and verify EIGRP authentication using key chains. This is a critical security measure to ensure that your routers only accept routing updates from trusted sources.