Hello! Welcome to your next lesson on EIGRP.
In our last session, we configured EIGRP using the modern named mode structure, establishing neighbor relationships for both IPv4 and IPv6. Now that we know how to form these adjacencies, our next critical task is to secure them. An unsecured routing protocol is a significant vulnerability in any enterprise network, as it can be exploited to inject false routes, create routing loops, or cause denial-of-service attacks.
Today, your learning goal is to implement and verify EIGRP authentication using key chains. This is a fundamental security practice that ensures your routers only form neighbor relationships with and accept routing updates from trusted, authorized devices. For a solutions engineer, mastering this skill is essential for building secure and resilient network designs.
1. Why EIGRP Authentication Matters
Imagine an attacker plugging a rogue router into your network. If your EIGRP-enabled interfaces are not secured, that rogue device could form an EIGRP adjacency with your core router. It could then start advertising malicious routes, potentially redirecting traffic to a device under its control for eavesdropping or creating a black hole for critical services.
EIGRP authentication prevents this by requiring neighbors to prove their identity before they can form an adjacency.
To understand the mechanics, let's watch a brief segment that explains the concept and compares older, insecure methods with the modern approach used by EIGRP.
This video from Kevin Wallace Training provides a great overview of why authentication is necessary and introduces the concept of hash-based authentication, which is what we will be using.
Watch from 01:22:25 to 01:25:53. Focus on the distinction between plain-text and hash-based authentication (MD5/SHA) and why hashing is more secure.
As the video explained, instead of sending a password in clear text, EIGRP uses a pre-shared key (a password you configure) and a hashing algorithm.
- The sending router takes the EIGRP packet and the pre-shared key, runs them through a hash function (like MD5 or SHA), and attaches the resulting hash digest to the packet.
- The receiving router performs the exact same calculation using its own locally stored pre-shared key.
- If the calculated hash matches the hash received in the packet, the router knows two things: the packet hasn't been altered in transit, and the sender possesses the correct pre-shared key.
This process ensures that only routers configured with the correct secret key can become EIGRP neighbors. EIGRP named mode supports both MD5 and the stronger HMAC-SHA-256 for this purpose.
2. The Two-Step Configuration Process
Implementing EIGRP authentication is a straightforward, two-step process:
- Create a Key Chain: This is a named container where you define one or more secret keys.
- Apply the Key Chain: You enable authentication on the relevant EIGRP interface and tell it which key chain to use.
Let's break down each step.
Step 1: Creating the Key Chain
A key chain is a flexible way to manage your authentication keys. Instead of hard-coding a single password on an interface, you create a list of keys. This is especially useful for key rotation, which we'll discuss shortly.
EIGRP Configuration Modes > Enhanced Interior Gateway Routing ...
This article from Cisco Press provides a clear, step-by-step guide to creating a key chain. Let's review the necessary commands.
Please read the section titled "Keychain Configuration." Focus on the three commands used to create the chain, identify a key, and set its password: key chain, key, and key-string.
To summarize the commands from the article:
key chain <NAME>: Enters key-chain configuration mode and gives the chain a name. This name is locally significant.key <ID>: Identifies a specific key within the chain using a number. This ID number must match on both neighboring routers.key-string <PASSWORD>: Sets the actual pre-shared secret for that key ID. This password must also match on both routers.
Here is a simple example of creating a key chain named EIGRP_KEYS with one key:
R1(config)# key chain EIGRP_KEYS
R1(config-keychain)# key 1
R1(config-keychain-key)# key-string CCNP-Secure!
R1(config-keychain-key)# exit
Managing Key Lifetimes
A powerful feature of key chains is the ability to schedule when keys are valid. This allows you to roll out a new password across your network without ever breaking EIGRP adjacencies. This is done with the accept-lifetime and send-lifetime commands.
send-lifetime: The period during which the router will use this key to sign outgoing EIGRP packets.accept-lifetime: The period during which the router will accept this key from an incoming EIGRP packet.
By creating an overlap, where the router accepts both the old and new keys for a transitional period, you can ensure a seamless key change.
Configuring EIGRP Authentication - Cisco Community
The article "Configuring EIGRP Authentication" on the Cisco Community provides an excellent, practical example of using lifetimes for a smooth key transition.
Read the section "Accept-lifetime and Send-lifetime" and study the example configuration. Note how the lifetimes for key 1 and key 2 are configured to create a 30-minute transition window.
This scheduled key management is highly dependent on accurate time synchronization between routers, which is why Network Time Protocol (NTP) is a critical service in production networks.

Step 2: Applying Authentication to the EIGRP Interface
Once the key chain is created, you must apply it to the interface(s) where you want to enforce authentication. Since we are using EIGRP named mode, this is done within the address-family interface configuration sub-mode.
EIGRP Configuration Modes > Enhanced Interior Gateway Routing ...
Let's return to the Cisco Press article to see exactly how to enable authentication within the named mode hierarchy.
Focus on the commands under "Enabling Authentication on the Interface," specifically the set for "Named mode configuration" using MD5. Notice that the configuration is placed under the EIGRP interface submode (af-interface).
The process is as follows:
- Enter the EIGRP named mode configuration:
router eigrp <NAME> - Enter the correct address family:
address-family ipv4 unicast autonomous-system <ASN> - Enter the specific interface configuration:
af-interface <interface-id> - Specify the authentication mode:
authentication mode md5(orhmac-sha-256 <PASSWORD>) - Link the key chain:
authentication key-chain <KEY-CHAIN-NAME>
Let's see this in action. The following video puts both steps together.
This segment from Kevin Wallace's deep dive demonstrates applying a keychain to a named EIGRP instance. Watch for the console message that indicates the neighbor adjacency drops and then successfully re-establishes once authentication is configured on both sides.
Please watch from 01:26:54 to 01:32:07. The first part reviews keychain creation with lifetimes, and the second part shows the application to the interface within named mode.
3. Verification and Troubleshooting
After configuration, you must verify that authentication is working correctly and be able to troubleshoot it if it isn't.
Verification Commands:
show key chain: This is the most important command. It displays all configured key chains, their keys, key strings (passwords), and their validity lifetimes. Always use this to check for typos in the key ID or key string, and to confirm which key is currently active.show ip eigrp interfaces detail <interface>: This command will show you the authentication mode (MD5/SHA) and the name of the key chain applied to the interface.
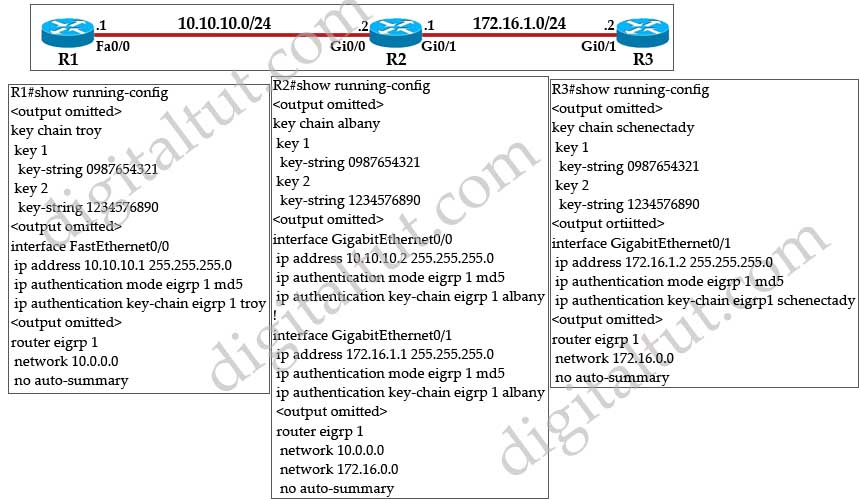
Troubleshooting:
The most common issue is a mismatch in the key ID or key string. If a neighbor adjacency fails to form after enabling authentication, check the following:
- Does the key ID match on both routers?
- Does the key string (password) match exactly, including case-sensitivity and any spaces?
- Is the Autonomous System Number (ASN) still matching?
- Are both routers using the same authentication mode (e.g., MD5)?
If you suspect an authentication failure, the debug eigrp packet command is invaluable. When authentication fails, you will see a console message like this, indicating that the router is receiving but ignoring packets from the neighbor:
EIGRP: ignored packet from 10.1.1.1 opcode = 5 (invalid authentication)
This tells you immediately that the problem lies with the authentication configuration.
Test your understanding!
You are tasked with securing the EIGRP adjacency between two routers, R1 and R2, connected via their GigabitEthernet0/0 interfaces. Both are running EIGRP named mode (router eigrp MY_CORP) in AS 100.
Requirements:
- Use a key chain named
EIGRP_AUTH. - Use key ID
10. - The shared password is
Cisco!23. - Use MD5 authentication.
Write the complete EIGRP authentication configuration (both the key chain and the interface application) for R1.
Show answer
! Step 1: Create the key chain
R1(config)# key chain EIGRP_AUTH
R1(config-keychain)# key 10
R1(config-keychain-key)# key-string Cisco!23
R1(config-keychain-key)# exit
R1(config-keychain)# exit

! Step 2: Apply it to the EIGRP named mode interface
R1(config)# router eigrp MY_CORP
R1(config-router)# address-family ipv4 unicast autonomous-system 100
R1(config-router-af)# af-interface GigabitEthernet0/0
R1(config-router-af-interface)# authentication mode md5
R1(config-router-af-interface)# authentication key-chain EIGRP_AUTH
R1(config-router-af-interface)# end
Note: The exact same configuration (with the exception of the router hostname) would be required on R2 for the adjacency to form.
Conclusion
You have now learned how to secure one of the most fundamental components of an enterprise network: the routing protocol. By implementing authentication, you prevent unauthorized devices from influencing your network's routing decisions, a critical step in building a robust and secure infrastructure.
Key Takeaways:
- EIGRP authentication prevents rogue routers from forming adjacencies by requiring neighbors to prove their identity.
- Modern EIGRP uses hash-based authentication (MD5 or SHA-256) with a pre-shared key, which is far more secure than plain-text methods.
- The configuration is a two-step process: create a key chain with keys and passwords, then apply the key chain to the EIGRP interface within the named mode address family.
- Key chains support timed keys using
accept-lifetimeandsend-lifetime, allowing for seamless password changes without disrupting neighbor adjacencies. - Verification is done with
show key chainandshow ip eigrp interfaces detail, while troubleshooting often involvesdebug eigrp packet.
Preview of the Next Lesson:
In our next lesson, we will shift our focus back to path selection. We will dive deeper into the DUAL algorithm to analyze EIGRP path selection using composite and wide metrics. You'll learn exactly how EIGRP calculates the metric you see in the routing table and how this calculation has evolved to support today's high-speed networks.