Hello! Welcome to the next lesson in your journey through the "Network Virtualization" module.
In our last lesson, we discussed Network Function Virtualization (NFV), which involves virtualizing an entire network appliance—like a router or firewall—into software that can run on generic hardware. This allows for great agility in deploying and scaling network services.
Today, we shift our focus from virtualizing the entire box to virtualizing within the box. We'll be covering the learning outcome: Configure and verify Virtual Routing and Forwarding (VRF-lite) for network segmentation. You'll learn how to create multiple, independent routing and forwarding tables inside a single physical router. This is a fundamental technique for creating logically separate networks on a shared physical infrastructure, a common requirement in enterprise environments.
1. What is Virtual Routing and Forwarding (VRF)?
By default, a router maintains a single, global routing table. All interfaces on the router use this one table to make forwarding decisions. VRF changes this by allowing you to create multiple virtual routing tables on the same device. Each virtual router instance operates independently, with its own set of interfaces, routes, and forwarding logic.
This is a Layer 3 concept, analogous to how VLANs segment networks at Layer 2. While VLANs create separate broadcast domains, VRFs create separate routing domains.
The "lite" in VRF-lite simply means we are using this technology in an enterprise context without the complexity of MPLS (Multi-Protocol Label Switching), which is typically found in large service provider networks.
To get a solid theoretical foundation, let's start with a short article that explains the core concepts and benefits.
VRF Lite Explained: Real-World Use Cases, Commands & Troubleshooting [CCNP Enterprise]
The article 'VRF Lite Explained' from NetworkJourney provides a concise and clear overview of what VRF-lite is and why it's used.
Please read the following sections: 'Theory in Brief': Focus on the definition of VRF-lite and its primary purpose for network segmentation and enabling IP address overlap. 'Real-World Use Case': Review the table to see practical scenarios where VRF-lite is the solution. As a solutions engineer, you may have encountered these problems. 'FAQs – VRF Lite,' Question 10: Pay close attention to the table comparing VRF-lite and VLANs to solidify your understanding of their distinct roles.
As the article highlighted, the key benefits of VRF-lite are:
- Network Segmentation: Logically isolating traffic between different departments (e.g., Engineering, HR, Guest), business units, or customers on the same physical infrastructure.
- IP Address Overlap: Allowing different VRFs to use the same or overlapping IP address ranges without conflict. This is incredibly useful during company mergers or when connecting to partner networks where you don't control the IP scheme.
- Enhanced Security: By preventing traffic from crossing between VRFs by default, you create secure boundaries at Layer 3.
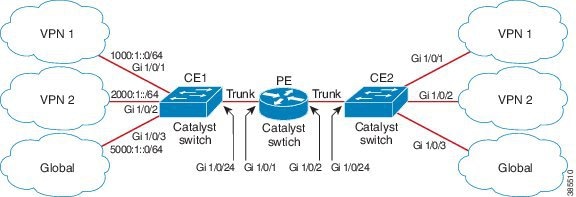
2. VRF-lite Configuration and Verification
Now, let's move from theory to practice. The configuration process for VRF-lite follows a logical, three-step workflow. We will then look at the VRF-aware commands needed for verification.
To guide us through a practical lab demonstration, we'll watch a detailed video.
The video 'VRF-lite Configuration' by Kevin Wallace is an excellent, step-by-step walkthrough of building a VRF-lite environment from scratch. It clearly demonstrates both the configuration and verification process.
Please watch the following segments carefully, as they map directly to the configuration and verification workflow: 02:51 - 04:14: Defining the VRF instances. 04:14 - 05:44: Assigning interfaces to the VRFs. 05:44 - 07:25: Configuring IP addresses, noting how overlapping IPs are permitted. 07:25 - 08:14: Using ping vrf to test connectivity. 19:31 - 20:45: Using show ip route vrf to inspect the VRF-specific routing tables.
Let's summarize the key commands from the video into a clear workflow.
Step 1: Create the VRF Instance
This is the first step, where you define the virtual routing table.
Router(config)# ip vrf CUST_A
Router(config-vrf)# exit
Router(config)# ip vrf CUST_B
Router(config-vrf)# exit
Step 2: Assign an Interface to the VRF
Next, you associate a physical or logical interface with the VRF you created.
Router(config)# interface GigabitEthernet0/1
Router(config-if)# ip vrf forwarding CUST_A
Important: As the video demonstrated, when you assign an interface to a VRF, any existing IP address on that interface is removed. You must re-apply the IP address after associating the interface with the VRF.
Step 3: Configure Interface IP Address
Now you can configure the IP address on the VRF-assigned interface. You could configure the exact same IP address on another interface, provided it's in a different VRF.
Router(config-if)# ip address 10.1.1.1 255.255.255.0
Step 4: Verify the Configuration
Verification is crucial. Because standard commands like show ip route only display the global routing table, you must use VRF-aware commands.
- To see all configured VRFs and their associated interfaces:
Router# show ip vrf - To view the routing table for a specific VRF:
Router# show ip route vrf CUST_A - To test connectivity from a specific VRF:
Router# ping vrf CUST_A 10.1.1.2

Test your understanding!
You have configured a VRF named GUEST_WIFI and assigned an interface to it. You are trying to test connectivity to a device with IP address 192.168.100.50 within that segment. You type ping 192.168.100.50 on the router, but it fails. The link is up, and you suspect a routing issue.
What are the first two commands you should use to troubleshoot, and what does each one tell you?
Show answer
-
ping vrf GUEST_WIFI 192.168.100.50: The standardpingcommand uses the global routing table, which has no knowledge of theGUEST_WIFIsegment. You must use theping vrf <vrf-name>syntax to source the ping from the correct virtual routing instance. This command tests data plane reachability within the VRF. -
show ip route vrf GUEST_WIFI: This command displays the routing table specifically for theGUEST_WIFIVRF. It allows you to check if the router has a route to the192.168.100.0/24network. If the route is missing, it points to a control plane issue (e.g., a missing static route or a dynamic routing protocol misconfiguration).
3. Using Dynamic Routing with VRF-lite
The isolated routing tables in your VRFs are initially empty except for their directly connected networks. To enable communication between different sites belonging to the same VRF, you need to populate these routing tables. This can be done with static routes or, more scalably, with a dynamic routing protocol like OSPF or EIGRP.
When configuring a dynamic routing protocol, you must specify which VRF the process belongs to. This creates a separate instance of the routing protocol for each VRF, ensuring routing updates for one VRF are never leaked into another.
Let's see how this is done with OSPF.
Let's return to the Kevin Wallace video to see how to enable OSPF within the context of our previously configured VRFs.
Watch the segment from 14:22 to 18:15. Focus on the syntax used to create an OSPF process that is associated with a specific VRF (router ospf 1 vrf cust-a) and how this is done independently for each customer.
The key configuration is associating the OSPF process with a VRF:
Router(config)# router ospf 1 vrf CUST_A
Router(config-router)# network 10.1.1.0 0.0.0.255 area 0
By doing this, you are running a completely separate OSPF process for the CUST_A VRF. You would then repeat this for CUST_B, likely using a different process ID, to establish routing within that segment. This ensures that CUST_A routes are only exchanged with other CUST_A routers, and the same for CUST_B.
Conclusion
In this lesson, you've learned how to implement network segmentation at Layer 3 using VRF-lite. By creating independent virtual routing tables within a single device, you can securely isolate traffic, manage overlapping IP address spaces, and build multi-tenant networks—all essential skills for an enterprise network professional.
Key Takeaways:
- VRF-lite creates multiple virtual routing and forwarding instances on a router, segmenting the network at Layer 3.
- It is used in enterprise networks to isolate traffic and allow for overlapping IP addresses without needing MPLS.
- The configuration involves three main steps: create the VRF, assign interfaces using
ip vrf forwarding, and configure IP addressing. - Verification and troubleshooting require VRF-aware commands, such as
show ip route vrf <name>andping vrf <name> <destination>. - Dynamic routing protocols like OSPF must be configured within the context of a VRF to build scalable routing domains.
Preview of the Next Lesson:
Our next lesson is "Analyze the components of an SD-WAN architecture (orchestration, management, control, and data planes)." The concepts of virtualization we've covered—NFV and now VRFs—are foundational to modern network architectures. VRFs, in particular, are a key mechanism used to create segmentation within the underlay network that supports an SD-WAN overlay. Your understanding of VRF-lite will be directly applicable as we explore how SD-WAN solutions build secure, virtualized networks on a massive scale.