Hello! Welcome to our lesson on IP Services.
In our previous session, we explored the fundamentals of multicast, focusing on addressing and how IGMP enables a host to signal its interest in a multicast group to its local router. This is the first crucial step in receiving multicast traffic.
Today, we address the next logical question: Once the local router knows a host wants to join a group, how does the multicast traffic from a source, possibly located across the enterprise network, get routed to that local router?
This lesson will address the learning outcome: Configure Protocol Independent Multicast (PIM) sparse mode for multicast distribution. We will cover the theory behind PIM sparse mode, its key components, and the essential commands to implement it on Cisco IOS devices.
1. From "Flood and Prune" to "Explicit Join"
Before we dive into PIM sparse mode (PIM-SM), it's helpful to briefly mention its counterpart, PIM dense mode (PIM-DM). PIM-DM uses a "flood and prune" or "push" model. It floods multicast traffic to every PIM-enabled router in the network and then relies on routers that don't need the traffic (because they have no interested receivers) to send "prune" messages back to stop the flow. While simple, this is highly inefficient, especially in networks where multicast receivers are few and far between—a "sparsely" populated environment.
PIM-SM was designed to solve this. It operates on an "explicit join" or "pull" model. No multicast traffic is forwarded unless a router has explicitly requested it on behalf of a receiver. This is far more scalable and is the standard for multicast in most enterprise networks.
The central component that makes this explicit join model work is the Rendezvous Point (RP).
2. The Role of the Rendezvous Point (RP)
Think of the RP as a designated meeting point in the network for a particular multicast group.
- Sources "register" with the RP: When a source starts sending traffic, its first-hop router (FHR) informs the RP.
- Receivers "meet" at the RP: When a receiver wants to join a group, its last-hop router (LHR) sends a join message towards the RP.
This coordination by the RP allows PIM-SM to build two types of distribution trees:
- Shared Tree (*,G): This is the initial path built from the RP down to the receivers. It's called a shared tree because multiple sources for the same group can use it. The notation
(*,G)signifies a tree for any source (*) to a specific group (G). - Source Tree (S,G): This is a more optimal path directly from a specific source (
S) to a specific group (G). After a receiver starts getting traffic via the shared tree, its LHR can choose to build a more direct, lower-latency path by creating a source tree. This process is called SPT (Shortest Path Tree) switchover.
The video below provides an excellent conceptual overview of these components, contrasting PIM-DM with PIM-SM and illustrating the function of the RP and the two tree types.
Cisco Multicast Routing for CCNA, CCNP, and CCIE Candidates
To understand the core logic of PIM sparse mode, watch this segment from Kevin Wallace Training.
Watch from 19:27 to 26:12. Pay close attention to the explanation of the shared distribution tree, the Rendezvous Point, the initial (*,G) join, and the eventual switchover to the shortest path tree (S,G).
This diagram illustrates the operational flow you just saw in the video, from neighbor discovery to building the final shortest path tree.

3. PIM Sparse Mode Configuration
Now, let's get practical. Configuring PIM-SM involves three fundamental steps on all routers participating in the multicast domain:
- Enable Multicast Routing Globally: This is the master switch for multicast on the router.
- Enable PIM on Interfaces: You need to tell the router which interfaces will participate in PIM.
- Define the Rendezvous Point: All routers must agree on the location of the RP.
Let's break down the commands.
Step 1 & 2: Base Configuration
These commands are the same for all PIM routers in your domain.
! On every multicast router
!
! 1. Enable multicast routing globally
Router(config)# ip multicast-routing

! 2. Enable PIM sparse mode on participating interfaces
Router(config)# interface <type/number>
Router(config-if)# ip pim sparse-mode
You must enable PIM on all Layer 3 interfaces that will carry multicast traffic, including those facing sources, receivers, and other routers.
Step 3: Configuring the Rendezvous Point
This is the most critical part of the configuration. How do all the routers learn the address of the RP? There are two primary methods you need to know for the ENCOR exam: Static and Auto-RP (dynamic).
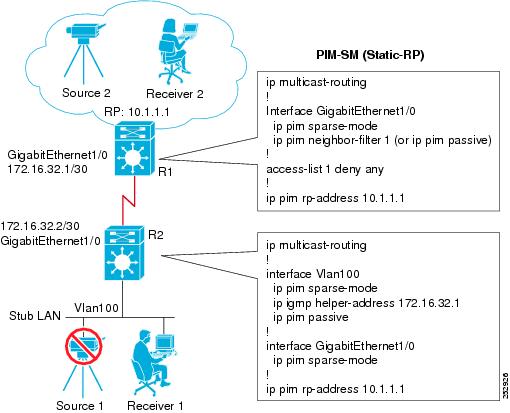
Method 1: Static RP Configuration
This is the simplest method. You manually configure the IP address of the RP on every single router in the PIM domain.
- Best Practice: The RP address should be an IP on a loopback interface of the designated RP router. Loopbacks are always up, making them more resilient than physical interface IPs.
The configuration is straightforward.
! On ALL routers in the PIM domain, including the RP itself
!
Router(config)# ip pim rp-address <RP_LOOPBACK_ADDRESS>
You can optionally use an access list to specify that this RP is only for a certain range of multicast groups. If no ACL is specified, the RP serves all groups (224.0.0.0/4).
The IPCisco article provides a clear, step-by-step example of a full static RP configuration, including the underlying OSPF routing.
For a complete textual example of a static RP configuration, please review the following guide from IPCisco.
Read the section titled 'PIM-SM Configuration'. Notice the clear steps: IP interfaces, routing protocol, enabling multicast, enabling PIM-SM on interfaces, and finally, configuring the static RP address on all three routers.
To see this in action, the following video segment demonstrates the static RP configuration and verification.
Cisco Multicast Routing for CCNA, CCNP, and CCIE Candidates
This video clip shows a live demonstration of configuring a static RP.
Watch from 31:32 to 34:53. The video shows how to configure the static RP address and then uses show ip mroute to verify that the router has joined the shortest path tree.
Test your understanding!
A last-hop router (LHR) has a directly connected host that joins group 239.10.10.10 via IGMP. The network is configured with a static RP. At this point, no source is active for this group. What entry would you expect to see in the LHR's multicast routing table (show ip mroute) for this group?
Show answer
You would expect to see a (*,G) entry, which represents the shared tree. The "star" indicates that the tree is for any source. The incoming interface (IIF) for this entry will point towards the RP, and the outgoing interface list (OIL) will include the interface facing the host that sent the IGMP join. You would not see an (S,G) entry yet, because no source has started sending traffic.
Method 2: Dynamic RP with Auto-RP (Cisco Proprietary)
Static configuration is simple but doesn't scale well and has no redundancy. If the RP fails, multicast stops working. Auto-RP is a Cisco-proprietary dynamic mechanism to solve this. It introduces two roles:
- Candidate-RP (C-RP): A router that wishes to be an RP. It announces its availability.
- Mapping Agent (MA): A router that listens for C-RP announcements, elects an RP, and advertises the group-to-RP mapping to all other PIM routers.
The process has a "chicken-and-egg" problem: routers need to learn the RP via multicast messages, but they need an RP to do sparse-mode multicast. This is solved by using ip pim sparse-dense-mode on the interfaces, which allows the Auto-RP control plane messages (on 224.0.1.39 and 224.0.1.40) to be flooded using dense mode, while data traffic uses sparse mode once the RP is known.
Here is a summary of the Auto-RP configuration from the official Cisco guide.
IP Multicast: PIM Configuration Guide
Let's review the official Cisco documentation for Auto-RP configuration commands.
Scan through the section 'Configuring Sparse Mode with Auto-RP'. Focus on Step 8 (ip pim sparse-dense-mode), Step 11 (ip pim send-rp-announce for the C-RP), and Step 12 (ip pim send-rp-discovery for the MA).
Now, let's watch a demonstration of this configuration.
Cisco Multicast Routing for CCNA, CCNP, and CCIE Candidates
The following video provides a clear walkthrough of configuring Auto-RP.
Watch from 34:53 to 40:59. Pay attention to the configuration of sparse-dense-mode and the commands to make a router a candidate-RP and a mapping agent. Also, observe the verification commands used at the end.
4. Verification
Once configured, you must verify that PIM is operating correctly. Here are the most important commands:
| Command | Purpose |
|---|---|
show ip pim neighbor |
Verifies that PIM routers have formed neighbor adjacencies on their common links. |
show ip pim rp mapping |
Crucial for both static and dynamic methods. It shows which RP is responsible for which multicast groups and how that information was learned (e.g., from static configuration or Auto-RP). |
show ip igmp groups |
Shows which multicast groups have active receivers on the router's directly connected interfaces. |
show ip mroute |
The most important command. It displays the multicast routing table. You can inspect (*,G) and (S,G) entries, see the incoming and outgoing interfaces, and check flags indicating the state of the tree. |
For a very deep dive into the PIM state machine, including the register process and tree building, the "Decoding Packets" video series is an excellent resource. The following segments show what happens when only a receiver is present, and when only a source is present. This is great for understanding the underlying mechanics.
Demo 4.1 - PIM Sparse Mode on IOS Routers Part 1
For a deeper look into the PIM-SM mechanics and verification, these segments from 'Decoding Packets' are highly detailed.
This is an optional but recommended deep-dive. Watch from 28:43 to 41:32 to see how the shared tree (*,G) is built when only receivers are present. Watch from 42:03 to 1:05:08 to observe the source registration process and (S,G) state creation when a source becomes active.
Conclusion
In this lesson, we have moved from local group management with IGMP to enterprise-wide multicast distribution with PIM sparse mode. You have learned how PIM-SM uses an explicit-join model, centered on the Rendezvous Point, to build efficient multicast trees.
Key Takeaways:
- PIM Sparse Mode is a "pull" model, sending traffic only where it is requested, making it highly scalable.
- The Rendezvous Point (RP) is a central coordinator for sources and receivers.
- PIM-SM uses two trees: an initial Shared Tree (*,G) from the RP, and a more optimal Source Tree (S,G) built directly from the source.
- Static RP configuration (
ip pim rp-address) is simple but requires manual configuration on every router. - Auto-RP is a dynamic, Cisco-proprietary method using Candidate-RPs and Mapping Agents to automate RP discovery.
- Verification is key: use
show ip pim neighbor,show ip pim rp mapping, andshow ip mrouteto troubleshoot and confirm operation.
Preview of the Next Lesson:
Now that we can deliver specialized traffic like video and voice streams efficiently using multicast, the next logical step is to ensure that this delay-sensitive traffic receives preferential treatment as it traverses the network. In our next lesson, we will analyze QoS mechanisms for classification, marking, queuing, policing, and shaping, which are essential for guaranteeing the performance of real-time applications.