Hello! Welcome to the first lesson of your CCNP ENCOR course.
This initial module focuses on Enterprise Network Architecture, a cornerstone of the ENCOR curriculum. Today's lesson will address the fundamental principles of hierarchical network design. We will analyze the classic three-tier model—comprising the access, distribution, and core layers—and explore its primary use cases and common variations.
Given your background as a solutions engineer and your CCNA certification, you've likely encountered this model before. Our goal today is to move beyond a simple definition and delve into the design rationale: why this structure is so crucial for building scalable, resilient, and manageable enterprise networks. Understanding these principles in depth is the first step toward mastering the advanced design concepts required for the CCNP Enterprise certification.
Let's begin.
From Messy to Modular: The Need for Hierarchy
Imagine a network that grew "organically" over time. New switches are added wherever a port is needed, servers are plugged into the nearest available switch, and connections are made based on convenience. This might work for a very small setup, but as the network grows, it quickly becomes chaotic, difficult to troubleshoot, and impossible to scale efficiently.
The hierarchical network model was developed to solve this problem by providing a structured, modular framework. To understand this transition from a chaotic to a structured approach, let's watch a short segment from a video by KishSquared.
ENCOR - Hierarchical Network Model
This video introduces the 'why' behind the hierarchical model, comparing it to the challenges of an organically grown network and framing the solution in terms of reusable, modular blocks.
Please watch from 00:12:10 to 00:15:26. Pay attention to the contrast between an 'organic' network and a modular, building-block design.
As the video explains, a hierarchical design brings order and predictability. This approach is built on four key principles:
- Hierarchy: A layered structure that clarifies the role of each device.
- Modularity: Allows you to replicate design elements as the network grows, simplifying scaling.
- Resiliency: Isolates faults to smaller domains, improving overall network availability.
- Flexibility: Enables intelligent use of network resources, like load sharing across redundant paths.
The Three-Tier Hierarchical Model
The most common implementation of this design is the three-tier model, which segments the campus network into three distinct layers: Access, Distribution, and Core.

Each layer has a specific set of functions and responsibilities. Let's break them down one by one.
1. The Access Layer: The Network Edge
The access layer is where end-user devices connect to the network. This includes PCs, IP phones, printers, security cameras, and wireless access points. Because it's the first point of entry into the network, it's one of the most feature-rich layers.
Primary Functions & Services:
- End-Device Connectivity: Provides Layer 2 switched connectivity to endpoints.
- VLAN Assignment: Assigns devices to specific VLANs, segmenting the network into different broadcast domains.
- Power over Ethernet (PoE): Delivers power to devices like IP phones and wireless APs.
- Quality of Service (QoS): Classifies and marks traffic to ensure that critical applications (like voice and video) receive the appropriate priority. The trust boundary is typically set here.
- Security: Implements crucial edge security features like port security, DHCP snooping, and 802.1X for access control.
To get a more detailed look at the services and considerations at this layer, please watch this segment.
ENCOR - Hierarchical Network Model
This clip provides a great overview of the various services that are implemented at the access layer, from VLAN assignment and QoS marking to port security.
Watch the segment from 00:30:15 to 00:40:08. Note the different services discussed and why it's important to implement them at the network edge.
Test your understanding!
A network administrator is designing a QoS policy for a large enterprise campus. They are debating whether to apply QoS marking (e.g., setting DSCP values) at the access layer or the core layer. Based on the principles of hierarchical design, what would you recommend and why?
Show answer
The best practice is to mark traffic as close to its source as possible, which means at the access layer.
Reasoning:
- Early Enforcement: Marking traffic at the ingress point (the access switch) ensures that the QoS policy is applied throughout the traffic's entire journey across the network.
- Scalability: The core layer's primary function is high-speed switching. Burdening it with classification and marking tasks for every single flow would add significant processing overhead and could impact its performance. The core should simply trust and act upon the markings that have already been applied at the access or distribution layers.
- Granularity: The access layer has the most visibility into individual end-devices and applications, allowing for more granular and accurate policy application.
2. The Distribution Layer: The Policy Workhorse
The distribution layer serves as the crucial middle ground between the access layer and the core. Its primary role is to aggregate traffic from the access layer switches and enforce network policies. This is where most of the "thinking" happens.
Primary Functions & Services:
- Aggregation: Acts as an aggregation point for all access layer switches in a building or area.
- Layer 2 / Layer 3 Boundary: This is typically where the Layer 2 broadcast domains from the access layer are terminated and routed. Switched Virtual Interfaces (SVIs) are configured here to enable inter-VLAN routing.
- Policy Enforcement: Implements access control lists (ACLs) to filter traffic and enforce security policies.
- Redundancy and Load Balancing: Provides redundant connections to both the access and core layers. It runs First-Hop Redundancy Protocols (FHRPs) like HSRP or VRRP to provide a resilient default gateway for end devices.
- Route Summarization: Summarizes routing information from the access layer before advertising it to the core, which helps reduce the size of routing tables in the core.
This layer truly is the workhorse of the campus network, as it combines high-speed forwarding with intelligent policy control.
3. The Core Layer: The High-Speed Backbone
The core layer is the backbone of the network. Its sole purpose is to provide fast, reliable, and low-latency transport between distribution layer blocks.
Primary Functions & Services:
- High-Speed Transport: Switches packets between distribution blocks as quickly as possible. This is purely a Layer 3 function.
- Scalability & Availability: Provides a highly available and scalable backbone. As more distribution blocks are added (e.g., for new buildings), they simply connect to the core.
The guiding principle for the core layer is simplicity. It should not perform any complex packet manipulation like applying ACLs, QoS policing, or inter-VLAN routing. Its job is to switch, and switch fast.
For a deeper, authoritative explanation of each layer's role, please read the following sections from the Cisco Campus LAN Design Guide.
Campus LAN and Wireless LAN Solution Design Guide - Cisco
This official Cisco design guide provides a detailed breakdown of the functions and design considerations for the access, distribution, and core layers.
Please read the sections titled 'Hierarchical design model', 'Access layer', 'Distribution layer', and 'Core layer'. Focus on the distinct functions Cisco outlines for each layer and the rationale behind them.
Use Cases: When to Use a Two-Tier vs. Three-Tier Design
The three-tier model is the gold standard for large, multi-building enterprise campuses. However, not every network requires a dedicated core layer. This leads to the two most common use cases:
1. Three-Tier Design (Large Campus)
- Use Case: Large enterprise networks spanning multiple buildings. When you have three or more distribution blocks, a dedicated core layer significantly simplifies connectivity and improves scalability compared to a full mesh of distribution switches.
- Benefit: The core provides a predictable, high-performance path between all parts of the campus.
2. Two-Tier or "Collapsed Core" Design (Small/Medium Campus)
- Use Case: Smaller networks, such as a single building or a large branch office.
- Architecture: The core and distribution layer functions are combined, or "collapsed," into a single layer of switches. These switches handle both policy enforcement (distribution) and high-speed backbone switching (core).
- Benefit: This design reduces cost and complexity by requiring fewer devices, while still maintaining the key benefits of a hierarchical structure.
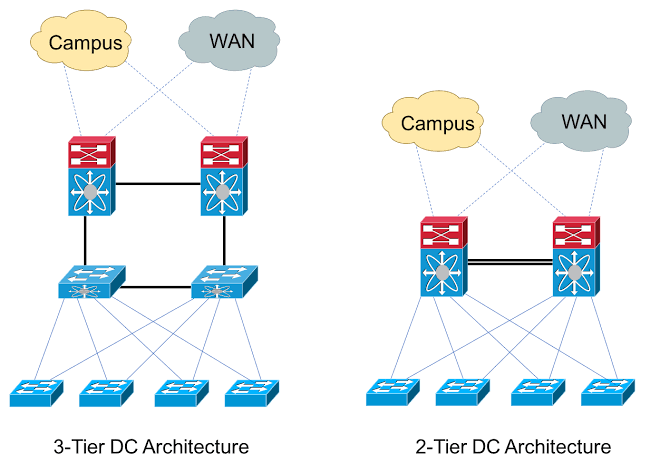
The choice between a two-tier and three-tier model is primarily driven by the scale of the network and future growth expectations.
For more information on the collapsed core model, refer to this Cisco document for small enterprise design.
[PDF] Small Enterprise Design Profile (SEDP)—Network Foundation Design
This PDF focuses on small enterprise designs and provides a clear explanation of the collapsed core model, its motivation (cost), and its implementation.
Read the sections 'Hierarchical Network Design' and 'Collapsed Core Network Design'. Pay attention to Figure 3, which illustrates the collapsed core topology.
A Key Design Choice: Layer 2 vs. Layer 3 Access
One of the most critical decisions in campus design is where to place the boundary between Layer 2 (switching) and Layer 3 (routing).
1. Layer 2 Access (Traditional Multi-layer Design)
- VLANs extend from the access layer to the distribution layer.
- The L2/L3 boundary is at the distribution switches, where SVIs act as default gateways.
- Pros: Allows VLANs to span multiple access closets, providing flexibility for applications that require Layer 2 adjacency.
- Cons: Relies heavily on Spanning Tree Protocol (STP) to prevent loops, which results in blocked (unused) uplinks and potentially slower convergence. Large broadcast domains can also be a concern.
2. Layer 3 Access (Routed Access Design)
- The L2/L3 boundary is moved down to the access layer switches.
- The links between access and distribution switches are routed (Layer 3) point-to-point links.
- Pros: Eliminates the need for STP on uplinks, allowing all links to be used (e.g., with Equal-Cost Multi-Path, ECMP). This leads to faster convergence and smaller, contained broadcast domains.
- Cons: Limits flexibility, as a single VLAN cannot span across multiple switches. This requires more careful IP address planning.
This decision involves significant trade-offs between flexibility and performance/simplicity. Modern network designs are increasingly favoring the routed access model due to its stability and scalability.
The video below gives a good summary of this important design debate.
ENCOR Section 1 - Examining Cisco Enterprise Network Architecture
This segment compares and contrasts the Layer 2 and Layer 3 access designs, highlighting the pros and cons of each, particularly concerning Spanning Tree.
Watch the clip from 00:34:25 to 00:38:26.
Test your understanding!
You are designing a network for a new building. The primary requirements are maximum link utilization between the access and distribution layers and the fastest possible convergence time in case of an uplink failure. Which access layer design model—Layer 2 or Layer 3—would you choose, and why?
Show answer
The best choice would be the Layer 3 (Routed Access) design.
Reasoning:
- Maximum Link Utilization: In a routed access design, the uplinks from the access switch to the distribution switches are Layer 3 links. This allows you to use routing protocols with Equal-Cost Multi-Path (ECMP) to load-balance traffic across all available uplinks. In a traditional Layer 2 access design, Spanning Tree Protocol (STP) would block redundant uplinks to prevent loops, leaving some links idle.
- Fastest Convergence: Routing protocols like EIGRP or OSPF can detect a link failure and reconverge much faster (often in sub-second timeframes) than STP can unblock a port. This directly addresses the requirement for the fastest possible convergence.
Conclusion
In this lesson, we have laid the groundwork for understanding modern enterprise network architecture.
Key Takeaways:
- A hierarchical network design provides a scalable, resilient, and manageable foundation by dividing the network into Access, Distribution, and Core layers.
- Each layer has a distinct function: the Access layer provides user and device connectivity, the Distribution layer implements policy and aggregation, and the Core layer ensures high-speed transport.
- The design can be adapted based on scale. A three-tier model is ideal for large campuses, while a two-tier (collapsed core) model is a cost-effective solution for smaller sites.
- A fundamental design choice is whether to use a Layer 2 access model (which relies on STP) or a Layer 3 access model (which uses routing to the edge for faster convergence and full link utilization).
Preview of the Next Lesson:
The hierarchical model is a powerful and enduring concept. In our next lesson, we will see how modern fabric architectures, such as Cisco's SD-Access, build upon these principles. We'll compare the traditional three-tier design to these newer approaches that use an underlay/overlay model to provide even greater automation, segmentation, and flexibility.