Hello! Welcome to your next lesson on OSPF.
In our last session, we focused on securing OSPF by configuring authentication. We saw that if neighbors don't agree on the authentication key and method, they won't form an adjacency. This is just one of many potential reasons why an OSPF adjacency might fail to establish. A stable network relies on stable adjacencies, making troubleshooting them a critical skill for any network professional.
This lesson directly addresses the learning outcome: Troubleshoot OSPF adjacency formation issues using show and debug commands. We will build a systematic process for diagnosing why OSPF neighbors are not reaching the FULL state, leveraging your existing knowledge and powerful IOS diagnostic tools.
1. The Foundation: A Systematic Troubleshooting Approach
As a solutions engineer, you know that effective troubleshooting isn't about guesswork; it's about following a logical process. When dealing with OSPF adjacency failures, our process starts with one key command: show ip ospf neighbor. The output—or lack thereof—tells us where in the OSPF state machine the process has failed and guides our next steps.
This flowchart provides an excellent mental model for this process.
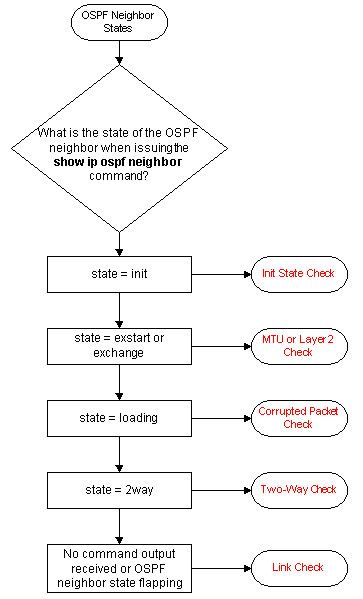
The core troubleshooting methodology involves these steps, which we will apply throughout this lesson:
- Define and Verify the Problem: Confirm which routers are failing to become neighbors and that you can replicate the issue.
- Gather Information: Use
showcommands to inspect the configuration and state of the interfaces and OSPF process. - Form a Hypothesis: Based on the information, determine the most likely cause (e.g., mismatched timers, MTU issue).
- Test and Implement a Solution: Apply a configuration change to fix the suspected issue.
- Verify the Fix: Check if the adjacency is now
FULLand routes are being exchanged.
2. The Tools of the Trade: show and debug
We have two primary types of tools at our disposal:
showcommands: These provide a snapshot of the current state of the router. They are safe to use on any production network. Key commands includeshow ip ospf neighbor,show ip ospf interface, andshow run.debugcommands: These provide real-time reporting of network events as they happen. They are incredibly powerful for diagnosis but can place a high load on a router's CPU. They must be used with extreme caution on production networks.
Before we use any debug commands, it's essential to understand the correct way to use them professionally.
CCNP ENCOR // Debug // ENCOR 350-401 Complete Course
This video from Jeremy's IT Lab provides a crucial overview of the debug command. It explains not only what it does but also the important precautions you must take before using it on a live network.
Please watch the video from 01:52 to 09:05. Focus on these key points: The potential CPU impact of debug commands. Using show processes cpu to check the CPU load before enabling a debug. The importance of terminal monitor when connected via SSH/Telnet. How to disable debugs with undebug all. How to use conditional debugging to filter output and reduce CPU load.
The key takeaways from the video are:
- Always check CPU load first:
show processes cpu sorted. - Use conditional debugs when possible:
debug condition interface <interface-name>filters the output to only what's relevant, making it easier to read and safer for the router. - Always remember to turn them off:
undebug all.
3. A Practical Troubleshooting Walkthrough
Now, let's see this methodology in action. The following video presents a troubleshooting lab where OSPF routes are not being learned. The presenter methodically works through several common adjacency issues.
OSPF Troubleshooting (with Downloadable Lab Guide)
This video from Kevin Wallace Training provides a complete, practical walkthrough of troubleshooting a multi-router OSPF network. You'll see how a network engineer isolates and resolves multiple, distinct issues that are preventing adjacencies from forming.
Please watch the entire video (from 00:24 to 15:59). Pay close attention to the systematic approach: first confirming the problem, then investigating each router and link, and resolving issues one by one. Notice which show commands are used to identify each problem.
Let's break down the issues discovered in the video, as they represent some of the most common OSPF adjacency problems.
-
Problem 1: Incorrect Passive Interface (on R3)
- Symptom: R3 was not forming an adjacency with R2.
- Diagnosis: The
show run | sec router ospfoutput on R3 showedpassive-interface GigabitEthernet0/1. A passive interface doesn't send or process OSPF Hello packets, so no adjacency can form on it. - Fix: The incorrect passive-interface command was removed and applied to the correct interface (the one not connected to an OSPF neighbor).
-
Problem 2: OSPF Area ID Mismatch (R2 and R3)
- Symptom: Even after fixing the passive interface, the adjacency did not form. Syslog messages on R2 indicated a "Mismatched Area ID".
- Diagnosis:
show run | sec router ospfon R3 showed its interface was inarea 0, while the topology required it to be inarea 1to match R2. - Fix: The network statement on R3 was corrected to use
area 1.
-
Problem 3: OSPF Hello Timer Mismatch (R1 and R2)
- Symptom: R1 and R2 were not forming an adjacency.
- Diagnosis: The
show ip ospf interface gigabitEthernet0/1command on R2 revealed a non-default Hello timer of 20 seconds. OSPF neighbors must have matching Hello and Dead timers to form an adjacency. - Fix: The
ip ospf hello-interval 20command was removed from R2's interface configuration, reverting it to the default of 10 seconds to match R1.
-
Problem 4: MTU Mismatch (R1 and R2)
- Symptom: After fixing the timers, the adjacency got stuck in the
EXSTARTstate. - Diagnosis: A neighbor stuck in
EXSTARTorEXCHANGEalmost always points to a Maximum Transmission Unit (MTU) mismatch. Theshow ip interface gigabitEthernet0/2command on R1 showed a non-default IP MTU of 1478 bytes, while R2 was at the default of 1500. - Fix: The MTU on R1's interface was reset to the default value. The adjacency immediately transitioned to
FULL.
- Symptom: After fixing the timers, the adjacency got stuck in the
4. Deep Dive: Correlating States to Problems
The video provided a great practical overview. Let's formalize this by mapping OSPF neighbor states to common problems and the tools used to diagnose them. The official Cisco guide "Troubleshoot OSPF Neighbor Problems" is an excellent reference for this.
Troubleshoot OSPF Neighbor Problems
To build a comprehensive troubleshooting framework, let's review this official Cisco support document. It breaks down adjacency failures by the specific state the neighbor is in, providing a detailed checklist for each scenario.
Please read the following sections: 'Neighbor States', 'No State Revealed', 'Neighbor in Init State', 'Neighbor in Exstart or Exchange State', and review the summary table in 'Typical Reasons for OSPF Neighbor Problems'. This will solidify the connection between a symptom (neighbor state) and its potential cause.
Here is a summary of the key troubleshooting paths based on the show ip ospf neighbor output:
show ip ospf neighbor Output |
Neighbor State | Common Causes | Key show / debug Commands |
|---|---|---|---|
| Empty output | DOWN |
- Interface down - OSPF not enabled - Passive interface - Area/Subnet mismatch - Hello/Dead timer mismatch - Authentication mismatch - ACL blocking 224.0.0.5 |
show ip interface briefshow ip ospf interfaceshow rundebug ip ospf hello |
| Neighbor seen | INIT |
- One-way communication - ACL or firewall blocking return Hello packets - Unidirectional link failure |
ping from both sidesdebug ip ospf packet |
| Neighbor seen | EXSTART/EXCHANGE |
- MTU mismatch - Duplicate Router ID - Issues with DBD packet exchange |
show interfaceshow ip interfaceping <neighbor> size <mtu> df-bitdebug ip ospf adj |
| Neighbor seen | LOADING |
- Corrupted LSA - Mismatched LSA types (rare) |
show log for %OSPF-4-BADLSA(Often requires TAC support) |
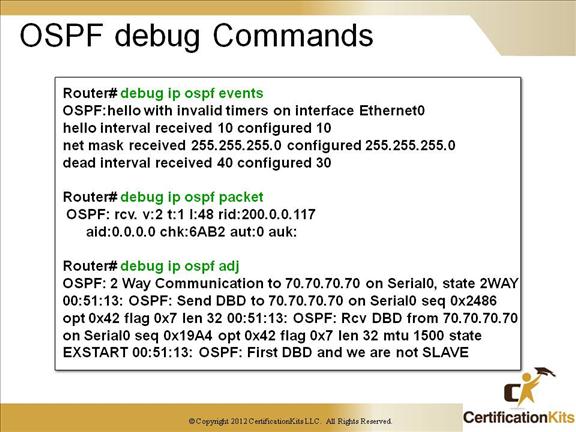
Let's look at what the debug output for an MTU mismatch looks like. The router will explicitly tell you what the problem is.
CCNP ENCOR // Debug // ENCOR 350-401 Complete Course
The Jeremy's IT Lab video we saw earlier also has a perfect demonstration of using debug ip ospf adj to pinpoint an MTU mismatch.
Please re-watch the short segment from 09:05 to 10:36. Notice how the debug output clearly states 'neighbor has a larger interface MTU', instantly identifying the root cause.
This highlights the power of debug ip ospf adj for issues that occur after the initial Hello exchange.
Test your understanding!
An OSPF adjacency between R1 and R2 is failing to come up. You run show ip ospf interface on both routers and see the following output for their connected interfaces:
R1 - Gi0/1:Timer intervals configured, Hello 10, Dead 40, Wait 40, Retransmit 5
R2 - Gi0/1:Timer intervals configured, Hello 20, Dead 80, Wait 80, Retransmit 5
Based on this output, what is the most likely state of the OSPF neighbor relationship when you run show ip ospf neighbor on R1?
A) FULL/BDR
B) EXSTART/DROTHER
C) INIT/DROTHER
D) The command will have no output.
Show answer
The correct answer is D) The command will have no output.
OSPF Hello and Dead timers are parameters checked within the Hello packet itself. If these timers do not match, the routers will discard each other's Hello packets as invalid. Because no valid Hellos are ever accepted, the neighbor relationship never even begins to form. The routers will not appear in each other's show ip ospf neighbor tables at all. The state would be considered DOWN, resulting in no output from the command.
Conclusion
Troubleshooting OSPF is a process of elimination guided by the OSPF neighbor state machine. By starting with show ip ospf neighbor, you can quickly narrow down the list of potential problems and select the right show and debug commands to find the root cause.
Key Takeaways:
- Follow a systematic approach: Start with
show ip ospf neighborto determine the failure point. - "No neighbor" is a big clue: If a neighbor doesn't appear at all, the problem is with basic connectivity or a mismatched parameter in the Hello packet (timers, area, subnet, authentication).
EXSTARTstate points to MTU: This is the most common cause for an adjacency getting stuck after the 2-Way state. Usedebug ip ospf adjto confirm.- Use
debugwith caution: Always check CPU load, use conditional debugging where possible, and always disable it when you are finished.
Preview of the Next Lesson:
Establishing a FULL adjacency is only the first half of the battle. Once neighbors are up, they must exchange Link-State Advertisements (LSAs) to build their routing tables. In our next lesson, we will address the learning outcome: Troubleshoot suboptimal OSPF routing paths and LSA propagation issues. We'll investigate scenarios where adjacencies are up, but routes are missing, incorrect, or taking an inefficient path through the network.