Introduction
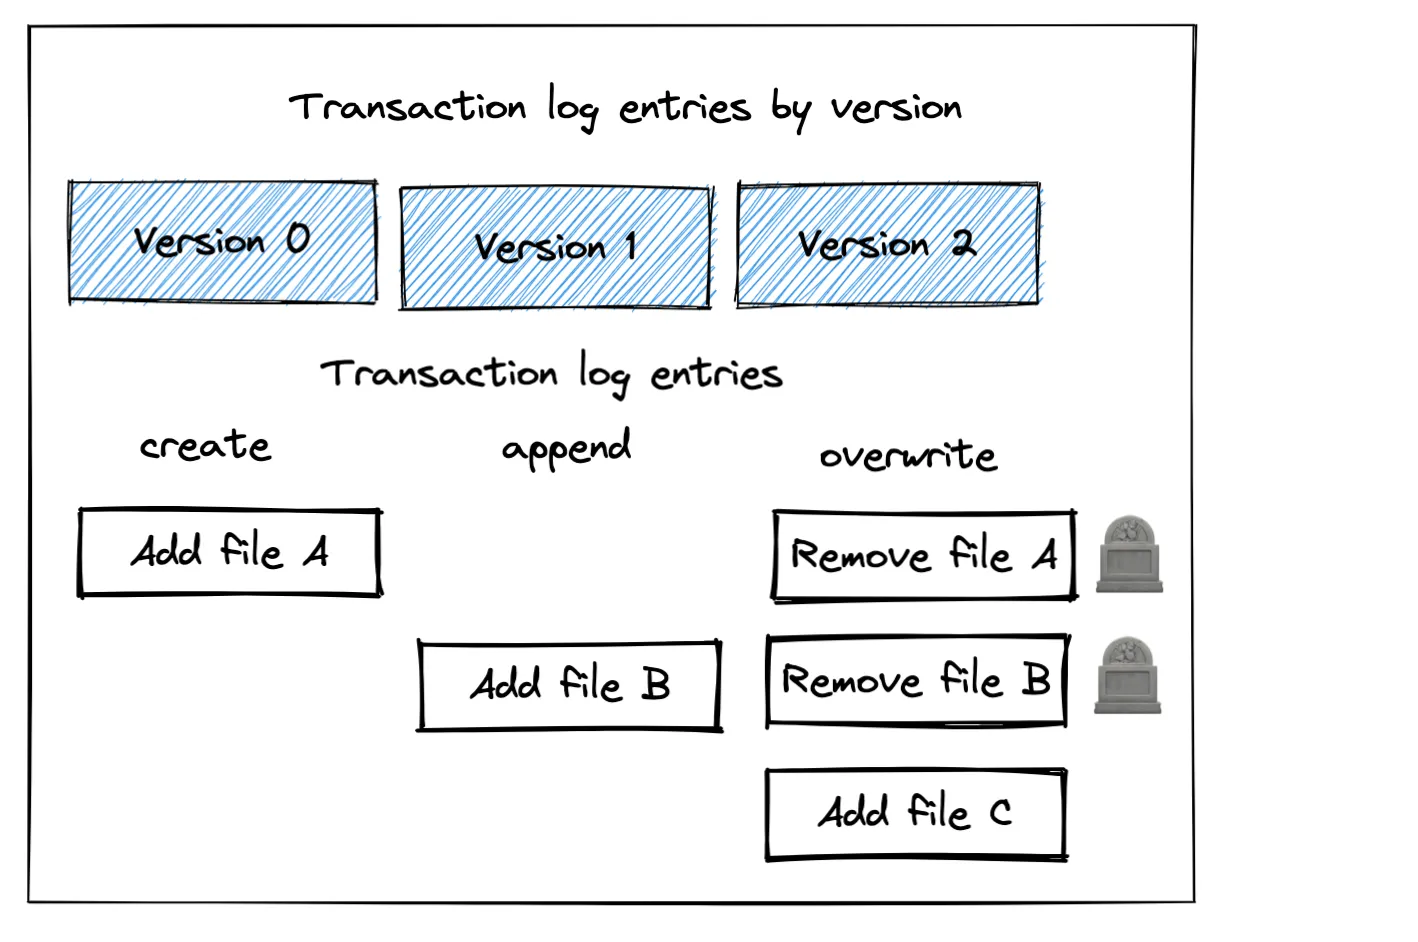
Hello! In our last lesson, you learned how to significantly boost read performance by compacting small files with OPTIMIZE and colocating data with Z-ORDER. You saw that operations like OPTIMIZE, UPDATE, and DELETE don't immediately erase old data. Instead, they create new versions of your data files and simply mark the old ones as no longer part of the current table version.
This mechanism is what powers Delta Lake's time travel feature, but it comes at a cost: over time, these unreferenced files accumulate, consuming cloud storage and increasing costs.
This is where today's lesson comes in. We will cover how to configure and run VACUUM to manage file storage and retention. The VACUUM command is your tool for permanent housekeeping—physically deleting old files that are no longer needed.
By the end of this 60-minute lesson, you'll be able to confidently use VACUUM to manage your Delta tables' physical storage, understand its implications, and apply best practices to do so safely.
Part 1: What is VACUUM and Why Do You Need It?
As you build data pipelines, you'll frequently perform operations that create new versions of data. While this is great for data versioning and recovery, it means your storage footprint will grow continuously if left unchecked. VACUUM is the command used to solve this problem.
Let's begin with a practical overview of the problem VACUUM solves.
A Data Practitioner's Guide - Managing Delta Table History
This article from the Databricks Community blog introduces the VACUUM command from a practical standpoint: managing the rising storage costs caused by lingering old data files.
Read the section 'Optimising Storage - VACUUM' and the subsection 'What VACUUM Does'. Focus on its two main functions: removing files not referenced by the current table state and the concept of the retention threshold.
As the article highlights, VACUUM physically deletes files that are:
- No longer referenced by a Delta table.
- Older than a specified retention threshold.
The critical takeaway is the trade-off: running VACUUM reduces storage costs and helps with compliance (e.g., GDPR data deletion requests), but it permanently removes your ability to time travel to versions whose files have been cleaned up.
Part 2: The VACUUM Command in Practice
The basic syntax for the command is straightforward:
VACUUM table_name
However, running it like this has important implications. Let's watch a video that breaks down the command's behavior and introduces its most important options.
65. Databricks | Pyspark | Delta Lake: Vacuum Command
This video provides an excellent overview of the VACUUM command, the default retention period, and the essential DRY RUN feature.
Watch the following segments: 00:00 - 02:33: Understand why VACUUM is necessary and how operations like OPTIMIZE, DELETE, and UPDATE lead to obsolete files. 08:20 - 11:34: See how to use DESCRIBE HISTORY to inspect changes and, most importantly, how DRY RUN allows you to preview which files will be deleted without actually removing them.
From the video, you learned two key things:
- Default Retention (7 Days): By default,
VACUUMwill not delete any unreferenced files unless they are older than 7 days (168 hours). This is a crucial safety net to prevent accidental deletion of data required by long-running jobs or recent time-travel queries. DRY RUN: AddingDRY RUNto yourVACUUMcommand is a vital best practice. It returns a list of files that would be deleted, allowing you to verify the operation before making any permanent changes.
-- This will show you a list of files to be deleted, but won't delete them.
VACUUM my_table DRY RUN
Part 3: Hands-On Lab: Cleaning a Delta Table
Now, let's put this into practice. Open a new Databricks notebook and follow along with these steps.
Step 1: Create a Table and Generate Old Files
First, let's create a table and perform some operations that will leave behind unreferenced files. This setup is similar to the exercises in our previous lessons.
# Create a sample DataFrame
data = [("100", "A"), ("200", "B"), ("300", "C")]
columns = ["id", "value"]
df = spark.createDataFrame(data, columns)


# Write the initial version of our Delta table
table_name = "vacuum_demo_table"
df.write.format("delta").mode("overwrite").saveAsTable(table_name)


# Perform an UPDATE, which creates a new version and tombstones the old file
spark.sql(f"UPDATE {table_name} SET value = 'Z' WHERE id = '300'")


# Perform an OPTIMIZE, which combines files and tombstones the original file(s)
spark.sql(f"OPTIMIZE {table_name}")
Step 2: Investigate the File System
Let's inspect the underlying directory for our table. You will see more Parquet files than are in the current version of the table.
# Get the table's location
table_location = spark.sql(f"DESCRIBE DETAIL {table_name}").select("location").collect()[0].location


# List the files in the directory
dbutils.fs.ls(table_location)
You should see several .parquet files, along with the _delta_log directory. The UPDATE and OPTIMIZE commands created new files but left the old ones in place.
Step 3: Hitting the Safety Check
Now, let's try to VACUUM the table. Because the files are brand new, the default 7-day retention period will prevent their deletion. If we try to force it with a zero-hour retention, Databricks will stop us.
-- This command will fail intentionally!
VACUUM vacuum_demo_table RETAIN 0 HOURS
You will see an exception with a message like: Are you sure you would like to vacuum files with such a low retention period? This safety check is there to prevent catastrophic data loss.
For development and testing, you can disable this check. The video below shows exactly how to do this.
65. Databricks | Pyspark | Delta Lake: Vacuum Command
When you try to run VACUUM with a short retention period, you'll hit the safety check. This clip demonstrates the error and shows how to disable the check for testing.
Watch from 11:34 to 14:07. Pay attention to the error from RETAIN 0 HOURS and the Spark configuration used to bypass it. Remember: Disabling this check in production is risky and should be done with extreme caution.
Step 4: Perform the VACUUM
Let's disable the check, run a DRY RUN to be safe, and then perform the actual cleanup.
# Disable the retention check for this session
spark.conf.set("spark.databricks.delta.retentionDurationCheck.enabled", "false")
-- First, a dry run to see what will be deleted
VACUUM vacuum_demo_table RETAIN 0 HOURS DRY RUN
This will list the obsolete parquet files. Now that you've confirmed the list, run the command for real.
-- Now, perform the actual cleanup
VACUUM vacuum_demo_table RETAIN 0 HOURS
Step 5: Verify the Cleanup and Consequences
First, list the files in the directory again. You'll see that the obsolete files are now gone.
# List files again to see the cleanup
dbutils.fs.ls(table_location)
More importantly, let's prove that the history has been permanently erased. Run DESCRIBE HISTORY to find the version number of the initial WRITE operation (Version 0). Then, try to query it.
-- See the table history
DESCRIBE HISTORY vacuum_demo_table
-- This command will now fail!
SELECT * FROM vacuum_demo_table VERSION AS OF 0
You will get an error indicating that the file for that version could not be found. This demonstrates the irreversible nature of VACUUM.
Part 4: Configuration and Best Practices
For professional-grade data engineering, you need to manage VACUUM systematically.
Configuring Data Retention
Instead of specifying RETAIN ... HOURS with every command, it's better to set the retention policy on the table itself. This ensures a consistent policy is applied.
The default retention for deleted files is controlled by the table property delta.deletedFileRetentionDuration. The default value is '7 days'. You can change this to suit your organization's data recovery and cost requirements.
-- Set a 30-day retention policy on the table
ALTER TABLE vacuum_demo_table SET TBLPROPERTIES (
  'delta.deletedFileRetentionDuration' = '30 days'
);

-- Now, running VACUUM will respect this 30-day policy
VACUUM vacuum_demo_table;
This approach is more robust for production pipelines. You can read more about it in the "Adjusting the Retention Period" section of the Databricks Community article A Data Practitioner's Guide - Managing Delta Table History... which you reviewed earlier.
Scheduling VACUUM
VACUUM is a maintenance operation. You should run it periodically on your tables to control storage costs. For most use cases, scheduling a Databricks Job to run VACUUM on your key tables on a nightly or weekly basis is a standard practice.
FULL vs. LITE Mode (Advanced Topic)
For very large tables where running a standard VACUUM is slow, Databricks offers a LITE mode.
FULL(Default): Lists all files in the table directory to identify files for deletion.LITE: Uses only the Delta transaction log to identify files for deletion. This is much faster as it avoids a full directory listing, but it requires that aFULLvacuum has been run successfully within the transaction log retention period (default 30 days).
This is an advanced feature you may encounter in performance-critical scenarios. You can read more about it in the official Databricks documentation, Remove unused data files with vacuum.
Conclusion
In this lesson, you've mastered a critical command for managing the lifecycle of your Delta tables. Proper use of VACUUM is essential for controlling costs and ensuring compliance in any production data lakehouse.
Key Takeaways:
VACUUMphysically and permanently deletes data files that are no longer referenced by a Delta table and are older than the retention period.- The default retention period is 7 days, which acts as a safety net against accidental data deletion.
- Always use
VACUUM ... DRY RUNto preview changes before making them permanent. - For production systems, set a durable retention policy using
TBLPROPERTIES ('delta.deletedFileRetentionDuration' = '...')and scheduleVACUUMto run as a periodic maintenance job. - Running
VACUUMremoves the ability to time travel to the cleaned-up versions.
Preview of the Next Lesson:
We have now covered optimizing table performance (OPTIMIZE) and managing physical storage (VACUUM). Next, we'll address another crucial aspect of table maintenance: managing changes to a table's structure. You will learn how to implement schema evolution using the mergeSchema and overwriteSchema options, allowing your tables to adapt to changing data sources without breaking your pipelines.