Introduction
Welcome back! In the last lesson, we designed workflows with complex dependencies, creating parallel tasks and conditional logic. You learned that every task needs compute resources to run, and we briefly touched on assigning a cluster to each task.
This lesson dives deep into that critical decision, addressing the learning outcome: Configure job clusters vs. all-purpose clusters for workflow tasks. Choosing the right compute strategy is one of the most important aspects of building production-ready, cost-effective data pipelines in Databricks.
We will cover:
- The fundamental differences between all-purpose and job clusters.
- How to configure each type within the Databricks Workflows UI.
- Strategies for sharing compute across tasks to optimize performance.
- A practical technique for accelerating development and debugging using the "Swap" feature.
By the end of this lesson, you'll be able to make informed decisions about compute configuration to balance cost, performance, and development efficiency in your data engineering workflows.
1. All-Purpose vs. Job Clusters: The Core Trade-Off
In Databricks, not all clusters are created equal. The two primary types you'll use for workflows have distinct purposes, lifecycles, and cost structures.
- All-Purpose Clusters: These are designed for interactive analysis and development. You create them manually via the Compute tab, and they remain running until you manually terminate them or an inactivity timeout is reached. Multiple users and jobs can attach to them, making them versatile for collaborative and exploratory work.
- Job Clusters: These are designed specifically for running automated jobs. A job cluster's configuration is defined within the job task itself. The cluster is created on-demand when the job run starts and is automatically terminated as soon as the job run completes.
The following image provides a concise summary of the key differences.
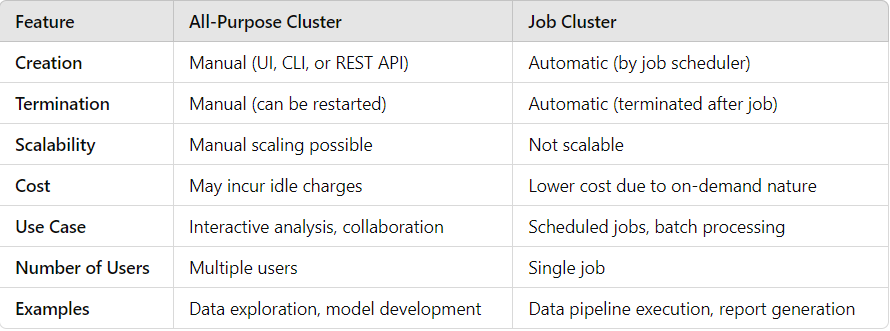
As you can see from the table, the primary distinction comes down to lifecycle and cost. Job clusters are ephemeral and have a lower price per DBU (Databricks Unit of computation), making them the standard choice for production workloads. All-purpose clusters offer the convenience of being "always on" (within their timeout period) but at a higher cost.
Basics of Databricks Workflows - Part 1: Creating your pipeline
For a clear, text-based explanation of this distinction, let's look at a post from the Databricks Community.
In this article, navigate to 'Step #2 - Create your first task'. Find the bullet points under the 'Cluster' field description. This section provides a direct and practical comparison of Job clusters and Interactive (All-Purpose) clusters, reinforcing why job clusters are recommended for production.
2. Configuring Compute for a Workflow Task
Let's translate this theory into practice within the Databricks Workflows UI. When you create or edit a task, you are required to specify its compute.
Option A: Using an Existing All-Purpose Cluster
This is the simplest option. You select an existing all-purpose cluster from a dropdown list.
- When to use it: Primarily for development, testing, or debugging. Because the cluster is already running, your task can start executing almost immediately, which is ideal for rapid iteration.
- Production caution: Using an all-purpose cluster for scheduled production jobs is generally discouraged because it's more expensive and you lose the benefit of isolated, ephemeral compute for each job run.
Option B: Defining a New Job Cluster
This is the recommended approach for production. In the task's compute settings, you define a cluster configuration from scratch. The UI for this is nearly identical to creating an all-purpose cluster.
20 Databricks Computes - All Purpose & Job | Access Modes | Cluster Policies | Cluster Permissions
This video provides an exhaustive walkthrough of all the settings available when creating a cluster. While it demonstrates creating an all-purpose cluster, the settings are the same for defining a job cluster.
Watch the segment from 01:05 to 11:35. You don't need to memorize every option, but focus on understanding the key configuration areas that you, as a data engineer, will frequently manage: Policy: Controls which settings are available or enforced. Databricks Runtime (DBR): The core software on the cluster. Always prefer LTS (Long-Term Support) versions for production. Photon Acceleration: Databricks' native execution engine, which can significantly speed up Spark SQL and DataFrame operations. Worker/Driver Types & Autoscaling: The core of performance tuning. You define the VM sizes and allow the cluster to scale between a minimum and maximum number of workers based on load. Termination: The inactivity timeout, which is crucial for cost control on all-purpose clusters but less relevant for job clusters which terminate automatically.
After understanding those settings, watch this short clip from the same video that explicitly defines the purpose of a job cluster.
20 Databricks Computes - All Purpose & Job | Access Modes | Cluster Policies | Cluster Permissions
Now, here's the specific explanation of Job Compute.
Watch from 15:13 to 16:32. The key takeaway is that job computes are created on the fly for a job run and are automatically shut down, ensuring you only pay for what you use.
3. Strategy: Sharing Compute Across Tasks
In a multi-task workflow, you don't have to create a new cluster for every single task. You can configure multiple tasks within the same job run to share a single job cluster.
This presents a strategic trade-off:
- Benefit: It significantly reduces latency. The first task using the shared cluster will incur the start-up time (typically 5-7 minutes). Subsequent tasks can start immediately without this overhead.
- Drawback: Tasks running in parallel on the shared cluster will compete for CPU, memory, and I/O resources. Additionally, you cannot specify cluster-level libraries in a shared job cluster configuration; they must be added at the task level.
The Databricks documentation explains this concept and its implications clearly.
Read the section titled 'Share compute across tasks'. Pay attention to the table that contrasts the lifecycle of a single-task cluster versus a shared cluster.
4. A Practical Tip for Development: The "Swap" Feature
The biggest frustration during development is waiting for a job cluster to spin up only to have your code fail in seconds due to a typo. To accelerate this iterative cycle, you can use the Swap feature.
This allows you to temporarily point your job task to a running all-purpose cluster for a quick test run, bypassing the cluster creation time. Once you've validated your logic, you can swap it back to the cost-effective job cluster definition for production.
How to Create Databricks Workflows (new features explained)
This video from Bryan Cafferky offers an excellent explanation and demonstration of this invaluable feature.
Watch from 17:59 to 18:45. The presenter explains exactly why this is so useful during testing and how it avoids the tedious wait time for cluster creation.
Hands-On Scenario: Observing Compute Behavior
Let's put this into practice to see the impact of these choices.
-
Create a New Job:
- Navigate to Workflows and create a new job named
Compute Optimization Test. - Create a simple notebook named
dummy_task_notebookwith one cell:print("Task executed successfully.")
- Navigate to Workflows and create a new job named
-
Configure Two Tasks with Separate Job Clusters:
- Task 1: Create a task named
task_with_new_cluster. For Type, selectNotebookand point it to yourdummy_task_notebook. - For Cluster, select Add new job cluster. You can keep the default settings.
- Task 2: Create a second task named
another_new_cluster. Make it depend on the first task. - For its Cluster setting, again select Add new job cluster.
- Task 1: Create a task named
-
Run and Observe:
- Run the job now. Go to the Runs tab and click on the active run.
- You will see the first task pending while its cluster is provisioned. Once it completes, the second task will start, and it will also go into a pending state to provision its own cluster. Note the total run time.
-
Configure for Shared Compute:
- Go back to the Tasks tab of your job.
- Select the second task,
another_new_cluster. - In the Cluster dropdown, instead of
New job cluster..., select the cluster definition from the first task (it will be named something likeJob cluster from task_with_new_cluster). - Rename the second task to
task_on_shared_cluster.
-
Run and Compare:
- Run the job again. This time, observe that only the first task has a significant cluster provisioning delay. The second task should start almost immediately after the first one finishes.
- Compare the total run time of this run to the previous one. The difference demonstrates the time saved by sharing a job cluster.
This exercise provides a concrete demonstration of the performance implications of your compute choices.
Conclusion
You now have a solid understanding of how to configure compute resources for your Databricks Workflows. Mastering this skill is essential for building efficient, scalable, and cost-effective data pipelines.
Key Takeaways:
- Job Clusters are for Production: They are cheaper, ephemeral, and provide isolated environments for each job run.
- All-Purpose Clusters are for Development: They are more expensive but provide an "always-on" interactive environment that is ideal for exploration and rapid debugging.
- Sharing a Job Cluster across tasks in a single run is a key optimization technique to reduce cluster start-up latency.
- The Swap feature is your best friend during development, allowing you to temporarily use a warm all-purpose cluster to test changes quickly.
Preview of the Next Lesson:
Now that we know how to configure the compute that our tasks run on, the next step is to control what happens when things go wrong. In the next lesson, "Implement error handling and retry policies for job tasks," we will explore how to make your workflows more resilient by automatically retrying failed tasks and defining what to do when a task cannot be completed successfully.